Welcome to the Linkurious Enterprise administrator documentation. This documentation will help you install, run and customize Linkurious Enterprise.
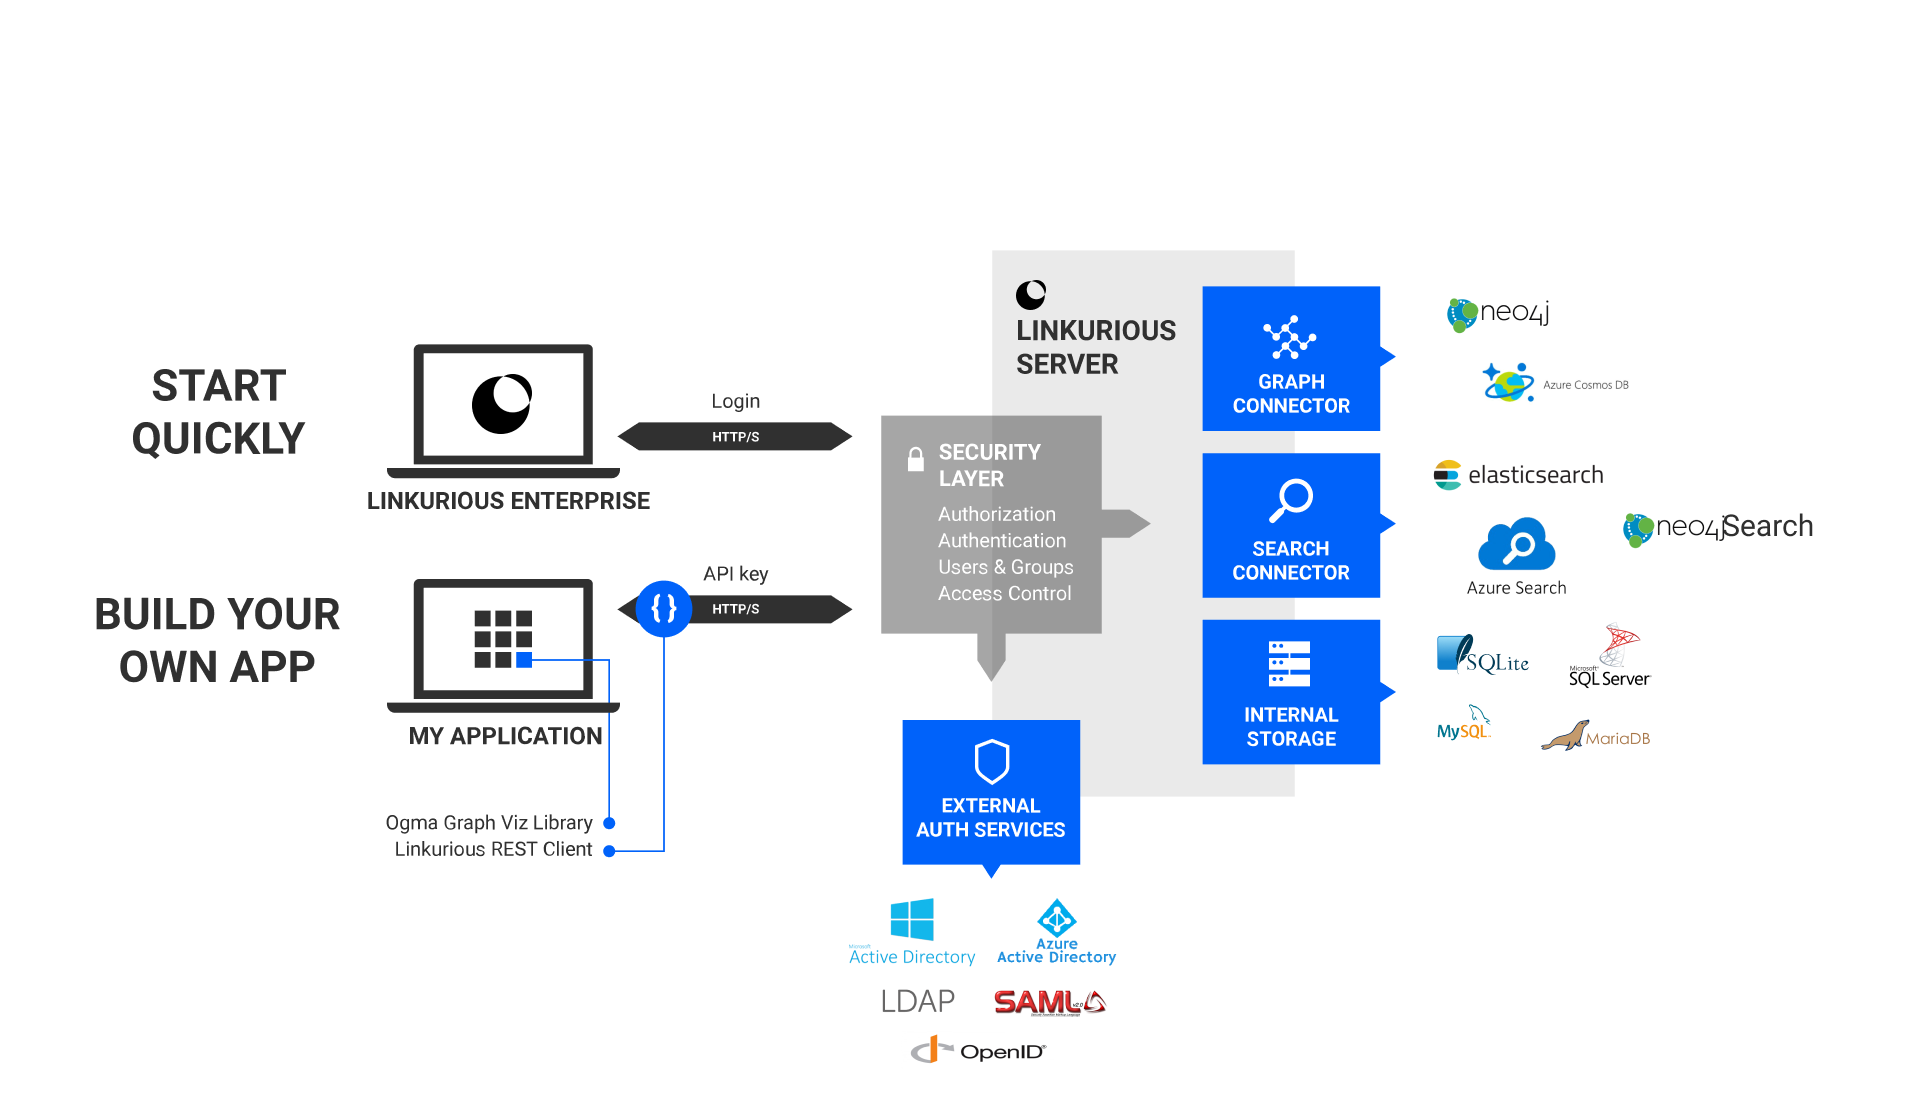
Linkurious Enterprise is a three-tier application.
The presentation layer is a Web application. It uses our graph visualization library, Ogma, to allow rich interactions with the graph. It also provides a user interface to enable data administration and collaboration among end users.
The presentation layer communicates with the logic layer via a JSON-based REST API. Custom presentation layer application can be developed on top of the logic layer.
The logic layer is a NodeJS-based server. It provides a unified REST API to read, write and search into graph databases from multiple vendors (Neo4j and Cosmos DB). It implements also a security layer with modular authentication that enables role-based access control policies. It can be connected to multiple graph databases at the same time and offers high-level APIs for collaborative exploration of graphs: users can create, share and publish graph visualizations, and multiple users can edit graph data.
Administrators can control it from its REST API for easy automation and deployment.
Multiple external authentication providers are supported (LDAP, Microsoft Active Directory, Microsoft Azure Active Directory, Google Suite, OpenID Connect, SAML2 / ADFS).
The data layer supports several graph databases, as well as indexation engines.
Consult with your vendor to make sure that your graph database is installed on appropriate hardware and configured for better performances:
Make sure that your graph database is secure:
Keep in mind that Linkurious Enterprise can be used without Elasticsearch, see search options.
If you are using Linkurious Enterprise with Elasticsearch
By default, SQLite is used for the user-data store. SQLite is not recommended for production environment: switch to MySQL/MariaDB/MSSQL instead.
Schedule regular backups of the user-data store:
Make sure your user-data-store database is secure
If you need high-availability, set up replication
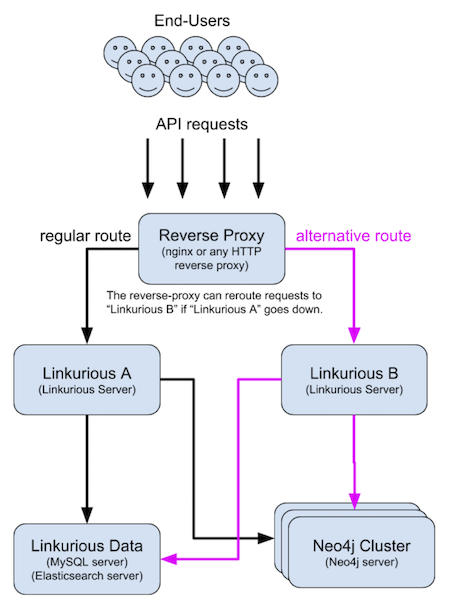
linkurious/data directoryforceHttps: true in Web Server configuration)Linkurious Enterprise can be set up with a backup instance to allow for continuity of service when the main server crashes.
For this setup:
A reverse proxy is then configured to send requests to the backup server when the main server is down. If you are using nginx, this sample configuration can be used:
http {
    # define the "backend" upstream
    upstream backend {
        # main server
        server linkurious-main.example.com;

        # backup server
        server linkurious-backup.example.com backup;
    }

    # redirect all queries to the "backend" upsteam
    server {
        location / {
            proxy_pass http://backend;
        }
    }
}
See nginx documentation for more details.
The user-data store database (containing visualizations, saved queries, user, groups, etc) is stored in a SQL database.
By default, this database is an SQLite database (located at linkurious/data/database.sqlite).
In production, the use of a MySQL/MariaDB/MSSQL database is recommended.
These databases can be located on a remote server.
The default user-data store (SQLite) is not encrypted.
Encryption is available with the following vendors:
Yes, when using an external user-data store (e.g. MariaDB, MySQL or MSSQL), the SQLite files can be deleted.
The configuration file contains all configurable options, as well as the configuration options of all configured data sources (e.g. User-Data Store host/port/username/encrypted password; Graph Database URL/username/encrypted password; Index Search URL/username/encrypted password, etc). All passwords/secrets in the configuration file are encrypted before storage.
The configuration file, like the rest of the data folder, should be considered private and not be readable by anyone other than the Linkurious Enterprise service account.
All application secrets stored by Linkurious Enterprise (Graph Database credentials, User-Data Store credentials, Index Search credentials, SSL certificate passphrase, etc.) are encrypted using the AES-256-CTR algorithm.
User passwords are strongly hashed before being stored in the database. Passwords for LDAP and other external authentication solutions are not stored at all.
The audit trail files are generated in linkurious/data/audit-trail by default.
This path can be set in the audit trail configuration.
The audit trail contains sensitive information and should be secured. It should be owned and readable only by the Linkurious Enterprise service account.
The data directory contains logs, configuration files, and, if enabled, audit trails. This information is sensitive, and the directory should be owned and readable only by the Linkurious Enterprise service account
A service account is an operating system user account with restricted privileges that is used only to run a specific service and own it data related to this service. Service accounts are not intended to be used by people, except for performing administrative operations. Access to service accounts is usually tightly controlled using privileged access management solutions.
Service accounts prevent other users and services from reading or writing to sensitive files in the directories that they own, and are themselves prevented from reading and writing to other parts of the file system where they are not owners.
We do not support Kerberos as of now (but we support many other third-party authentication services).
Linkurious Enterprise creates three types of logs:
data/logs/analytics.log): Usage telemetry (GDPR safe, not sensitive information)data/logs/linkurious.log and linkurious.exceptions.log): Server debugging logs (may contain graph queries).data/audit-trail/audit-trail.log): See audit trail log format details.If your LDAP server supports secure LDAP, use the "ldaps://" protocol in your LDAP configuration.
If you need authentication and transport layer security for Elasticsearch:
To customize supported TLS ciphers, in the general configuration, set tlsCipherList in the server section.
Here is an example, based on Mozilla's recommended cipher list:
{
  "tlsCipherList": "TLS_AES_128_GCM_SHA256:TLS_AES_256_GCM_SHA384:TLS_CHACHA20_POLY1305_SHA256:ECDHE-ECDSA-AES128-GCM-SHA256:ECDHE-RSA-AES128-GCM-SHA256:ECDHE-ECDSA-AES256-GCM-SHA384:ECDHE-RSA-AES256-GCM-SHA384:ECDHE-ECDSA-CHACHA20-POLY1305:ECDHE-RSA-CHACHA20-POLY1305:DHE-RSA-AES128-GCM-SHA256:DHE-RSA-AES256-GCM-SHA384:!eNULL:!aNULL"
}
We are trying to keep the Linkurious Enterprise update process as simple as possible. However, sometimes configuration can require specific manual activities.
Before you upgrade to a new version of Linkurious Enterprise, consider browsing our public resources to verify whether there are specific instructions that applies to your configuration or activities you are planning.
PEM (for Privacy-Enhanced Mail) is a file format for storing and sending cryptographic keys and certificates.
To verify if a certificate is PEM-encoded, open it with a text-editor, it should look something like this:
-----BEGIN CERTIFICATE-----
MIICLDCCAdKgAwIBAgIBADAKBggqhkjOPQQDAjB9MQswCQYDVQQGEwJCRTEPMA0G
A1UEChMGR251VExTMSUwIwYDVQQLExxHbnVUTFMgY2VydGlmaWNhdGUgYXV0aG9y
DwEB/wQFAwMHBgAwHQYDVR0OBBYEFPC0gf6YEr+1KLlkQAPLzB9mTigDMAoGCCqG
SM49BAMCA0gAMEUCIDGuwD1KPyG+hRf88MeyMQcqOFZD0TbVleF+UsAGQ4enAiEA
l4wOuDwKQa+upc8GftXE2C//4mKANBC6It01gUaTIpo=
-----END CERTIFICATE-----
If you have a DER-encoded certificate (binary), it can be converted to PEM:
openssl x509 -inform der -in certificate.cer -out certificate.pemCrypto Shell Extensions)details tabCopy to file...NextBase-64 encoded X.509 (.CER) and click NextNextFinishMost graph vendors support search strategies other than Elasticsearch. See details on our search options page.
Yes. See the geospatial configuration options for further details.
Yes, you can configure ArcGIS as the tile-server for geo-spatial mode. The ArcGIS documentation describes the API endpoints that is compatible with Linkurious Enterprise:
http://<MapServer-url>/tile/{z}/{y}/{x}For example:
./linkurious/start.sh: start the server./linkurious/stop.sh: stop the server./linkurious/menu.sh: open the management console./linkurious/menu.sh status: print the current status of the server./linkurious/menu.sh install: install as a system-wide service (requires root)./linkurious/menu.sh uninstall: remove from system-wide services (requires root)./linkurious/menu.sh help: show advanced optionsDepending on the configuration options specified, enabling the audit trail can have an impact on performance. See the audit trail documentation for details.
Release Date: 2023-03-16
Technical requirements for users that access Linkurious Enterprise with their Web browser:
Hardware requirements of the Linkurious Enterprise Web client vary with the size of the visualized graphs. For up to 500 nodes and edges in a single visualization, we recommend to use a machine with 4 GB RAM, and 2 CPU cores @ 1.6 Ghz.
End-users will access Linkurious Enterprise through a Web browser. The following browsers are officially supported:
| Feature \ Vendor | [Neo4j][1] | [Cosmos DB][2] |
|---|---|---|
| Full-text search | ✅ | ✅ |
| Graph styles customization | ✅ | ✅ |
| Graph filtering | ✅ | ✅ |
| Graph editing | ✅ | ✅ |
| Access rights management | ✅ | ✅ |
| Custom graph queries | ✅ | ✅ |
| Custom query templates | ✅ | ✅ |
| Alerts | ✅ | ❌ |
| Shortest path analysis | ✅ | ❌ |
Linkurious Enterprise is a Web-application server. It needs to be installed on a server and can then be accessed by multiple users using their Web browser.
Technical requirements for the machine used to install the Linkurious Enterprise Web-application server:
Linkurious Enterprise hardware requirements change according to your needs and setup. Here are some scenarios with their suggested minimum hardware configurations.
Project up to 20 users and few alerts.
Using the embedded Elasticsearch1:
Not using the embedded Elasticsearch:
Project up to 100 users and tenth of alerts.
Using the embedded Elasticsearch1:
Not using the embedded Elasticsearch:
Project with more than 100 users and several alerts.
To maintain stable performance, it is necessary to move heavily loaded components to well-dimensioned dedicated servers/clusters:
Hardware requirements only for the Linkurious Enterprise server:
Linkurious Enterprise requires a 64-bit system to run.
1The embedded Elasticsearch is not recommended when dealing with large amounts of data, see Elasticsearch documentation.
2Some extra space is required for the Elasticsearch full-text index. This space is proportional to the size of your graph database. A (very) rough estimate could be 50% of your graph database (it also depends on the actual data density).
3It is possible to configure Elasticsearch for higher memory usage, please contact us at support@linkurio.us.
4It is possible to configure Linkurious Enterprise for higher memory usage more, please contact us at support@linkurio.us.
Please keep in mind that these technical requirements are for Linkurious Enterprise server only. For hardware requirements regarding your graph database, please refer to these guides:
Linkurious Enterprise includes an embedded Elasticsearch instance for search capabilities. Please keep in mind that this embedded instance will only work for smaller graphs (less than 50M nodes + edges). For larger graphs, you will need to deploy an Elasticsearch cluster. Please refer to Elasticsearch's hardware requirements guide for details.
Linkurious Enterprise server can be deployed on the following platforms:
Linkurious Enterprise depends on Node.js that requires a Linux kernel >= 3.10 and a GLIBC >= 2.17.
You can check the Linux kernel and the GLIBC version available on your system on http://distrowatch.com.
SQLite requires C++ features provided by GCC >= 10. CentOS 7 and RHEL 7 ship with GCC 4.2 by default. In order to use a SQLite user-data-store on these operating systems, GCC 10 must be installed manually, using the following procedure:
Install gcc10-libstdc++ (see package information here).
Add the environnment variable LD_LIBRARY_PATH with the value $PATH:/opt/gcc-10.2.1/usr/lib64/
in the data/manager/manager.json configuration file:
{
  "name": "Linkurious",
  "description": "http://linkurio.us",
  "autoStartServices": true,
  "port": 5891,
  "secret": "graphs-are-awesome",
  "services": [
    {
      "name": "Linkurious Server",
      "home": "../../system",
      "maxRestarts": 0,
      "noRestartExitCodes": [
        2,
        3
      ],
      "restartDelay": 2000,
      "binPath": "node",
      "arguments": [
        "server/app.js",
        "-p"
      ],
      "env": {
        "NODE_OPTIONS": "--max-old-space-size=4096",
        "LD_LIBRARY_PATH": "$PATH:/opt/gcc-10.2.1/usr/lib64"
      }
    },
    // ...
  ]
}
Doing this is not necessary on CentOS 8+ / RHEL 8+, or if using another user-data-store than SQLite.
The latest version of Linkurious Enterprise can be downloaded from https://get.linkurio.us/.
Log in with the username and password created during the purchase process and then go to the download section for the specific license (in case of multiple one), it will be possible to download the package for the correct platform.
The ZIP file contains:
Please see the Linkurious Enterprise version compatibility matrix and our documentation on how to update Linkurious Enterprise.
To work properly, Linkurious Enterprise only need permissions (including write access) on the whole application directory, no administrative rights are needed.
The only exception may be related to Operating Systems' security policies preventing any standard user to bind applications on the first 1024 port numbers, see web server configuration to learn more on the issue and how prevent to grant administrative rights.
As best practice, it is advised to create a dedicated service account (e.g. linkurious)
with the minimum level of permissions.
> unzip linkurious-linux-v3.1.15.zip> cd linkurious-linuxlinkurious-linux/data/config/production.json (see how to configure a data-source)See how to start Linkurious Enterprise on Linux.
linkurious-windows folderlinkurious-windows/data/config/production.json (see how to configure a data-source)See how to start Linkurious Enterprise on Windows.
> unzip linkurious-osx-v3.1.15.zip> cd linkurious-osxlinkurious-osx/data/config/production.json (see how to configure a data-source)See how to start Linkurious Enterprise on Mac OS.
> docker load -i linkurious-docker-v3.1.15.tar.gzThe Linkurious Enterprise docker image exposes the ports 3000 and 3443 for http and https connections respectively.
These ports should be mapped on the host machine to allow user connections.
Please visit the docker documentation to learn how publish the ports of a container.
Even if not strictly necessary, the best practice is to define external named volumes to store application data outside the container.
The Linkurious Enterprise docker image doesn't declare any volume, however below folders should be maintained when upgrading Linkurious Enterprise and therefore should be mapped to external volumes:
/data stores Linkurious Enterprise configuration, logs and application data./elasticsearch stores the Embedded Elasticsearch data.Please visit the docker documentation to learn how the configure volumes.
Here is an example to create named volumes (an arbitrary name can be chosen):
docker volume create lke-data
docker volume create lke-elasticsearch
See how to start Linkurious Enterprise with docker.
In order to run Linkurious Enterprise automatically when the operating system starts, it is possible to install it as a system service on Linux, Mac OS and Windows.
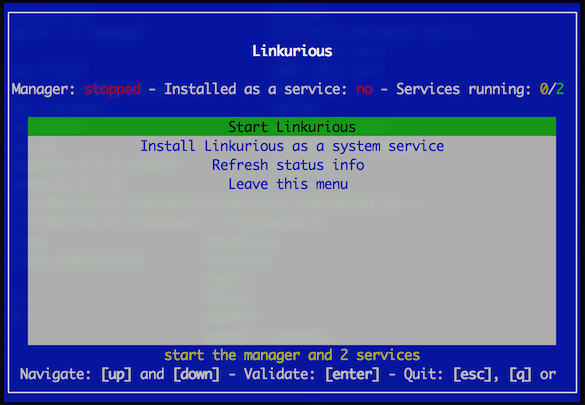
Open the administration menu by running menu.sh, menu.bat or menu.sh.command in the Linkurious Enterprise folder.
Click on Install Linkurious as a system service (administrative rights may be needed to successfully complete the task).
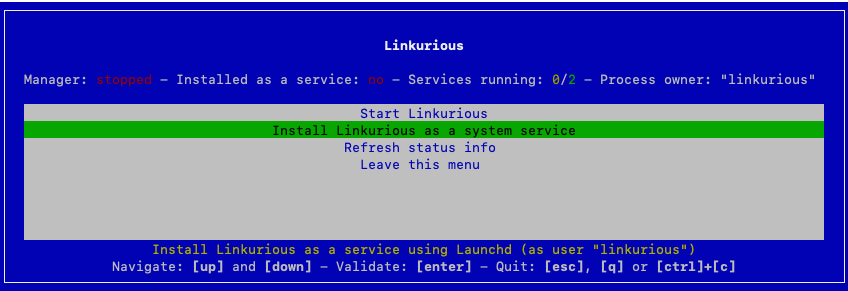
Linkurious Enterprise automatically detects the owner of the folder and will use that user as the
Process owner.It is possible to use a different user by running the
menuscript with the option--user=USER(whereUSERis the desiredProcess ownerwith adequate permissions).
When Linkurious Enterprise is installed as a service, the administration menu (by running menu.sh,
menu.bat or menu.sh.command in the Linkurious Enterprise folder) will show the current status
of the service as well as a new entry to Uninstall Linkurious from system services.
To start Linkurious Enterprise, run the start.sh script in the linkurious-linux directory.
Alternatively, run the menu.sh script and click Start Linkurious.
By default, Linkurious Enterprise server will listen for connection on port 3000.
However, some firewalls block network traffic ports other than 80 (HTTP).
See the Web server configuration documentation to learn how to make Linkurious Enterprise listen on port 80.
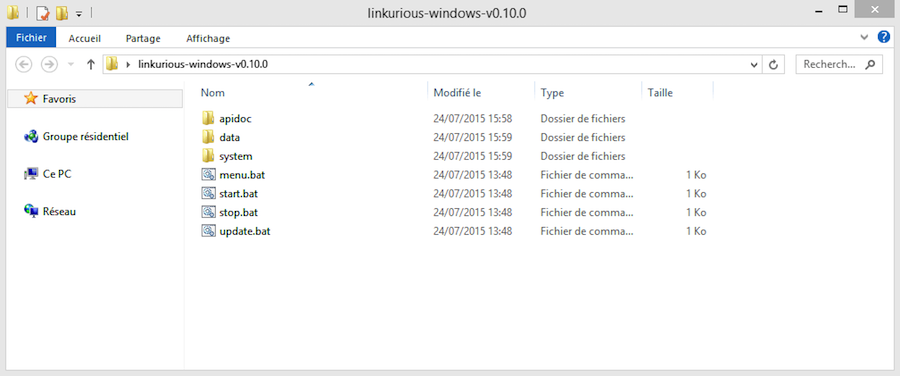
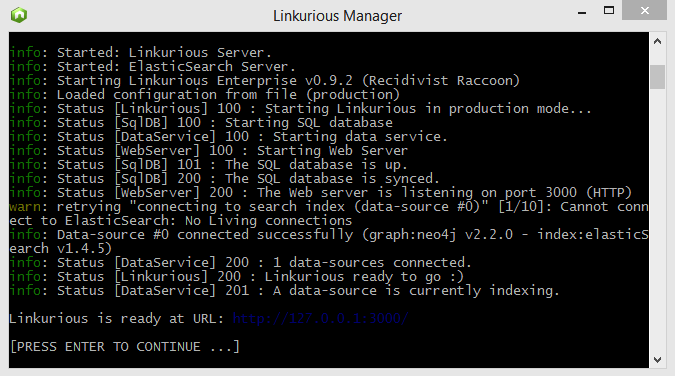
To start Linkurious Enterprise, run the start.bat script in the linkurious-windows directory.
Alternatively, run the menu.bat script and click Start Linkurious.
The firewall of Windows might ask you to authorize connections to Linkurious Enterprise. If so, click on Authorize access.
Content of the linkurious-windows directory:
Linkurious Enterprise starting up on Windows:
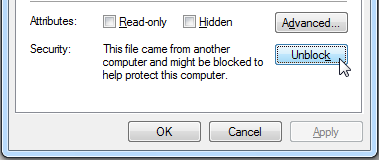
Mac OS prevents you from running applications downloaded from the internet.
To solve this problem, please run the following command before starting Linkurious Enterprise.
This will remove the attributes used by the operating system to identify Linkurious Enterprise files as untrusted.
xattr -rc <Linkurious_home_directory>
To start Linkurious Enterprise, run the start.sh.command script in the linkurious-osx directory.
Alternatively, run the menu.sh.command script and click Start Linkurious.
To start a Linkurious Enterprise docker image, please use the docker run command.
Here is an example:
 docker run -d --rm \
     -p 3000:3000 \
     --mount type=volume,src=lke-data,dst=/data \
     --mount type=volume,src=lke-elasticsearch,dst=/elasticsearch \
     linkurious:3.1.15
If you choose to mount a host machine folder as a volume please make sure that the user within the container has read and write access to the volume folders. By default Linkurious Enterprise runs ath the linkurious user (uid: 2013). You can do that by adding a
--useroption to the docker run command. The folders that you want to mount must exist before starting Docker, otherwise Linkurious Enterprise will fail to start due to permissions errors. Please read the docker documentation to learn more.
Here is an example:
 docker run -d --rm \
     -p 3000:3000 \
     --mount type=bind,src=/path/to/my/data/folder,dst=/data \
     --mount type=bind,src=/path/to/my/elasticsearch/folder,dst=/elasticsearch \
     --user "$(id -u):$(id -g)" \
     linkurious:3.1.15
If no user is set, the Linkurious Enterprise container will check for appropriate file permissions and change file permissions if necessary.
By default, Linkurious Enterprise runs as the user linkurious who only exists in the container, not on the host. As a consequence, is is not trivial to to set up mount folders on the host which this new user has write permissions for. To make this process easier, file permissions will be set automatically if you run the container as root, and a helpful error message will be printed if file permissions cannot be fixed automatically.
If you are setting memory limits on the running container, using the argument --memory 1024m you will possibly need to adapt the quantity of memory used by the Linkurious Enterprise instance.
When setting '--max-old-space-size' please take into account the full NodeJs process memory, subtracting roughly 50m to the allocated memory of the container.
Considering you are not using the embedded Elasticsearch instance:
 docker run -d --rm \
     -p 3000:3000 \
     --mount type=bind,src=/path/to/my/data/folder,dst=/data \
     --memory 1024m \
     -e NODE_OPTIONS='--max-old-space-size=984' \
     linkurious:3.1.15
We do not recommended using embedded ES in a memory limited container.
You may also pass in environment variables that can be expanded in the configuration
Please read the previous section on starting a Linkurious Enterprise instance using docker, and the section on fault tolerance.
A simple way to test out Linkurious Enterprise using Kubernetes is to create a simple deployment, using only one replica, and allocate a PersistentVolume for both of the volumes (lke-data, lke-elasticsearch) described above.
In production however you would want to follow the fault tolerance guide and use a StatefulSet, with a main/failover strategy, and the appropriate strategy configured for your load-balancer or ingress.
Run the stop.sh script in the linkurious-linux directory.
Alternately, run menu.sh and click Stop Linkurious.
Run the stop.bat script in the linkurious-windows directory.
Alternately, run menu.bat and click Stop Linkurious.
Run the stop.sh.command script in the linkurious-osx directory.
Alternately, run menu.sh.command and click Stop Linkurious.
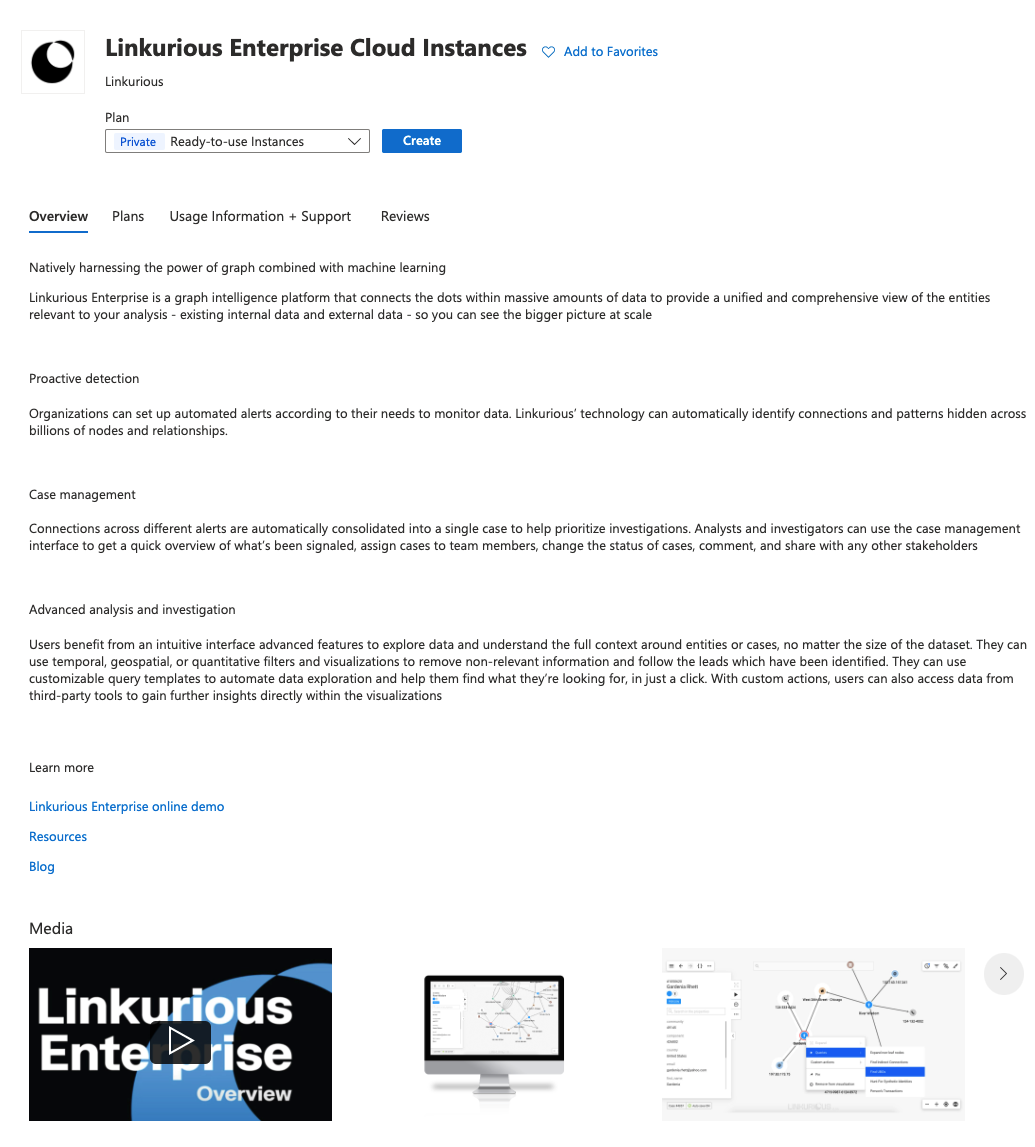
The most recent version of Linkurious Enterprise is now available through the Azure Marketplace.
The Microsoft Azure Marketplace is an online store that offers applications and services either built on or designed to integrate with Microsoft's Azure public cloud
With this integrated experience on Azure, enterprises can quickly and easily have ready-to-use instances running the latest version of Linkurious Enterprise.
This document describes how to deploy and run Linkurious Enterprise on Azure.
To deploy and run Linkurious Enterprise in the Azure marketplace, you need:
If you don’t have a valid license, get in touch with our sales team.
Before deployment, you will need to register two resource providers (Microsoft.Compute and Microsoft.Network) at the subscription level, if they have not been previously registered.
To do so:
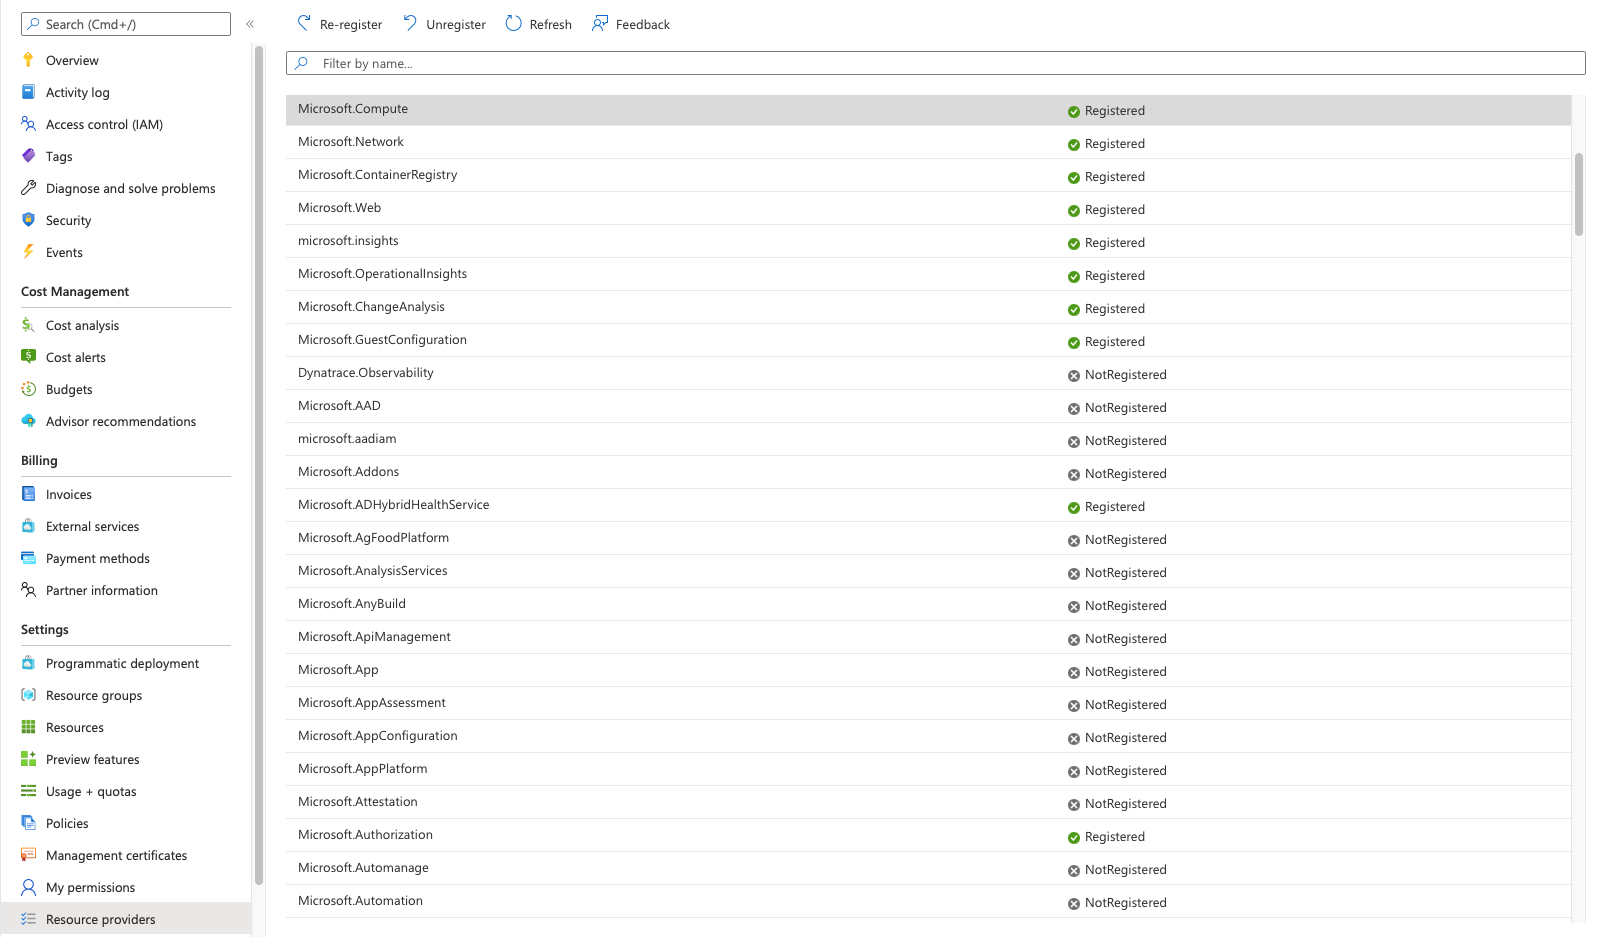
Please contact your Azure administrator if you do not have sufficient rights to do so.
To be able to deploy to a ressource group, you will need to either be able to create ressource groups, or be granted the "owner" role on a given ressource group.
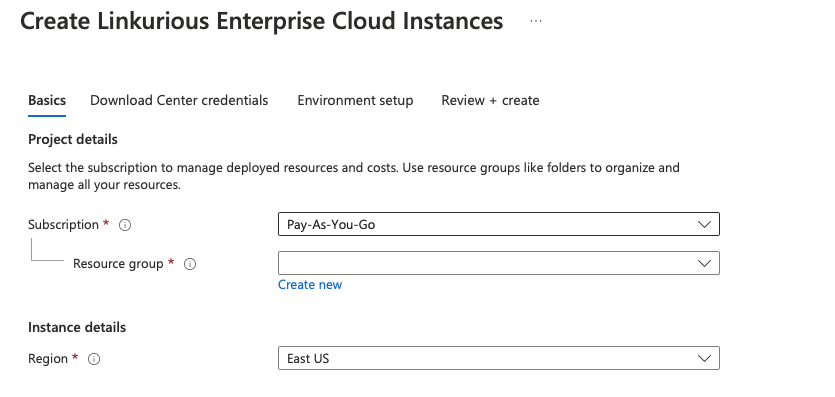
To deploy Linkurious Enterprise, you start by clicking on the Create button on the Linkurious Enterprise product page.
This will open an interactive multi-step prompt to configure and deploy an instance.
This first step allows you to select a subscription, a resource group and a region.
The subscription is the link between your billing strategy on Azure, and the resources you will consume through the deployment of Linkurious Enterprise.
The resource group is the namespace for all resources that will be created by the deployment of Linkurious Enterprise.
The region is the location where your resources will be deployed.
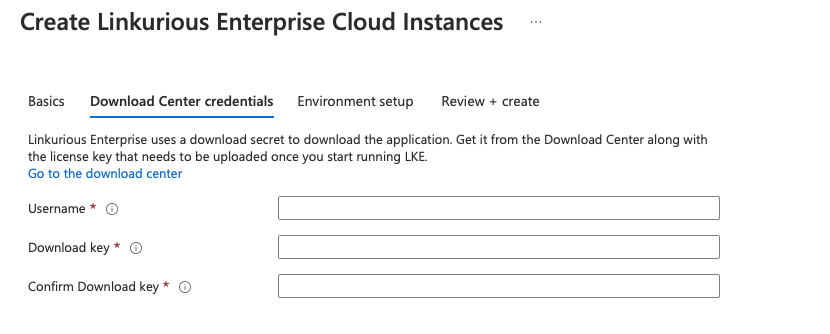
In the second step, you are prompted to provide the necessary credentials that allow Azure to download the application docker image from Linkurious Enterprise’s download center.
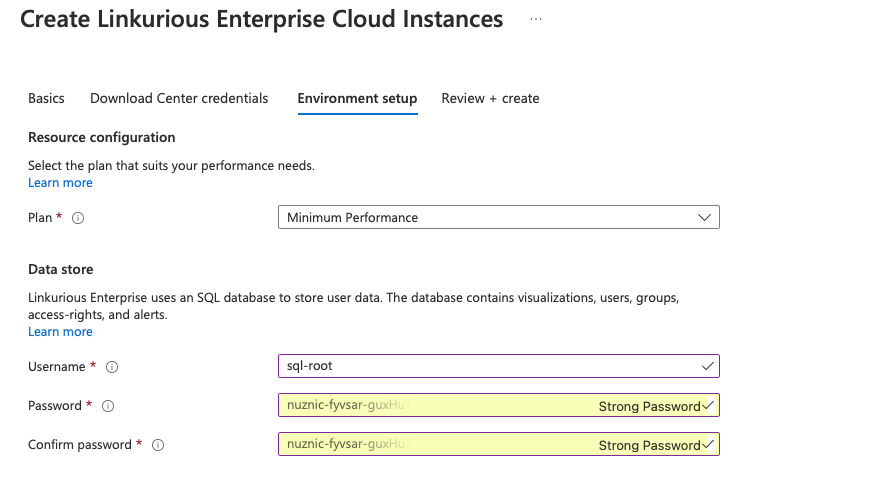
In the third step, you select the hosting plan for the deployment of Linkurious Enterprise. This establishes the hardware characteristics of the environment on which the application will execute. You also provide new credentials to secure the sql database where Linkurious Enterprise stores the visualizations and all other user assets.
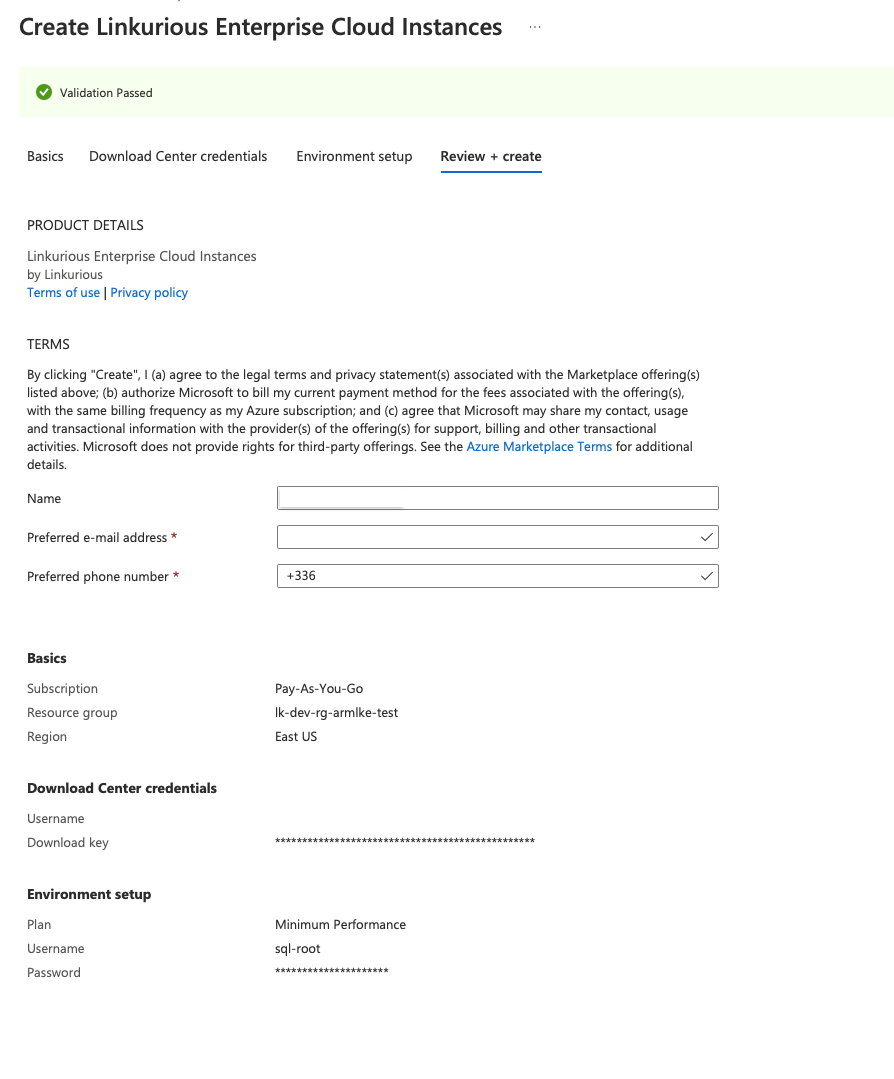
In this step, you can review your choices, agree to terms and conditions and start deployment by clicking the “create” button.
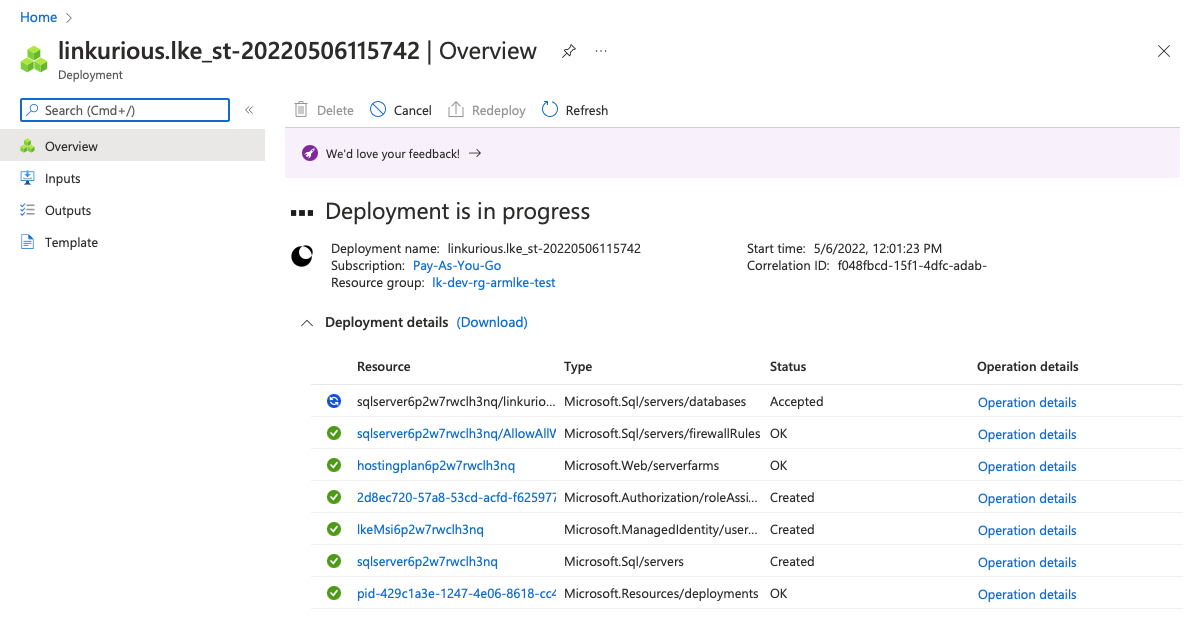
Your deployment starts and will take a few minutes.
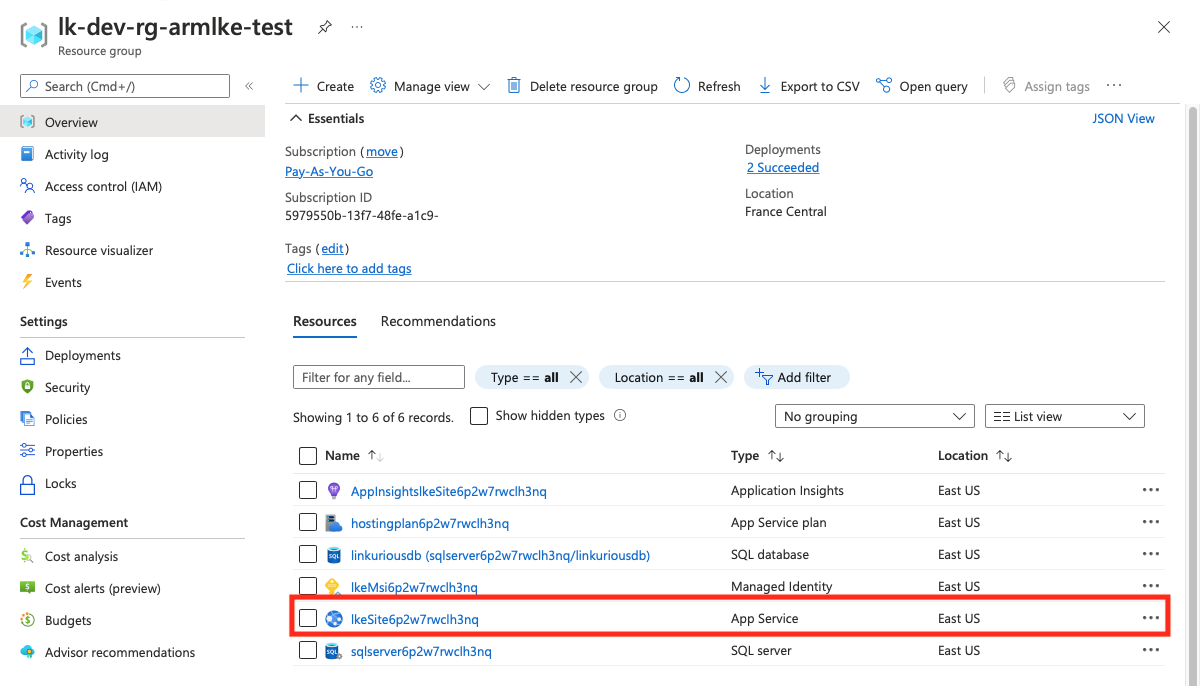
Once the deployment is completed, you can select Linkurious Enterprise App service in the resource group overview page and click on browse to open the application.
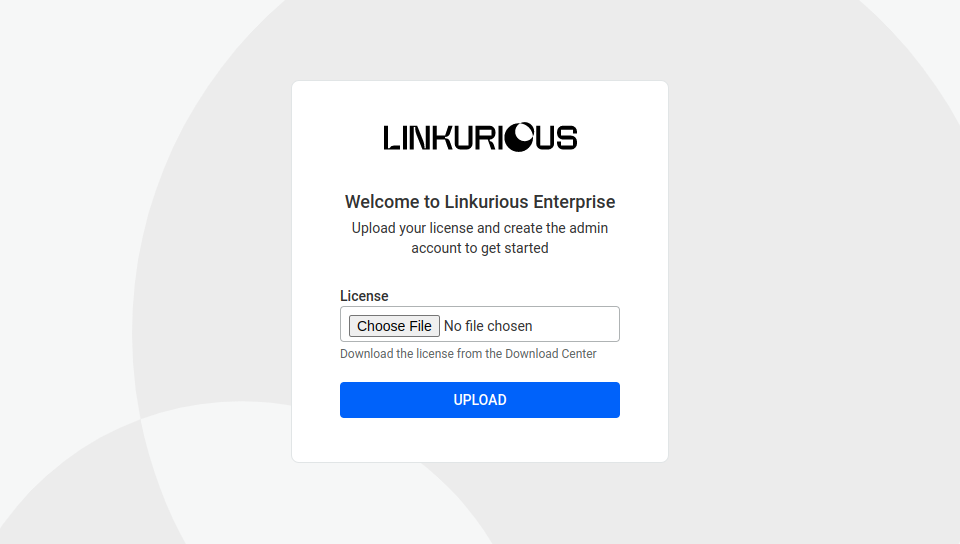
When you access Linkurious Enterprise for the first time, you will be prompted to upload a license and create the first administrator account.

To update your instance of Linkurious Enterprise, you will need to update the docker image tag to a higher version on the deployment center page of the application.
For example, to update Linkurious from 3.1.0 to 3.1.1, you edit the image tag from
linkurious/linkurious-enterprise:3.1.0 to linkurious/linkurious-enterprise:3.1.1
Here are the step by step instructions from the Azure portal:
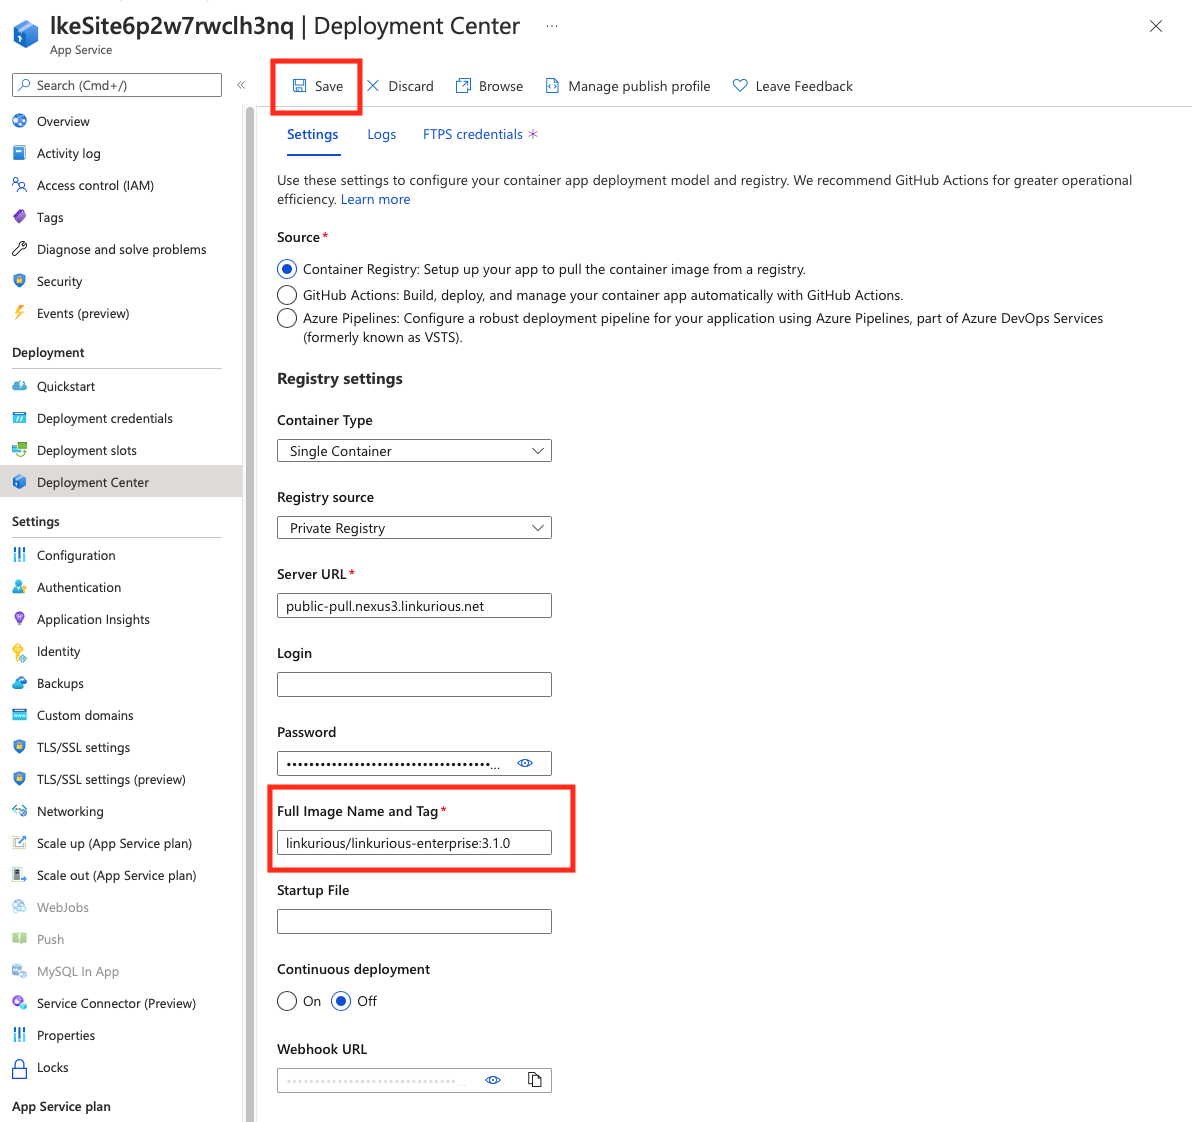
Please take into account that updating will restart your Linkurious Enterprise instance. To check the progress of your deployment, click "log stream" on the left sidebar.
To backup and restore your instance of Linkurious Enterprise running on Microsoft Azure, please ensure that you are running on a plan that meets the necessary requirements.
There are two ways to backup your Linkurious Enterprise Cloud instances on Microsoft Azure : Snapshots and Backups.
Azure provides hourly snapshots when backups are activated. This is the preferred method for backup and restore as this avoids file lock issues. Please follow the official Azure documentation for snapshots.
Once snapshot is restored it's advised to restart Linkurious Enterprise after restoring.
Azure also provides a second backup method: Backups. This will enable you to easily create app backups manually or on a schedule. Please follow the official Azure documentation to set-up backups
Before restoring your application from a backup, you will need to stop Linkurious Enterprise
To edit the Linkurious Enterprise configuration, you can either edit the configuration file located at linkurious/data/config/production.json
or use the Web user-interface:
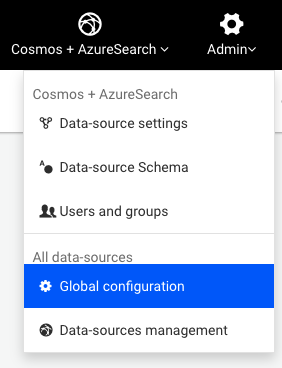
Using an administrator account, access the Admin > Configuration menu to edit the Linkurious Enterprise configuration:
Some configuration change requires a restart to be applied. Linkurious Enterprise will notify you about it and offer you to restart from the Web UI only if you made the changes from the Web UI itself. If you modified the production.json file manually, changes won't get applied immediately and you will need to restart Linkurious Enterprise.
Configuration keys are divided by category.
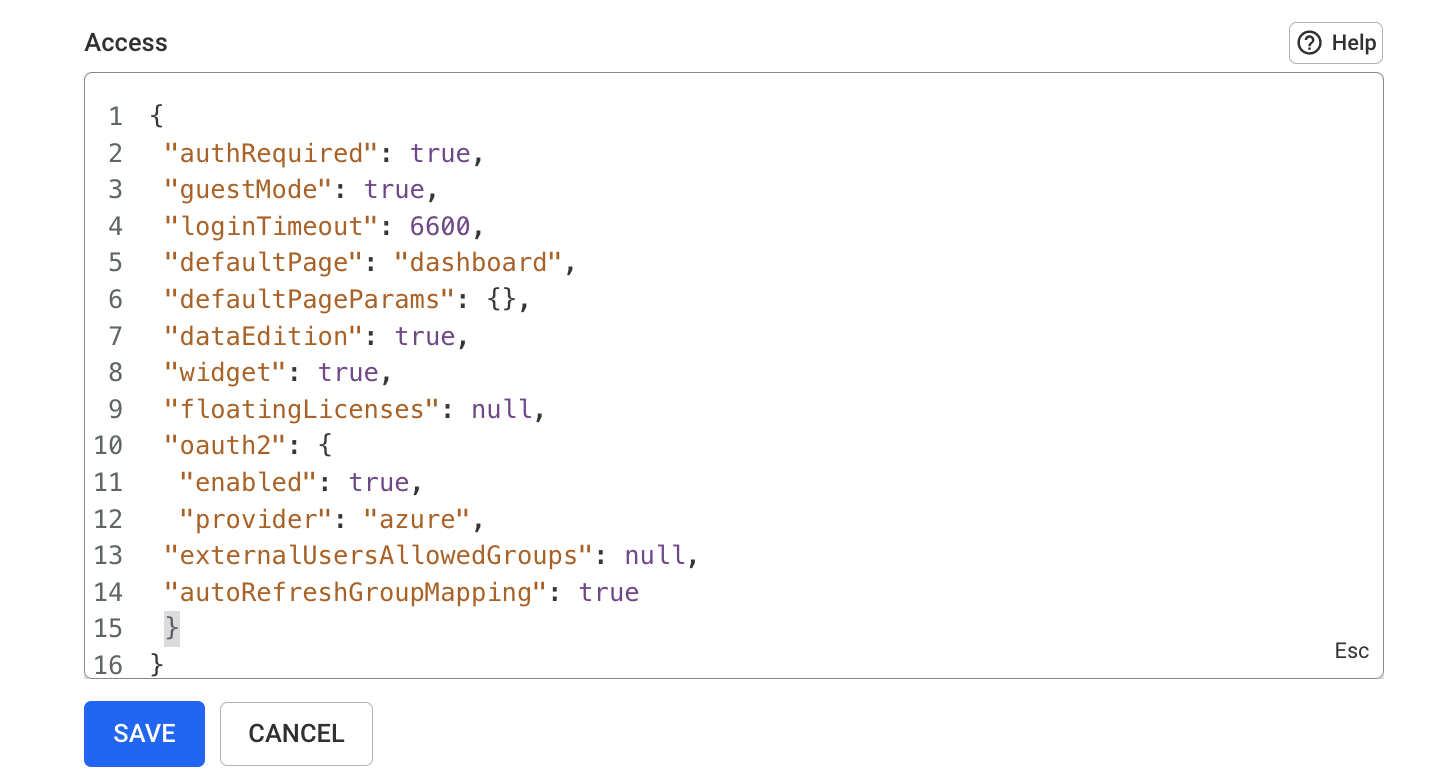
Password fields will always be hidden from the Web UI, but they can be edited.
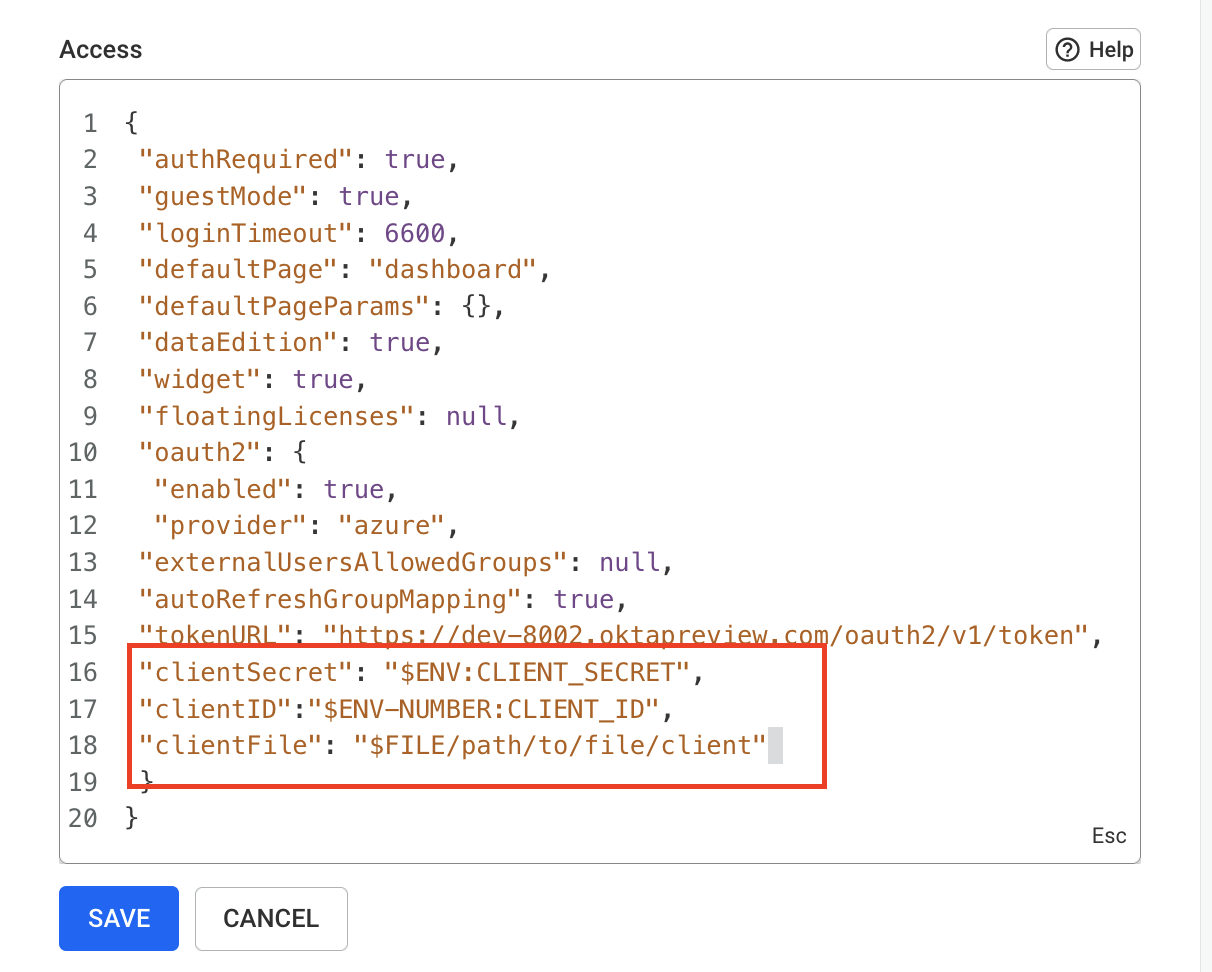
You can also pass variables to the configuration, that will in turn expand to their appropriate value from environment variables or files. For example using : "$ENV:NEO4J_PASSWORD" in the configuration will expand to the value of the environment variable "NEO4j_PASSWORD". Expandable variables are:
-"$ENV:VAR1": replaced with the value of the process' environment variable called "VAR1".
-"$ENV-NUMBER:VAR2": replaced with the value of the process' environment variable called "VAR2" parsed as a number.
-"$ENV-JSON:VAR3": replaced with the value of the process' environment variable called "VAR3" parsed as JSON.
-"$FILE:/path/to/file": replaced with the content of the file at "/path/to/file" parsed as a utf-8 string.
In the configuration object, you can use the following syntax:
When you are finished changing, click Save.
Limitation: There are some limitations with the "$ENV-JSON" expansion,
ENV-JSON breaks if used at the root level or at the first level of the configuration (for example for the whole "server.*" configuration key.)
ENV-JSON breaks if used at any level within the "dataSource.*" configuration key.
Linkurious Enterprise starts 3 separate processes when launched:
node (or node.exe): The internal process managernode (or node.exe): The Linkurious Enterprise Server processjava (or java.exe): The embedded Elasticsearch indexation server (if enabled).Check if these processes are alive by opening the menu from the Linkurious Enterprise directory (see how to open it on each operating system below):
Run menu.sh. Alternately, run menu.sh status.
Run menu.bat. Alternately, run menu.bat status.
Run menu.sh.command. Alternately, run menu.sh.command status.
The status of the API can be retrieved using a browser or a command line HTTP client like cURL.
To retrieve the API status, send a GET request to http://127.0.0.1:3000/api/status
(replace 127.0.0.1 and 3000 with the actual host and port of your server).
// example response
{
  "status": {
    "code": 200,
    "name": "initialized",
    "message": "Linkurious ready to go :)",
    "uptime": 8633
  }
}
To retrieve the API status, send a GET request to http://127.0.0.1:3000/api/version
(replace 127.0.0.1 and 3000 with the actual host and port of your server).
// example response
{
  "tag_name": "3.1.15",
  "name": "Brilliant Burrito",
  "prerelease": false,
  "enterprise": true
}
The logs of the application are located in linkurious/data/manager/logs folder:
linkurious-server.log: Linkurious Enterprise server outputembedded-elasticsearch.log: embedded Elasticsearch outputFor a structured version of the Linkurious Enterprise server logs in JSONL format, see the linkurious/data/logs folder:
linkurious.log: Linkurious Enterprise server general log, with timestampslinkurious.exceptions.log: Linkurious Enterprise server exceptions log, with timestampsAs part of the your license, you have access to a customer service, which will help you resolve issues discovered while using our products.
If you are a commercial partner, you also have access to the support service, and can submit demands on behalf of customers too.
Unless your organization has a premium support agreement, the support service team will provide a first answer within 48 working hours (timezone: France, 9 hours per day, 5 days per week, excluding French public holidays).
If you face issues while working with Linkurious Enterprise or require assistance using our product, you can submit your request as described below.
For the best experience, it is suggested to open a new request via our online support portal. In this way you can benefit from:
As an alternative, you can still submit a new request by sending an email to support@linkurio.us, however you will not benefit from the above mentioned features.
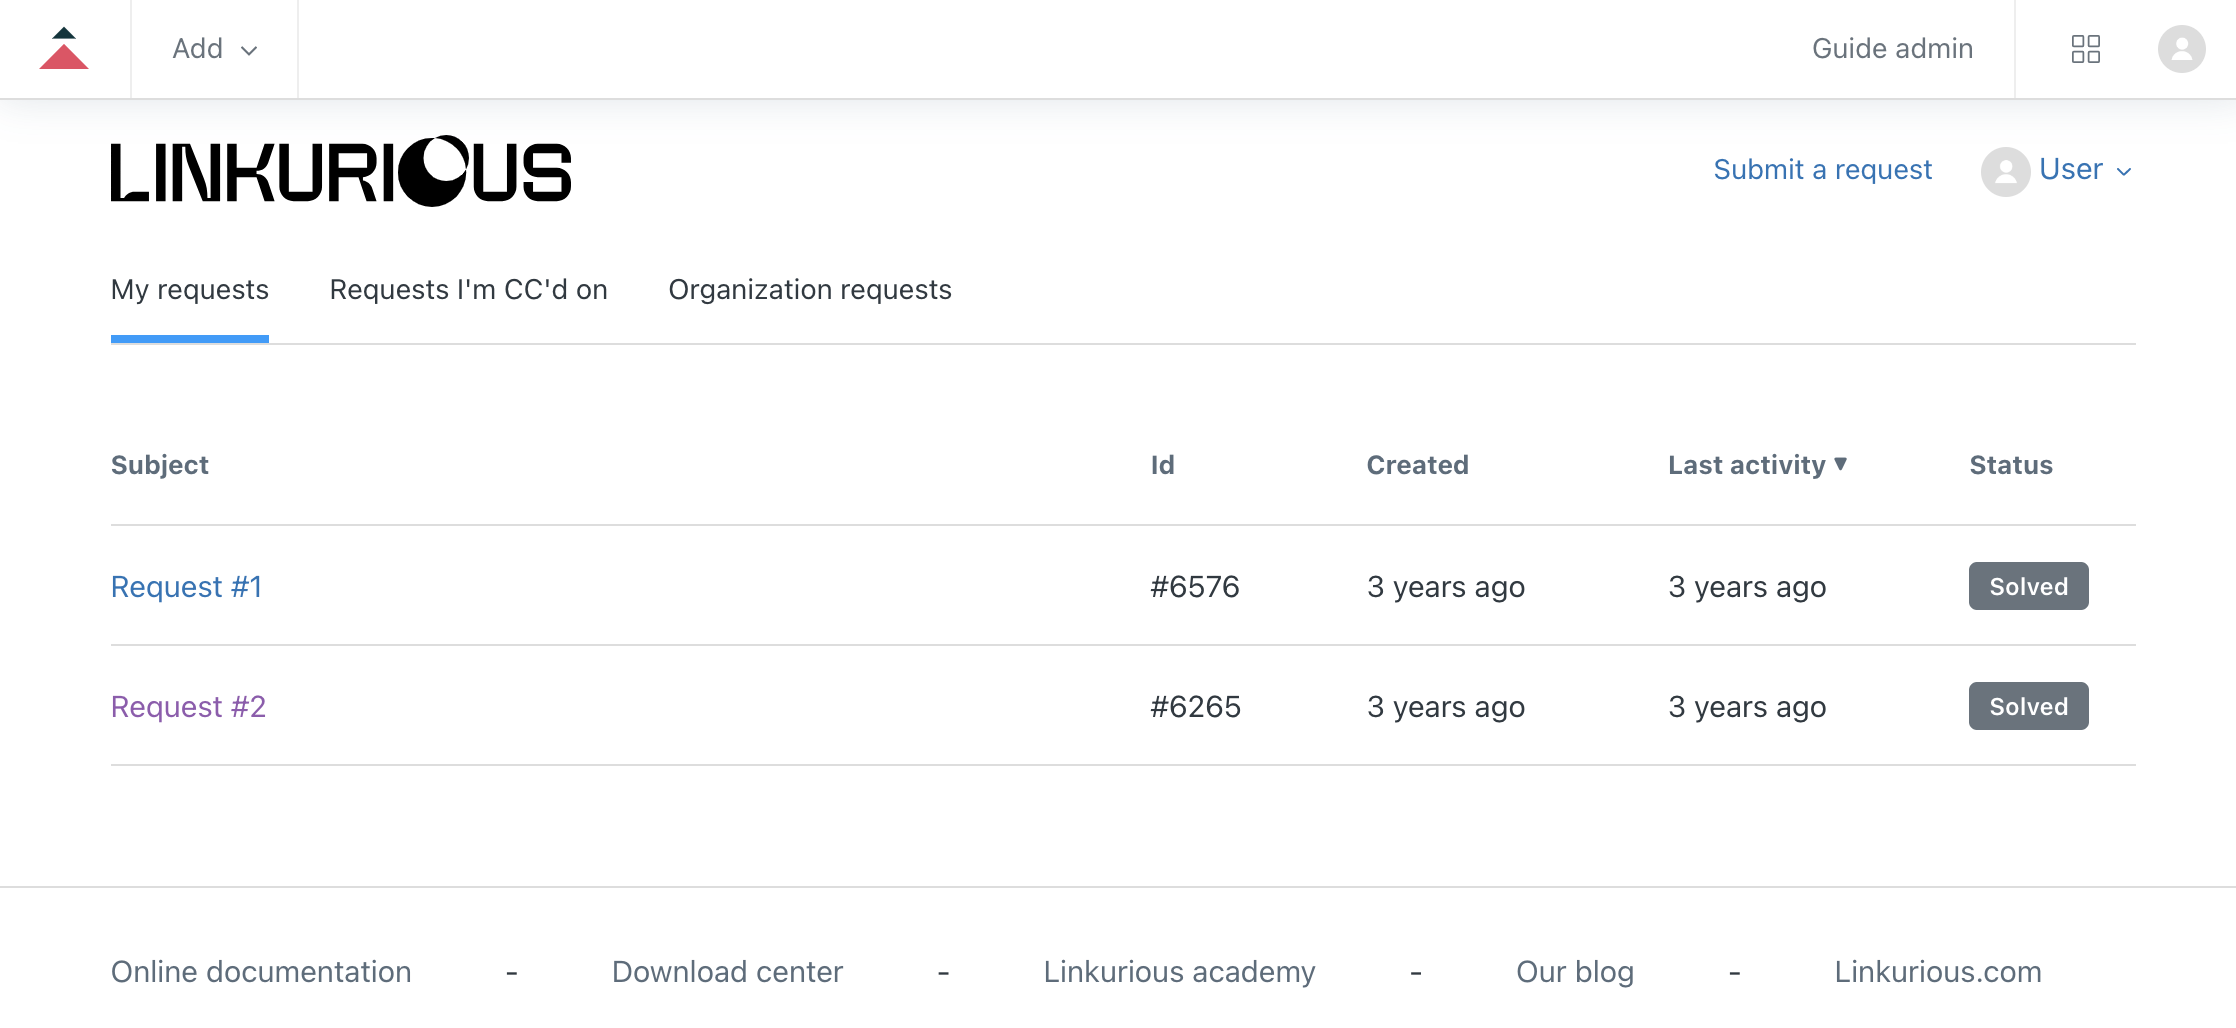
You can access your online support portal at https://support.linkurious.com.
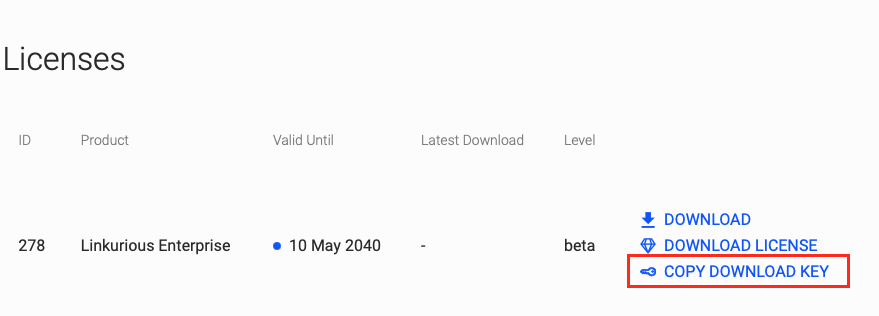
To authenticate, use your Linkurious Download Center credentials (if you do not have access, you can ask your team to invite you).
After logging into the online support portal, you will see your dashboard from where you can:
By clicking on the request's subject, you can access the full history and interact with the support team as needed.
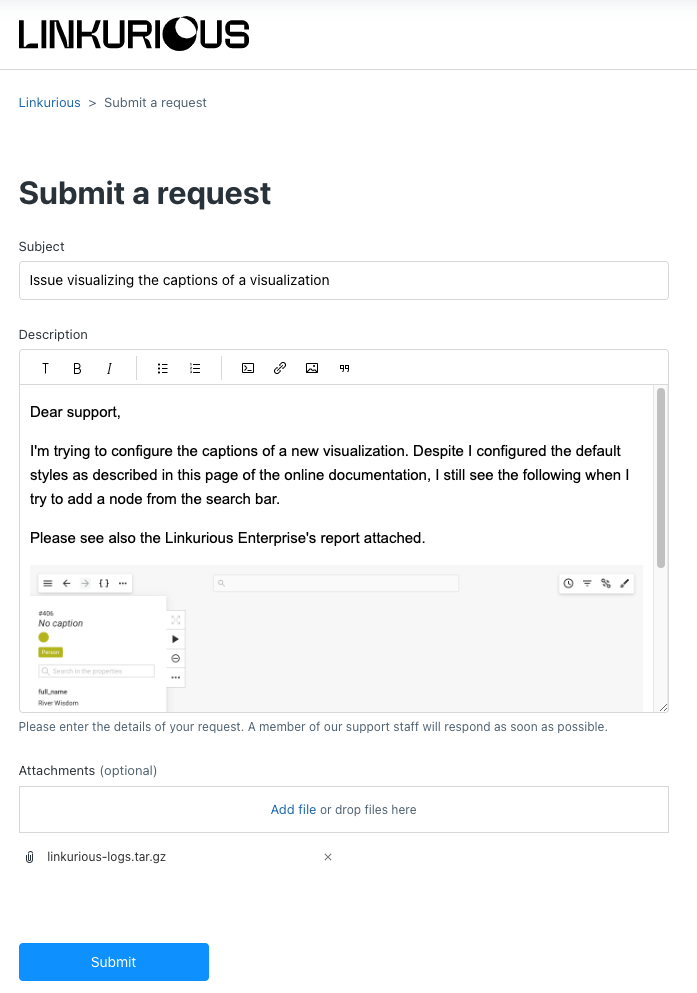
After logging into the online support portal, you will be able to submit a new request.
When submitting a new request, it is suggested to follow a few best practices to minimize the resolution time:
Subject that describes your problem;Subject any useful information to determine the correct SLA
(e.g. usually it is based on the criticality classification of the problem: Blocking, Critical, Major, etc.);Here is an example of a suitable request (you can either embed images in the description or attach additional files separately).
After pressing Submit, you will receive an automatic confirmation email. You can reply to it to
add more contents or follow up with the support team.
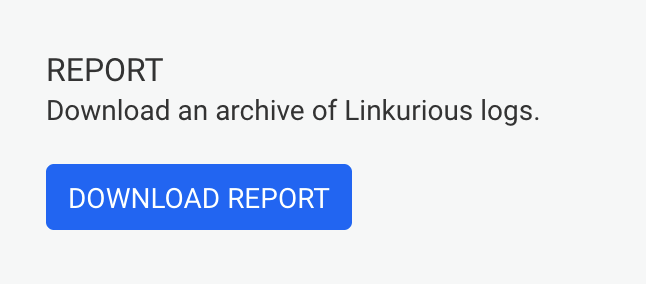
The Linkurious Enterprise report is an archive that contains all the information needed to enable our support team to provide a resolution as quickly as possible.
The archive contains system logs, Linkurious Enterprise configurations, and does not contain any sensitive data related to your graph database.
There are two possible ways of collecting the report:
You can download an automatically generated report from the Web user interface via the Admin > Global configuration menu:
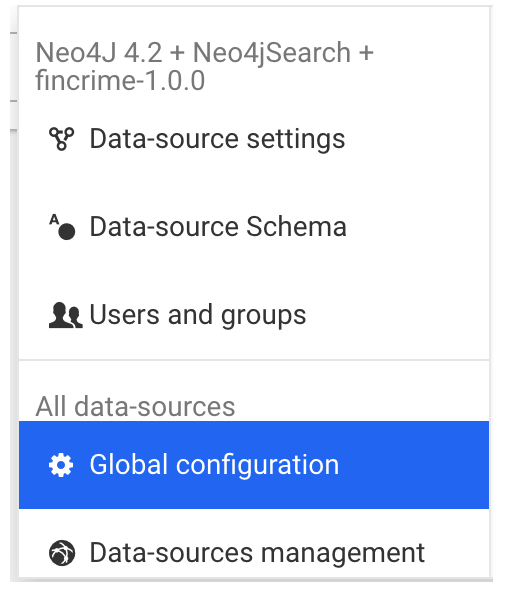
At the end of the page, click Download Report:
It can happen that the system fails to start due to an error. In that case, the following files should be added manually to a compressed archive:
The application logs: the manager and logs folders stored in <linkurious-installation>/data
The application configuration (optional): the production.json file stored in <linkurious-installation>/data/config
Depending on your situation, the configuration file (
production.json) may sometimes contain clear-text passwords. Consider redacting such passwords before sharing your configuration with the support team.
In some cases the support team may need some extra logs or data only accessible from your browser, please follow the below steps to collect them.
Option + ⌘ + J (on macOS); Shift + CTRL + J (on Windows/Linux).
Option + ⌘ + J (on macOS); Shift + CTRL + J (on Windows/Linux).
This file may contain sensitive data, this is usually not asked if not for specific complex issues. Always be careful when sharing this file. In case of doubts on those steps we suggest involving your internal IT / security team.
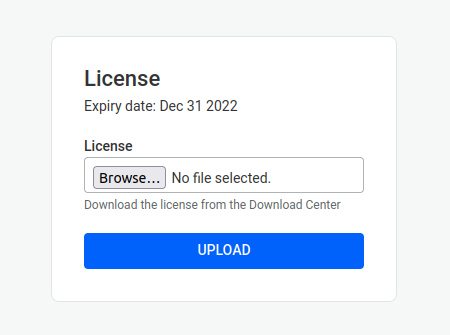
When running Linkurious Enterprise for the first time, you are asked to provide a valid license. You can download your license file from our download center.
Once you have provided a valid license, we ask you to create your Admin account.
When your license expires, you are notified within the Linkurious Enterprise interface and asked to upload a new one.

To manually check your license expiry date:
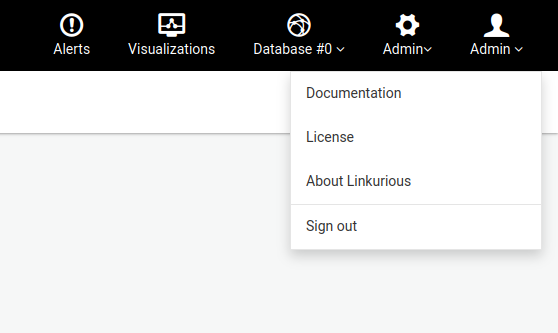
Choose License.
In the license page, you can find the expiry date.
If your license with Linkurious has expired, please contact our sales team. In case your license has already been renewed, you can update the license. To achieve this:
From the top menu, hover over your username on the far right side.
Choose License.
Upload the new license.
Linkurious Enterprise is scanned continuously for vulnerabilities both in the application code and in third-party dependencies using static code analysis tools and dependency scanning tools.
While doing that, we regularly have Linkurious Enterprise tested by independent third-party security specialists to test it for exploitable vulnerabilities (a.k.a. pentesting).
When a security vulnerability is discovered in Linkurious Enterprise:
Our vulnerability reports include a severity level. This severity level is based on our self-calculated CVSS score (Common Vulnerability Scoring System) for each specific vulnerability. CVSS is an industry standard vulnerability metric (learn more about CVSS).
For CVSS v3, we use the following severity rating system:
| CVSS v3 score range | Report severity level |
|---|---|
| 0.1 - 3.9 | Low |
| 4.0 - 6.9 | Medium |
| 7.0 - 8.9 | High |
| 9.0 - 10.0 | Critical |
Below are a few examples of vulnerabilities which may result in a given severity level. Please keep in mind that this rating does not take into account details of your installation and are to be used as a guide only.
Critical severity vulnerabilities usually have most of the following characteristics:
For critical vulnerabilities, it is advised that customers patch or upgrade as soon as possible, unless you have other mitigating measures in place. For example, a mitigating factor could be if your installation is not accessible from the Internet.
High severity vulnerabilities usually have some of the following characteristics:
Medium severity vulnerabilities usually have some of the following characteristics:
Low severity vulnerabilities typically have very little impact on an organization's business. Exploitation of such vulnerabilities usually requires local or physical system access. Vulnerabilities in third party code that are unreachable from Linkurious Enterprise's code may be downgraded to low severity.
If you have discovered an unknown security vulnerability in Linkurious Enterprise (or in an associated product or service), please get in touch with us via email: security@linkurious.com
Before starting to explore the content of your graph database using Linkurious Enterprise, you need to import data in your graph database.
The following sections will help you import data into your graph:
If you already have data in your graph database or you don't need to import anything, see how to configure your graph database with Linkurious Enterprise.
Linkurious Enterprise relies on Neo4j to store data. To import data into Neo4j, you have a number of solutions depending on your needs.
If your data is static:
If you are streaming data, you can use Neo4j Streams Kafka Integration to ingest any kind of Kafka event into your graph.
For simple CSV files, to get you quickly up and running, you can use the official Linkurious CSV importer plugin to import data directly through Linkurious Enterprise. The plugin provides a simple user interface to upload CSV files and easily define relationships.
If you are using spreadsheets, you can easily transform the data within to Cypher queries with this tutorial.
Finally, If your data is in JSON format, you could use the
load JSON functionality from APOC
By default, a pre-loaded movie database is available in Neo4j Desktop.
You can also get started with Neo4j Sandbox and launch a free Neo4j online instance with an example dataset
If you are still not sure, or your data import needs are more complex, or if you need to get help from professionals, contact us and we will be happy to answer your questions.
Please refer to the Cosmos db online documentation for details on how to load data into Cosmos db.
When saving a visualization or a case, Linkurious Enterprise only stores the ID references to the nodes and edges stored in your graph database.
When updating your graph data you need to make sure your graph engine preserves those references to avoid any data loss.
There are 2 different strategies for updating your graph data. Each strategy has its own advantages and risks.
This strategy consists in adding, removing or updating the nodes and edges within an existing database.
You can use this strategy when you know exactly the nodes and edges that have changed since your last database update.
After performing this update the following changes will be reflected in Linkurious Enterprise:
When you remove nodes and edges from your graph database, there is a chance those IDs are reused by the graph engine when you later create new nodes and edges. The consequence is that your existing visualizations may contain references to new nodes and edges unrelated to the existing context.
If you plan to incrementally remove data from your graph database, we recommend you use alternative identifiers before creating your visualizations.
This strategy consists in recreating your graph database from an external source.
You consider the current graph database stale, and you create a new graph database with fresh data.
This strategy is useful when your current infrastructure does not allow you to keep track of which nodes and edges are updated.
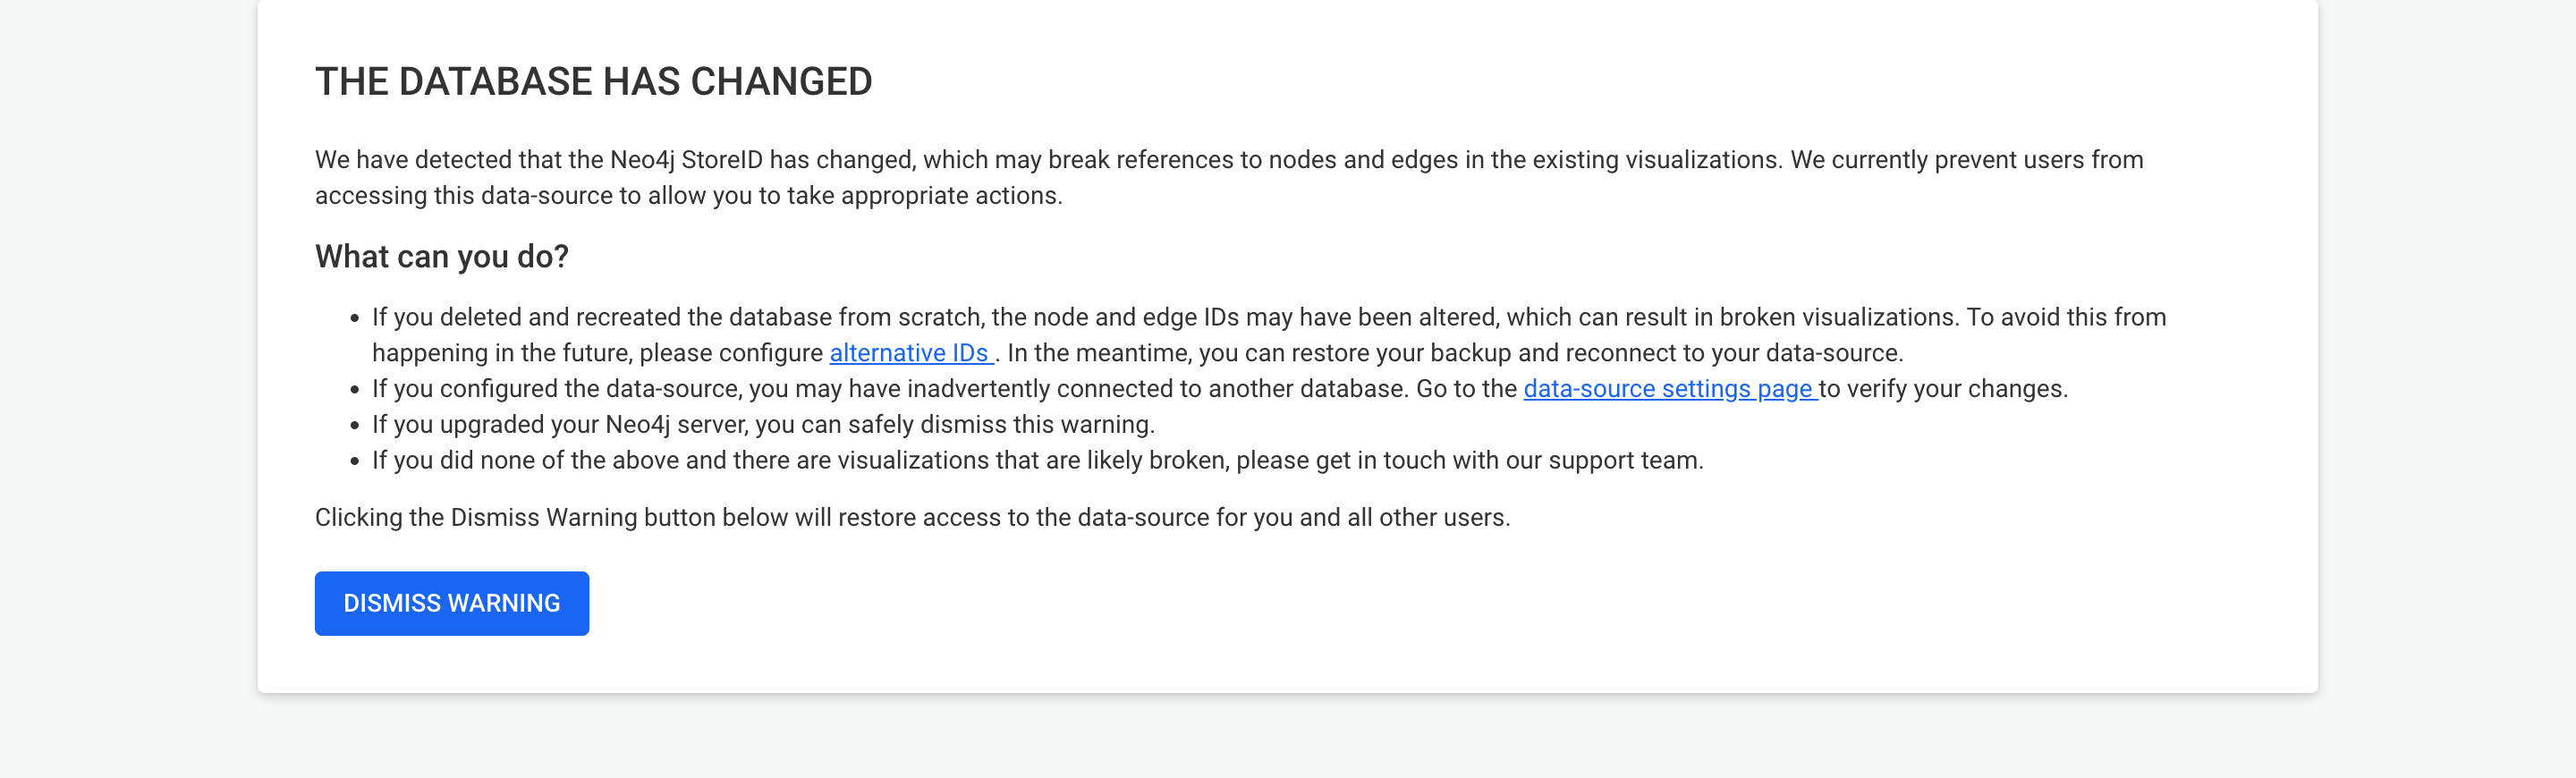
When you rebuild your graph database, new IDs will be assigned to all your nodes and edges, consequently breaking the references stored by Linkurious Enterprise.
If you are planning to use this strategy, it is very important you configure alternative identifiers before creating your visualizations.
In the unfortunate scenario that you have performed a database rebuild without configuring the alternative identifiers, Linkurious Enterprise will prevent access to your visualizations in an effort to prevent any data loss.
As an administrator, you can perform the following actions:
We release a new version of Linkurious Enterprise every couple of month on average. New releases include new features, improvements, and bug fixes.
The following pages will help you check for updates, back-up Linkurious Enterprise before updating, and update Linkurious Enterprise.
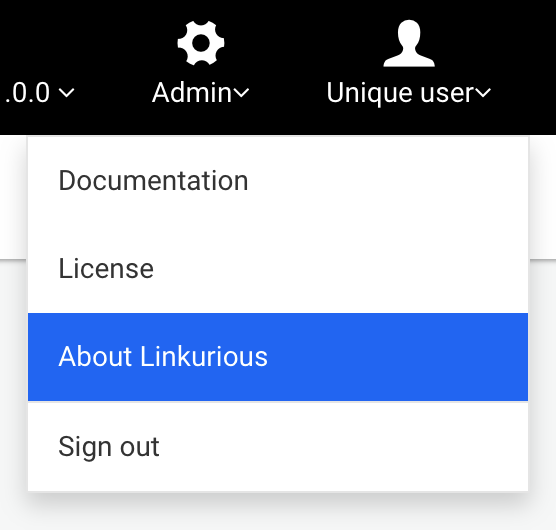
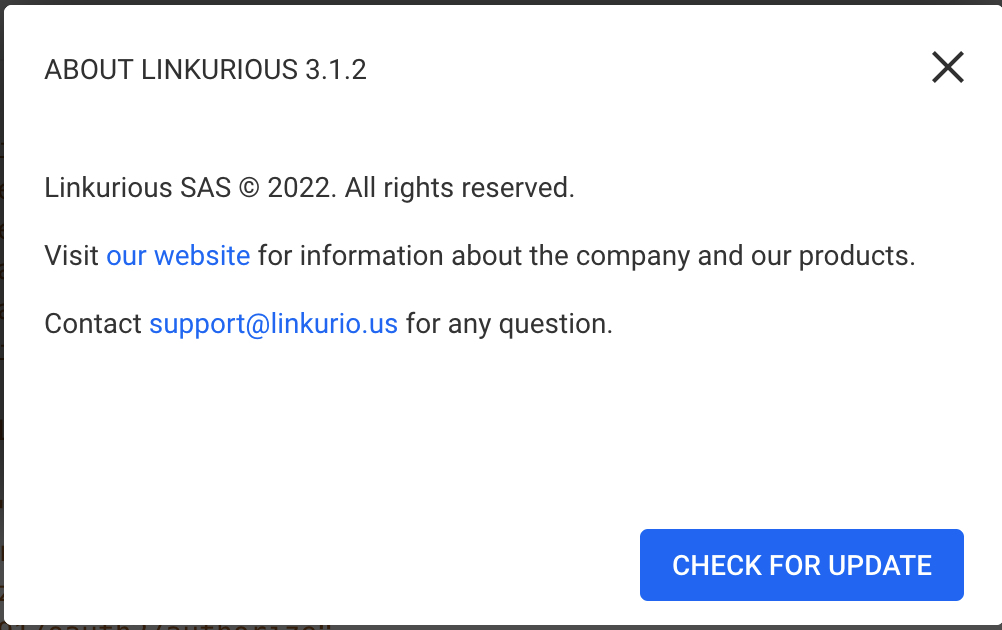
Using an administrator account, access the Your Username > About menu to open the Linkurious Enterprise info:
Click Check for updates to see if you are using the latest version.
Alternatively, you can check at http://linkurio.us/version/linkurious-enterprise.json
// example response
{
  "tag_name": "v3.1.15", // latest version of Linkurious Enterprise
  "message": null,
  "url": "https://get.linkurio.us/" // where to download the latest version from
}
Follow these steps to perform a backup of your Linkurious Enterprise data:
linkurious/data folderPlease note that this procedure does not back-up your graph data, but only your Linkurious Enterprise configuration and user-data (visualizations, users, etc.).
If you are backing up your data before a system update through a standard installer
(i.e. Linux, Windows, Mac OS), make also a copy of the whole linkurious directory
to be able to perform an easy rollback in case of problems.
If you follow this procedure, you will be able to update Linkurious Enterprise to a newer version without loosing your configuration and user-data store. Your data will be automatically migrated to the newer version.
Before updating, make sure that you have backed-up your data in case something unexpected happens.
Even though this procedure is the standard one for a general update, some version (especially major releases) can introduce changes requiring extra attention. Please browse our public resources to verify whether there is something applicable to your specific configuration before proceeding with the update.
During the update procedure, if Linkurious Enterprise is running, it will be stopped. You will need to re-start Linkurious Enterprise after the update procedure.
linkurious-xxx-v3.1.15.zip into the root folder of your working Linkurious Enterprise directory (along the start stop and update scripts)update.sh, Mac OS: update.sh.command, Windows: update.bat).
In case of failures, run it again to revert the changes.If the update script fails, please check the update log located
at linkurious/data/update.log for details.
If you use the Linkurious Enterprise Docker image, the only step to update Linkurious Enterprise is to use the new Docker image with the existing Linkurious Enterprise data volume.
To update your Linkurious Enterprise cloud instance please refer our Azure documentation.
This procedure only allows to undo an update and restore the version of Linkurious Enterprise that was installed just before the update, without loss of data.
This procedure requires that you have performed a full backup of Linkurious Enterprise before the update (see details in our backup guide).
If you are working on Linux, Windows or Mac OS:
linkurious folder to linkurious_previous (it is needed if you will reach to support for investigation)linkurious folder from your backupIf you use the Linkurious Enterprise Docker image:
To rollback your Linkurious Enterprise cloud instance please refer our Azure documentation.
A data-source is a conceptual representation of a graph database within Linkurious Enterprise. Visualizations and other user data created within Linkurious Enterprise will be associated their respective data-source.
Every data-source is uniquely identified with a sourceKey,
a string computed when Linkurious Enterprise connects to the database for the first time,
based on internal information from the data-source and saved in the configuration file.
Editing or removing the sourceKey of an existing configuration is strongly discouraged
and may lead to unexpected behaviours.
By default, Linkurious Enterprise is configured to connect to a Neo4j database at 127.0.0.1:7474.
Linkurious Enterprise can connect to some of the the most popular graph databases:
Linkurious Enterprise is able to connect to several graph databases at the same time and lets you switch from one database to another seamlessly.
You can configure your data-sources via the Web user interface
or directly on the linkurious/data/config/production.json file.
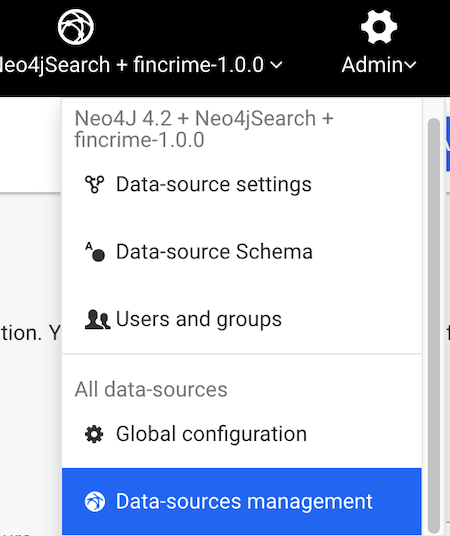
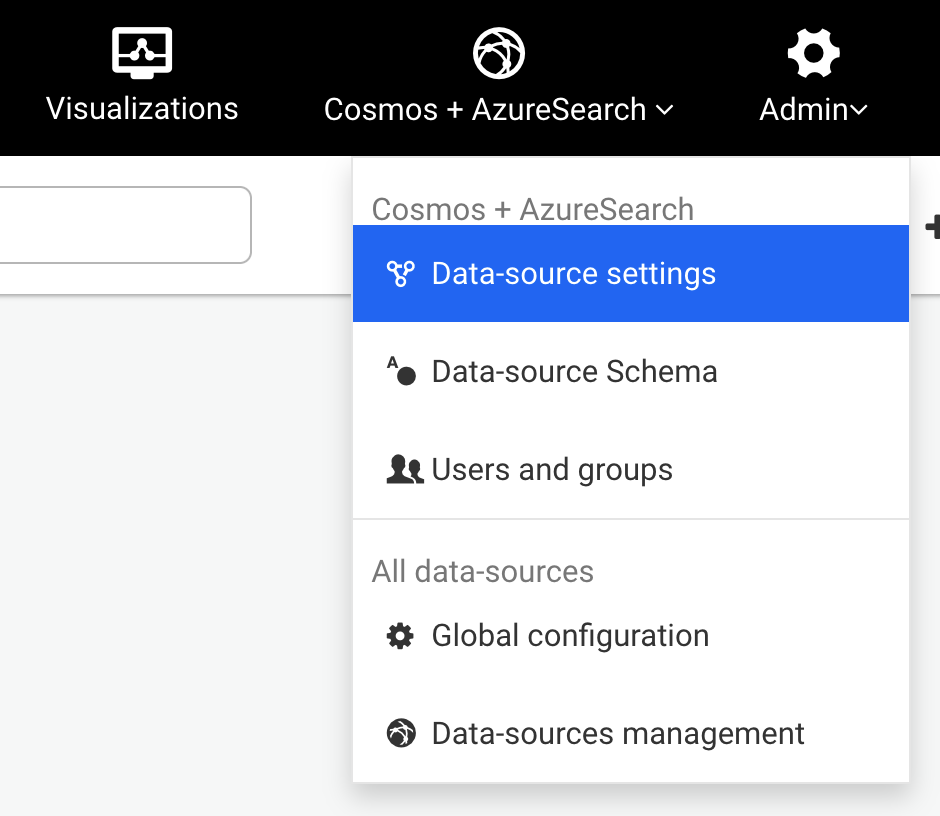
Using an administrator account, access the Admin > Data menu to edit the current data-source configuration:
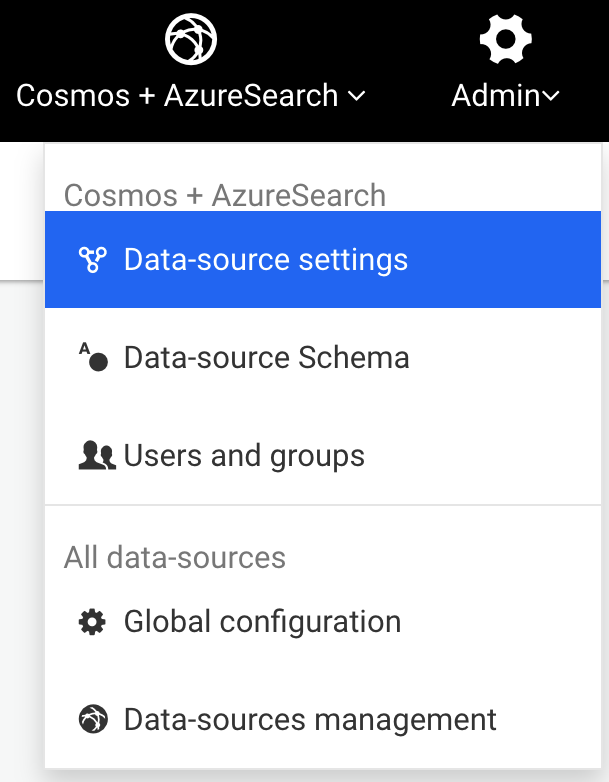
Edit the data-source configuration to connect to your graph database:
Submit the changes by hitting the Save configuration button.
Edit the configuration file located at linkurious/data/config/production.json.
See details for each supported graph database vendor:
Please check for supported Neo4j versions in our compatibility matrix.
To edit the Neo4j data-source configuration,
you can either use the Web user-interface
or edit the configuration file located at linkurious/data/config/production.json.
Example configuration:
{
  "dataSources": [
    {
      "graphdb": {
        "vendor": "neo4j",
        "url": "neo4j://127.0.0.1:7687/",
        "user": "myNeo4jUser",
        "password": "nyNeo4jPassword"
      },
      "index": {
        "vendor": "neo4jSearch"
      }
    }
  ]
}
Linkurious connects to Neo4j via the
Boltprotocol. To do so, you need to enable the protocol in your Neo4j configuration file. If an HTTP/S URL is configured, Linkurious will automatically upgrade the connection to Bolt.
Supported graphdb options with Neo4j:
url (required): URL of the Neo4j server (HTTP / HTTPS / bolt / neo4j)user (optional): Neo4j user (if credentials are enabled, see Neo4j credentials)password (optional): Neo4j password (if credentials are enabled)proxy (optional): URL of the HTTP proxy to use to connect to Neo4j (only used when url is HTTP/S)alternativeNodeId (optional): Name of the node property to use as reference in visualizations (see alternative IDs)alternativeEdgeId (optional): Name of the edge property to use as reference in visualizationslatitudeProperty (optional): Name of the node property to use for latitude (used in geo mode)longitudeProperty (optional): Name of the node property to use for longitude (used in geo mode)allowSelfSigned (optional, default false): Whether to allow self-signed certificatesdatabaseName (optional): Name of the database to be connectedallowVirtualEntities (optional, default true): Whether to allow virtual nodes and virtual edgesalternativeURLs (optional): Linkurious accepts a string array consisting of alternative Neo4j Bolt URLs for high availabilityignoredEdgeTypePrefixes (optional): List of edge type prefixes to be excluded in the schema samplingLinkurious Enterprise allows using Neo4j instances running on Neo4j Aura as data-sources.
Neo4j Aura is only supported for the Neo4j Aura instances running Neo4j engine v4.0 and later.
In order to have full-text search, you can choose among the following options:
If you just installed Neo4j, these steps will help you create credentials:
Alternatively, you can disable credentials in Neo4j by editing the Neo4j configuration at neo4j/conf/neo4j.conf
by uncommenting the following line:
dbms.security.auth_enabled=false
Note that Linkurious requires a Neo4j user with the Neo4j built-in
adminorarchitectrole. This is needed so that Linkurious can use Neo4j features like Index creation and Query cancellation.
Configuring alternative IDs indices is recommended.
The first step is to:
myAlternativeNodeIdIndex['Company', 'Person']myUniqueNodeIdOnce we have this information we can create the indices with the following Cypher queries:
call db.index.fulltext.createNodeIndex('myAlternativeNodeIdIndex', ['Company', 'Person', 'City'], ['myUniqueNodeId'], {analyzer: 'keyword'})
call db.index.fulltext.createRelationshipIndex('myAlternativeEdgeIdIndex', ['WORKS_FOR', 'LIVES_IN'], ['myUniqueEdgeId'], {analyzer: 'keyword'})
If new node labels or edge types are added to Neo4j, it's necessary to recreate these indices with the full list of categories.
Once the indices are created, we can configure them Linkurious:
Example configuration:
{
  "dataSources": [
    {
      "graphdb": {
        "vendor": "neo4j",
        "url": "neo4j://127.0.0.1:7687/",
        "user": "myNeo4jUser",
        "password": "nyNeo4jPassword",
        "alternativeNodeId": "myUniqueNodeId",
        "alternativeNodeIdIndex": "myAlternativeNodeIdIndex",
        "alternativeEdgeId": "myUniqueEdgeId",
        "alternativeEdgeIdIndex": "myAlternativeEdgeIdIndex"
      },
      "index": {
        "vendor": "neo4jSearch"
      }
    }
  ]
}
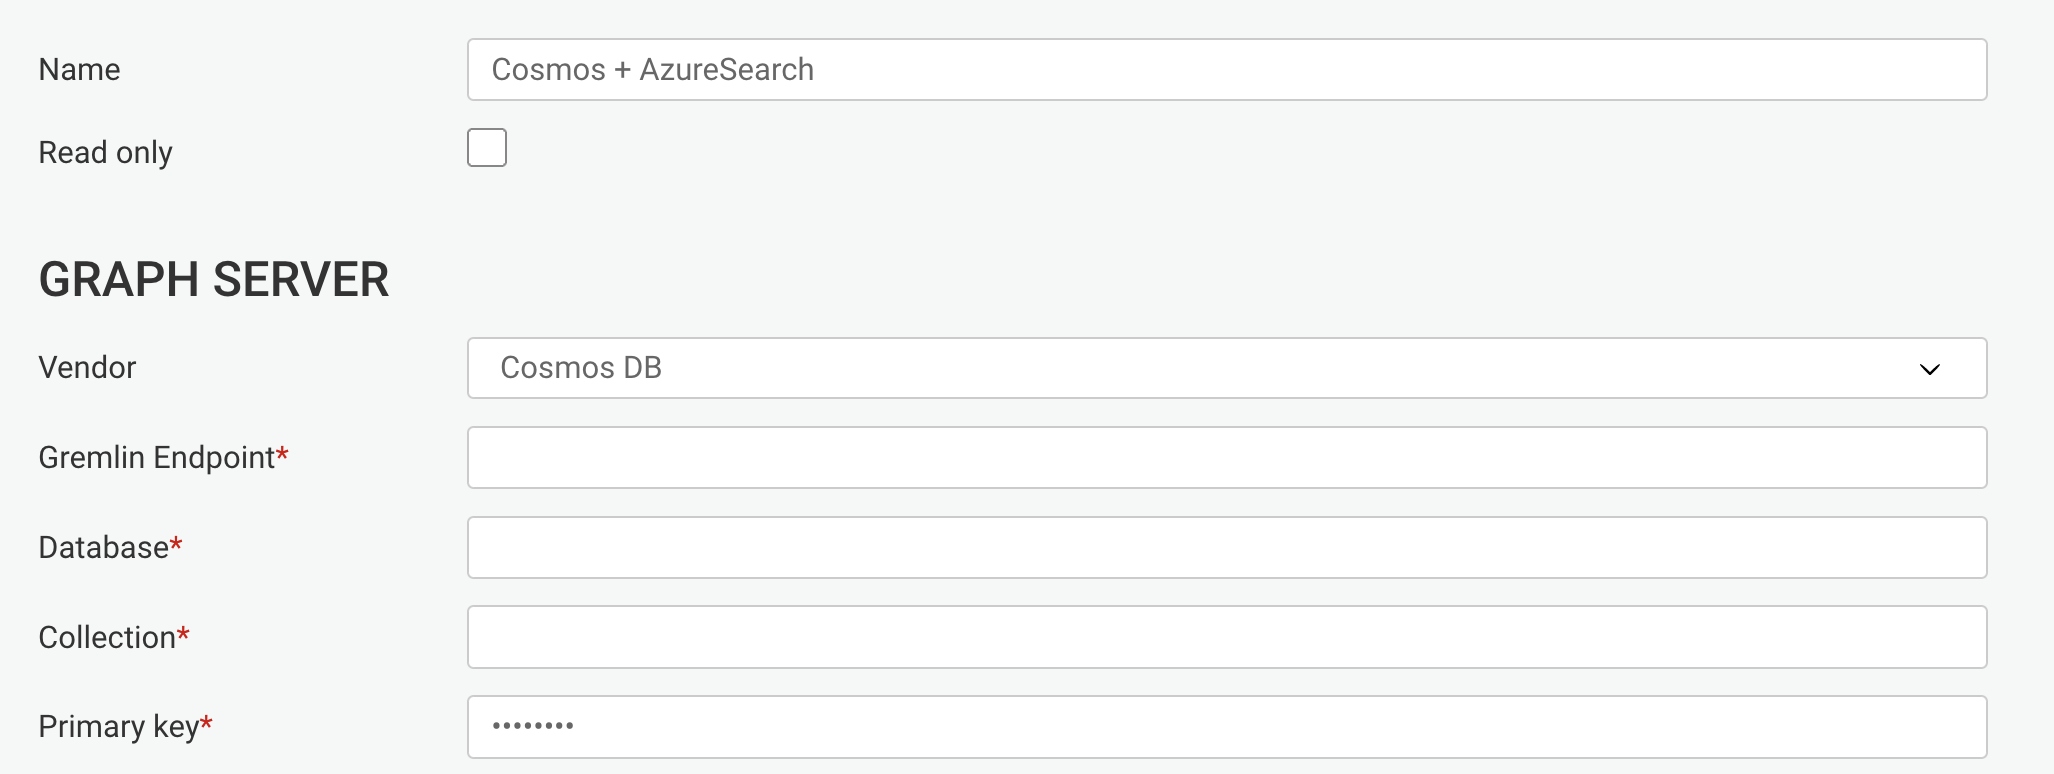
Cosmos DB is supported by Linkurious.
To edit the Cosmos DB data-source configuration,
you can either use the Web user-interface
or edit the configuration file located at linkurious/data/config/production.json.
Example configuration:
{
  "dataSources": [
    {
      "graphdb": {
        "vendor": "cosmosDb",
        "url": "https://your-service.gremlin.cosmosdb.azure.com:443/",
        ".NET SDK URI": "https://your-service.documents.azure.com:443/",
        "database": "your-graph-database",
        "collection": "your-collection",
        "primaryKey": "your-account-primary-key",
        "partitionKey": "your-collection-partition-key"
      },
      "index": {
        "vendor": "azureSearch",
        "url": "https://your-search-service.search.windows.net",
        "apiKey": "your-search-service-admin-api-key",
        "nodeIndexName": "your-node-index",
        "edgeIndexName": "your-edge-index"
      }
    }
  ]
}
Supported graphdb options for Cosmos DB:
url (required): This is the full Gremlin Endpoint of your Cosmos DB. Should not to be confused with the .NET SDK URI.NET SDK URI (required): The .NET SDK URI of your Cosmos DBdatabase (required): Cosmos DB databasecollection (required): Cosmos DB collectionprimaryKey (required): Cosmos DB account primary keypartitionKey (required): The partition key of your Cosmos DB collectionalternativeNodeId (optional): Name of the node property to use as reference in visualizations (see alternative IDs)alternativeEdgeId (optional): Name of the edge property to use as reference in visualizationslatitudeProperty (optional): Name of the node property to use for latitude (used in geo mode)longitudeProperty (optional): Name of the node property to use for longitude (used in geo mode)allowSelfSigned (optional, default false): Whether to allow self-signed certificatesIn order to have full-text search, you can choose among the following options:
When you save a visualization in Linkurious Enterprise, only the node and edge identifier are persisted in the user-data store, along with position and style information. When a visualization is loaded, the node and edge identifiers are used to reload the actual node and edge data from the graph database.
If you need to re-generate your graph database from scratch, the graph database will probably generate new identifiers for all nodes and edges, breaking all references to nodes and edges in existing visualizations.
You can configure Linkurious Enterprise to use a node or edge property as stable identifiers. Once set-up, Linkurious Enterprise will use the given property as identifier instead of using the identifiers generated by the database.
Thank to this strategy, visualizations will be robust to graph re-generation.
Notice that the properties used as identifier should be indexed by the database to allow for a fast lookup by value.
To use alternative node and edge identifiers,
edit your data-source database configuration in the configuration file (linkurious/data/config/production.json):
Example of alternative identifier configuration with Neo4j:
{
  "dataSources": [
    {
      "graphdb": {
        "vendor": "neo4j",
        "url": "http://127.0.0.1:7474/",
        "alternativeNodeId": "STABLE_NODE_PROPETY_NAME",
        "alternativeEdgeId": "STABLE_EDGE_PROPETY_NAME"
      }
      // [...]
    }
  ]
}
Configuring alternative ids indices is only possible with Neo4j 3.5.1 and above. If you plan on using a compatible Neo4J version and alternative ids, we recommend configuring alternative ids indices.
To achieve better performance with alternative Ids is recommended to configure indices for alternative node and edge Ids.
Refer to the documentation specific to Neo4j on how to configure these indices.
You have the possibility to merge data-sources from the data-source management page with the following steps:
From the dashboard, go to the Admin > Data-sources management menu
The data-source to be merged should be the old data-source now marked as offline because it has been replaced with the freshly generated data-source.

On the resulting modal, select the new data-source then click on the merge button.
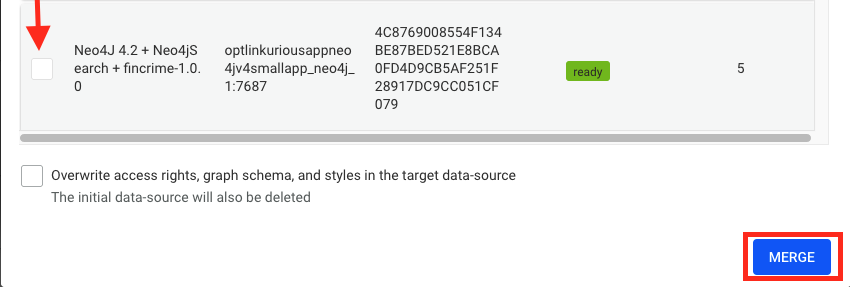
The user can choose to perform a normal merge, or an overwrite merge.
As a result, the following objects from the old data-source will be merged in the new data-source:
The Data-Source won't be deleted in case the user decides to do an overwrite merge at a later stage.
To perform an overwrite merge, simply select the "overwrite" check box in the merge modal.
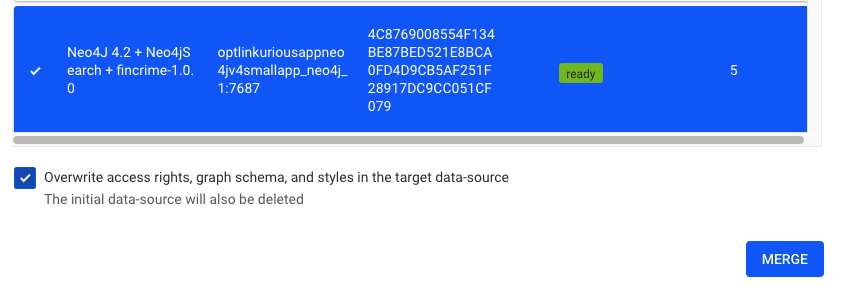
As a result, the objects from the old data-source mentioned above will be merged in the new data-source. Additionally, the following objects will be replaced in the new data-source with the ones from the old data-source:
This action will irreversibly remove any data associated with the old data-source, and the data-source will be deleted.
The following advanced data-source settings applies to all data-sources.
To change them, see how to configure Linkurious Enterprise.
dataSourceConnectionTimeout (default: 30): The maximum time in seconds before the connection attempt to each data-source times out.
dataSourceAutoReconnectInterval (default: 300): Number of seconds after which Linkurious will try to reconnect automatically to all offline data-sources.
This value is internally converted in minutes; if it is not a multiple of 60, it will be rounded to the nearest number of minutes.
Explicitly setting this parameter to 0 disable the offline data-sources auto-reconnection feature.
pollInterval (default: 10): Check if the data-sources and search engine are connected at each interval (in seconds).
timeline (default: false): Whether the visualization timeline is available in the workspace UI
layoutWorkers (default: 2): Number of processes dedicated to computing server-side the layout of visualizations (Currently only available via Linkurious APIs)
indexationChunkSize (default: 5000): The number of nodes and edges retrieved at each batch during the indexation of the graph database.
searchAddAllThreshold (default: 500): The maximum number of search results that the user can add to a Visualization at once.
minSearchQueryLength (default: 3): The number of characters needed to trigger a search query. Set 1 to provide live results from the first character typed by the user.
searchPrefixExpansion (default: true): Whether Linkurious should return nodes and edges that contain the search query as a prefix, e.g.: Searching Link will return node Linkurious.
supernodeThreshold (default: 10000): Number of adjacent edges after which a node is considered a supernode.
edgesBetweenSupernodes (default: false): Whether Linkurious should retrieve edges between 2 supernodes. Note: Linkurious always return edges between a supernode and a regular node.
rawQueryTimeout (default: 60000): Milliseconds after which a query to the database will time out.
defaultFuzziness (default: 0.1): Default value to search fuzziness between 0 and 1. A value of 0 means exact matching of the search query.
expandThreshold (default: 50): When the user expands a node with too many neighbors, Linkurious Enterprise will ask to refine the query so that fewer neighbors are returned.
rawQueryLimit (default: 500): The maximum number of results returned by Linkurious Enterprise when executing a query or query template.
sampledItemsPerType (default: 1000): The number of nodes/edges per category/type to read from the graph for the schema sampling
sampledVisualizationItems (default: 1000): Number of nodes/edges to read from existing visualizations for the schema sampling
showBuiltinQueries (default: true): Whether built-in queries like Shortest Path should appear in the list of Graph Query templates.
slowQueryThreshold (default: 500): Milliseconds after which a query is logged in the log file as a slow query.
defaultLayout (default: {algorithm: 'force', mode: 'best'}): The default layout to be applied to visualizations.
defaultLayout.algorithm (default: force): Can be force or hierarchical. defaultLayout.mode (default: best): (best|fast) for force algorithm and (LR | RL | TB | BT) for hierarchical algorithm. See the layout section in the user manual for more information.searchRetryMultiplier (default: 5): During search, update the index by removing the missing items from the index server. The higher the multiplier is, the less chance search will return non-existing items but search might take more time.
extraCertificateAuthorities: The relative or absolute path to a single PEM file. When set, the well known "root" CAs
(like LetsEncrypt) will be extended with the extra certificates in the
file. The file should consist of one trusted certificate or multiple ones concatenated one after the other in the PEM format. If in your chain of certificates you have some Intermediate certificates, adding the Root CA will be enough to trust the whole chain.
If the path is relative, the file should be located within the linkurious/data folder.If Linkurious Enterprise is installed as a service, the service needs to be uninstalled and re-installed for the change to be taken into account.
obfuscation (default: false): Set to true if you want all the passwords in the configuration to be obfuscated at the next restart of Linkurious Enterprise.Linkurious Enterprise allows you to search your graph using natural full-text search.
In order to offer the search feature out-of-the-box, Linkurious Enterprise ships with an embedded Elasticsearch server. This option allow for zero-configuration deployment in many cases.
By default, Linkurious Enterprise uses Elasticsearch for search. This options requires Linkurious Enterprise to index your graph database, which technically means that Linkurious Enterprise will feed the whole content of the graph database to Elasticsearch to make it searchable. The time required to index the graph database increases with the size of the graph and this solution has limits in its scalability.
Indexation typically happens at speeds between 2000 and 20000 nodes or edges per second, depending on the number of properties for nodes and edges, and hardware performances.
By default, Linkurious Enterprise ships with an embedded Elasticsearch server (version 7.10.2).
This server only listens for local connections on a non-default port (it binds to 127.0.0.1:9201),
for security reasons and to avoid collisions with existing servers.
It is possible to use your own Elasticsearch cluster for performances reasons. Linkurious Enterprise supports Elasticsearch v1.x and v2.x. See details about Elasticsearch configuration options.
Using Elasticsearch is convenient but may not fit cases where the graph database is big (more than a couple million nodes and edges) and is regularly modified from outside Linkurious Enterprise, which required to re-index the whole database.
In order to offer a scalable search feature on big graphs, Linkurious Enterprise offers alternatives search solution. See details about the different options.
You can configure your search engines via the Web user interface
or directly on the linkurious/data/config/production.json file.
Using an administrator account, access the Admin > Data menu to edit the current data-source configuration:
Edit the search engine configuration to connect to your graph database:
Submit the changes by hitting the Save configuration button.

Edit the configuration file located at linkurious/data/config/production.json.
See details for each supported search connector.
| Feature | Description |
|---|---|
| Onboarding | Does this search option require additional configuration, or can it be used out-of-the-box with the associated graph database? |
| Fast indexation | How fast is indexation? Note that this is a relative metric; while some search options may be faster than others, speed will depend on the complexity of your data model and your hardware limitations. |
| Automatic index sync | Are changes made to the graph DB propagated to the index automatically? |
| Search scalability | How well search queries perform for large graph databases? The actual upper limit on the performance of a given option will vary from vendor to vendor. |
| Advanced search | If advanced search features are available, such as numerical and date range search operators. |
| Onboarding | Fast indexation | Automatic index sync | Search scalability | Advanced search | |
|---|---|---|---|---|---|
| Embedded Elasticsearch | Plug-and-play | No | No | Won't scale beyond ~100M nodes | Yes (requires configuration) |
| External Elasticsearch (v2+) | Requires Elasticsearch installation and configuration | No | No | Yes (by adding hardware to Elasticsearch cluster) | Yes (requires configuration) |
| Neo4j Search (v3.5.1+) | Requires configuration in Neo4j (properties to index must be specified) | Yes | Yes | Limited | No |
| Elasticsearch Incremental Indexing | Requires External Elasticsearch (versions compatible with Linkurious Enterprise) and Neo4j v3.5.1 and above | Yes (except the first full indexation) | Yes (requires configuration) | Yes (by adding hardware to Elasticsearch cluster) | Yes (requires configuration) |
| Onboarding | Fast indexation | Automatic index sync | Search scalability | Advanced search | |
|---|---|---|---|---|---|
| AzureSearch | Requires AzureSearch setup (easy) | Yes | Yes | Yes | No |
| Embedded Elasticsearch | Plug-and-play | No | No | Won't scale beyond ~1M nodes (missing backpressure) | Yes (requires configuration) |
| External Elasticsearch (v2+) | Requires Elasticsearch installation and configuration | No | No | Won't scale beyond ~1M nodes (missing backpressure) | Yes (requires configuration) |
The neo4jSearch connector is a solution for full-text search with Neo4j.
neo4jSearch is supported since version 3.5.1 of Neo4j.
Linkurious can use the builtin search indices managed by Neo4j itself.
You can either use the Web user-interface
or edit the configuration file located at linkurious/data/config/production.json to set the index.vendor property to the value neo4jSearch.
To edit the Neo4j data-source configuration,
you can either use the Web user-interface
or edit the configuration file located at linkurious/data/config/production.json.
Example configuration:
{
  "dataSources": [
    {
      "graphdb": {
        "vendor": "neo4j",
        "url": "http://127.0.0.1:7474/",
        "user": "myNeo4jUser",
        "password": "nyNeo4jPassword"
      },
      "index": {
        "vendor": "neo4jSearch",
        "indexEdges": true
      }
    }
  ]
}
Supported index options with Neo4jSearch:
indexEdges (optional): Whether to create or use an edge indexNote that, in Neo4jSearch, only fields stored in Neo4j as string will be searchable. Numerical and date properties won't be searchable if stored in Neo4j as numbers or native dates.
Azure search is the recommended full text search solution for Cosmos DB.
Linkurious requires an index on nodes to perform a search. If you do not have a configured index yet, you can create one via the azure portal.
Additionally, you can create an index on edges if you want search them as well with Linkurious.
Please review the description of each index attributes and make sure the label field is marked
as filterable. Linkurious will not be able to use the index otherwise.
To edit the AzureSearch data-source configuration,
you can either use the Web user-interface
or edit the configuration file located at linkurious/data/config/production.json.
Example configuration:
{
  "dataSources": [
    {
      "graphdb": {
        "vendor": "cosmosDb",
        "url": "https://your-service.gremlin.cosmosdb.azure.com:443/",
        "database": "your-graph-database",
        "collection":  "your-collection",
        "primaryKey": "your-account-primary-key"
      },
      "index": {
        "vendor": "azureSearch",
        "url": "https://your-search-service.search.windows.net",
        "apiKey": "your-search-service-admin-api-key",
        "nodeIndexName": "your-node-index-name",
        "edgeIndexName": "your-edge-index-name"
      }
    }
  ]
}
Supported index options with Azure search:
url (required): URL of the search serviceapiKey (required): Primary Admin Key of the search servicenodeIndexName (required): Name of the node index of your graph databaseedgeIndexName (optional): Name of the edge index of your graph databasePlease refer to the Azure search online documentation for details on how to load data into Azure search.
Note that today, in Azure Search, it's not possible to search on numbers or dates. If you are interested in this feature, please get in touch.
Elasticsearch is supported from version 6.x using the elasticSearch connector.
Linkurious Enterprise ships with an embedded Elasticsearch server (version 7.10.2).
ATTENTION: The internal Elasticsearch is not intended to be used for graph databases > 50,000,000 nodes. Though indexation and search performance are ultimately dependent on hardware limitations, it has been configured to prevent horizontal scaling and so is not an efficient choice for large DBs. It is meant instead as a quick indexation strategy for POCs or small deployments.
To use the Linkurious Enterprise embedded Elasticsearch instance, set the following index configurations keys:
vendor must be elasticSearchhost must be "127.0.0.1"port must be 9201Example configuration:
{
  "dataSources": [
    {
      "graph": {
        "vendor": "neo4j"
        "url": "http://127.0.0.1:7474"
      },
      "index": {
        "vendor": "elasticSearch",
        "host": "127.0.0.1",
        "port": 9201
      }
    }
  ]
}
Search connector elasticSearch supports the following options:
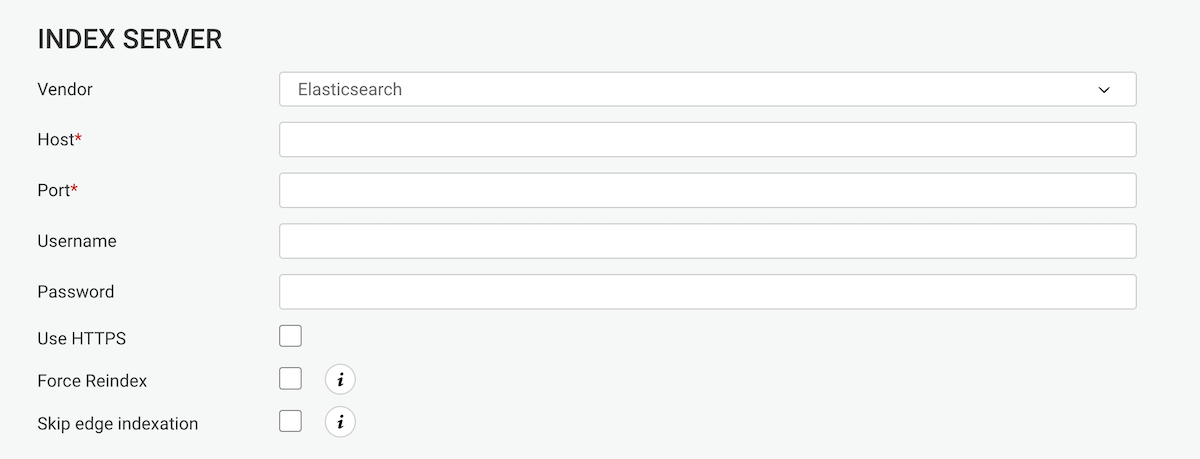
host (required): Elasticsearch server hostport (required): Elasticsearch server port (standard is 9200)https: true to connect to Elasticsearch via HTTPSuser: Elasticsearch username (if you are using X-Pack Security, a.k.a ElasticShield)password: Elasticsearch passwordforceReindex: true to re-index the data-source each time Linkurious Enterprise startsskipEdgeIndexation: true to skip edges indexation (edges won't be searchable)analyzer (default: "standard"): The custom analyzer aimed at analyzing a specific language text. (see available language analysers)numberOfShards (default: 1): The number of shards each index has. This parameter must be set before the graph database is indexed for the first time.numberOfReplicas (default: 1): The number of replica each shard has. This parameter must be set before the graph database is indexed for the first time.Example configuration:
{
  "dataSources": [
    {
      "graph": {
        "vendor": "neo4j",
        "url": "http://127.0.0.1:7474"
      },
      "index": {
        "vendor": "elasticSearch",
        "host": "192.168.1.122",
        "port": 9200,
        "skipEdgeIndexation": true
      }
    }
  ]
}
Please check here how to configure search on numerical and date properties.
By default, Linkurious Enterprise ships with an embedded Elasticsearch instance which works out-of-the-box by default. The embedded Elasticsearch instance will work well for average to large database sizes, but for search-heavy use-cases or very large databases, configuring your own Elasticsearch cluster might be necessary.
An easy way to deploy an easy-to-scale Elasticsearch cluster yourself is to use Amazon Web Services (AWS).
Please follow these steps to create a configure your AWS Elasticsearch cluster with Linkurious Enterprise:
Visit the Amazon Web Services website and create your account (or log in if you already have one).
Visit the Amazon Elasticsearch Service page, log-in and follow the steps to create an Elasticsearch cluster:
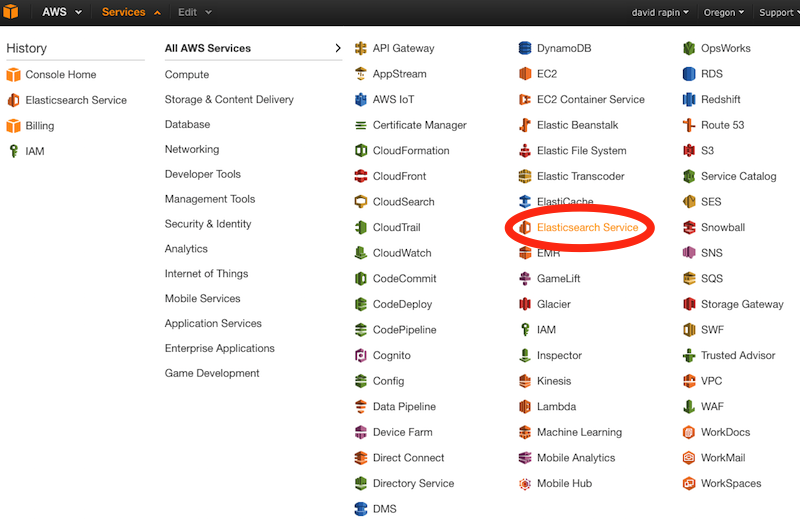
Select Services > Elasticsearch Service
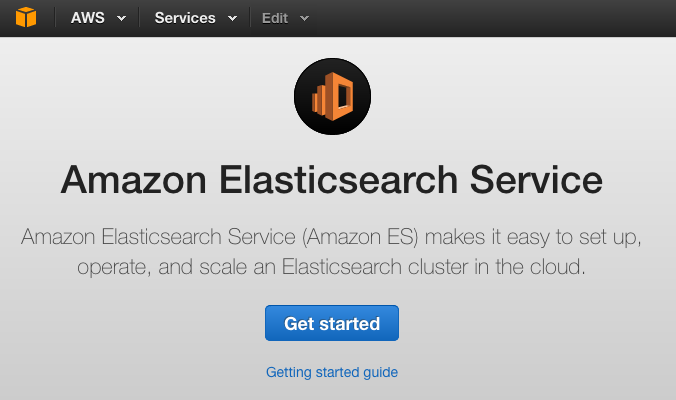
Click get started
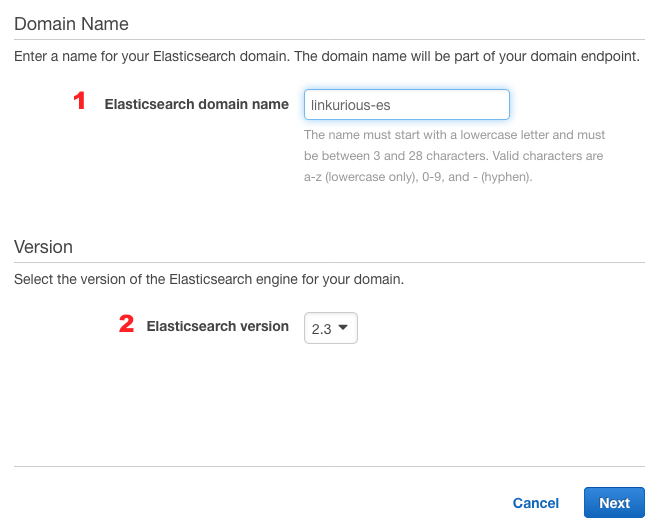
Name your cluster (1) and select the Elasticsearch version 2.x (2), click Next
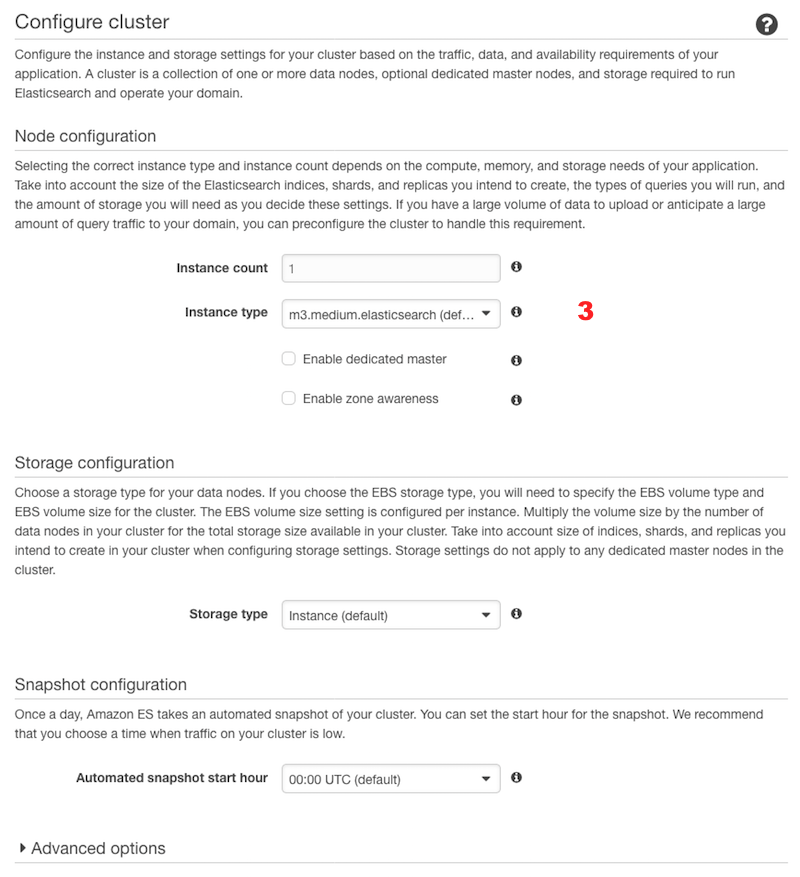
Select the instance type, the number of instances and the number of dedicated masters in your cluster (3), depending on your database's size
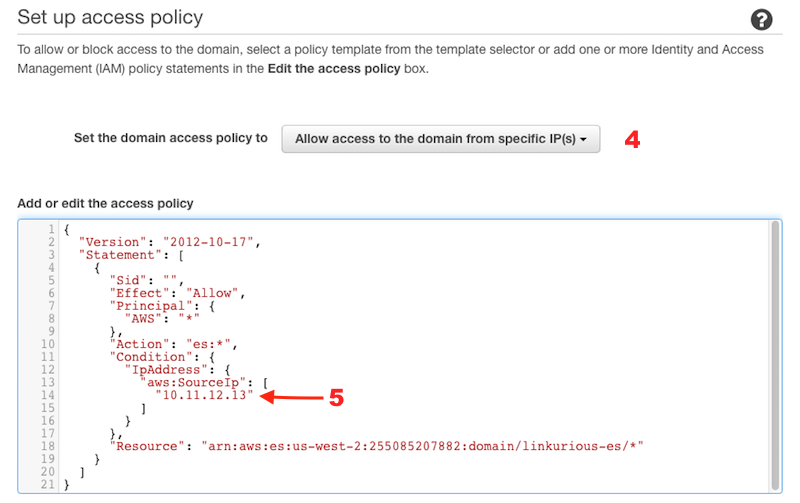
Configure the access policy for your cluster. Use access from specific IP (4) and enter the public IP address of your Linkurious Enterprise server (5)
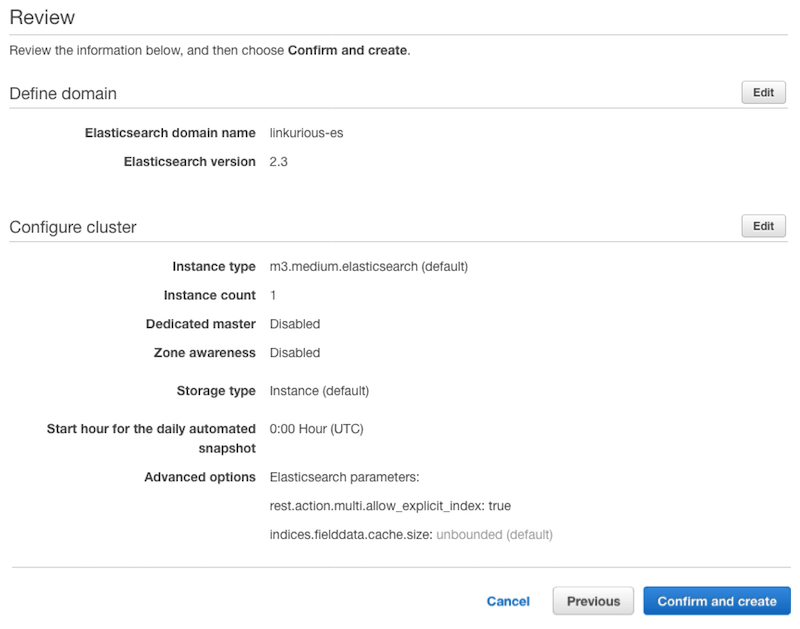
Review your configuration and confirm the creation of the cluster
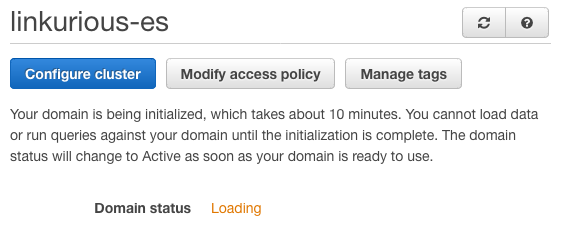
Wait until the cluster is deployed (usually less than an hour)
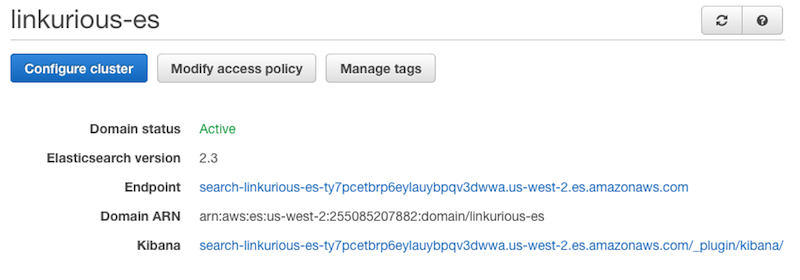
When your cluster is deployed, copy the Endpoint host name
Configure Elasticsearch as explained here
Incremental indexing allows you to keep in sync your Elasticsearch index and your Neo4j graph database.
Linkurious Enterprise will index at a regular interval new and updated items from your database. This way, you avoid a complete reindex every time you update your data.
This is achieved by keeping track of a timestamp on every node and edge in the database, hereby allowing the indexer to only consider the nodes with newer timestamps and consequently reducing the indexing time.
You should consider this option if your database holds a significant number of items and needs to be updated frequently.
Here some important considerations when choosing incremental indexing:
Linkurious Enterprise relies on APOC triggers to ensure that every node and edge created or updated has a timestamp.
You need to make sure that you have installed APOC correctly and enabled APOC triggers. You can find all the information you need to install APOC from Neo4j documentation.
You can quickly verify that you have installed everything correctly by executing the following command from your Neo4j browser:
CALL apoc.trigger.list()
Your need to carefully choose the property that will hold the timestamp on every node/edge of your database. The consequence of this choice is that Linkurious Enterprise will create triggers that will store a timestamp on this property for all new and updated nodes/edges.
This means that any information stored on that property will be overwritten by the trigger
After you have installed and configured APOC, you can enable incremental indexing from the data-source configuration page or by editing the configuration file with the following options:
incrementalIndexation You can enable incremental indexing by switching this option to true.timestampPropertyName You must then provide the timestamp property name to keep track of during
incremental indexing. E.g: “lastEditTimestamp”.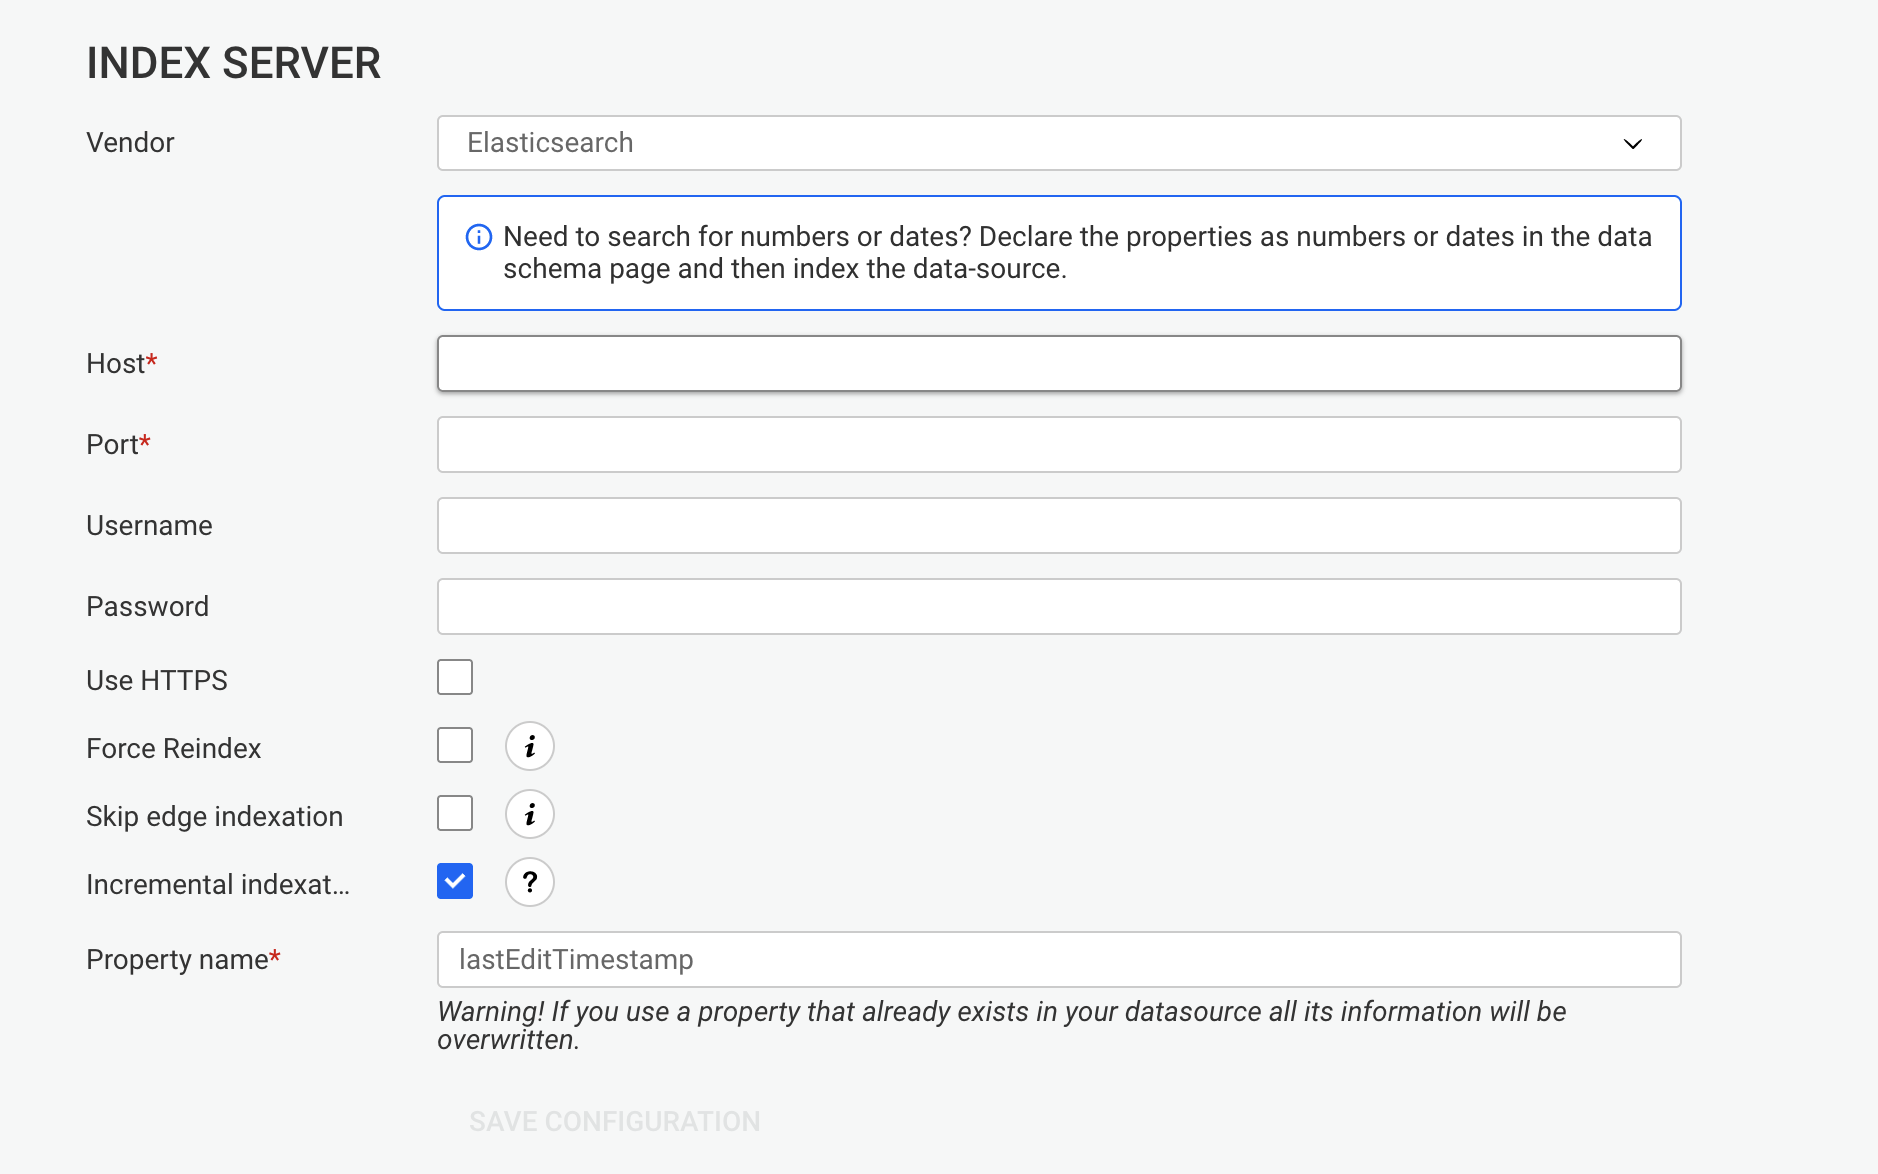
After you have enabled incremental indexing for the first time, Linkurious Enterprise requires to perform a complete re-indexing of the data-source to ensure that every item has been indexed. You simply need to click on the "Start indexing" button to complete the configuration.
Linkurious Enterprise will index your data-source incrementally from that point forward using the timestamps generated by the APOC triggers.
Once you have set up the incremental indexation, you can configure the frequency at which it will be triggered. You can customize this schedule by adding a cron expression to your Elasticsearch configuration.
You can make this change from the configuration file located at linkurious/data/config/production.json under datasources.index for each dataSource.
By default, we have set all incremental indexing to be launched every Sunday at 12PM, but you can change it to the frequency that most suits your needs. We advise that you schedule your increments to run after you have updated your database with new information. Here are some examples of cron expressions:
"incrementalIndexationCron": "*/5 * * * *""incrementalIndexationCron": "*/30 * * * *""incrementalIndexationCron": "0 * * * *""incrementalIndexationCron": "00 15 * * *""incrementalIndexationCron": "00 00 1,15 * *""incrementalIndexationCron": "00 00 1 * *"If you need to index your data-source at non-regular intervals:
You can disable automatic indexing with the following configuration: "incrementalIndexationCron": "none"
Elasticsearch is required to be able to perform numerical and date search.
To properly configure Elasticsearch for number and date search please follow these steps:
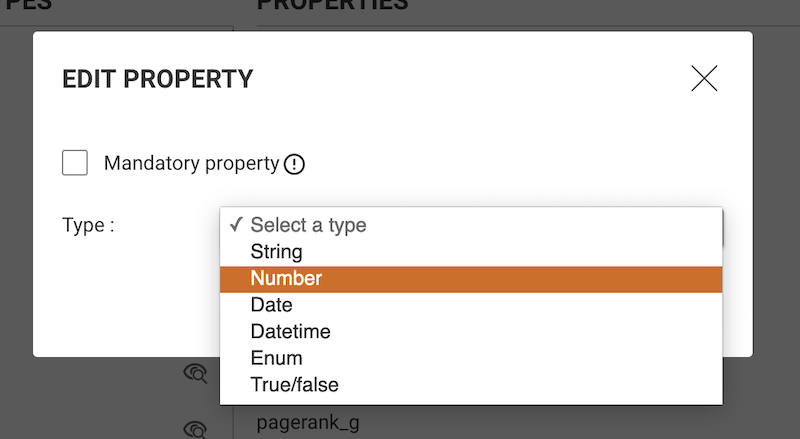

Note that if you change the types after the indexing, you will need to re-index for the changes to apply.
Linkurious Enterprise uses an SQL database to store user-data. The database contains:
By default, the user-data store is a SQLite file-based database. This makes Linkurious Enterprise easy to deploy.
For deployment at scale (more than a couple users), we recommend switching to one of the supported server-based databases:
To see the exact list of supported vendors and versions, please review the compatibility matrix.
In order to get started with Linkurious Enterprise, there are few requirements for user-data store to function properly.
In order to create a new linkurious database and an associated user, refer to your team of database experts to comply with possible internal policies. Below is an example of typical queries you can use (replace SQL_USER_NAME, SQL_PASSWORD, and SQL_HOST by actual values).
CREATE USER 'SQL_USER_NAME'@'SQL_HOST' IDENTIFIED BY 'SQL_PASSWORD';
CREATE DATABASE linkurious;
GRANT ALL PRIVILEGES ON linkurious.* TO 'SQL_USER_NAME'@'SQL_HOST';
Please note that custom
sql_modein MariaDB and MySQL is not supported. Linkurious Enterprise only supports the default value forsql_mode.
CREATE DATABASE linkurious;
CREATE LOGIN SQL_USER_NAME WITH PASSWORD = 'SQL_PASSWORD', DEFAULT_DATABASE = linkurious;
USE linkurious;
CREATE USER SQL_USER_NAME FOR LOGIN SQL_USER_NAME;
EXEC sp_addrolemember 'db_owner', SQL_USER_NAME;
Linkurious Enterprise provides many options which can be used to configure user-data store connection. Below, you can find the configuration documentation and configuration examples for popular DBMS solutions.
In the Linkurious Enterprise configuration file, it is possible to configure the database connection under db key.
name (default: "linkurious"): Database name for Linkurious Enterprise to use.username (optional): Username for the database userpassword (optional): Password for the database useroptions: Child object that contains connection optionsdialect (default: "sqlite"): The database dialect to be used. Supports: "sqlite", "mysql", "mariadb", "mssql" host: Host address of the databaseport: Port address of the databasestorage (only for "sqlite"): Storage location for the database filedialectOptions (optional): Child object that contains dialect specific additional options ssl (default: false, boolean): Whether to use SSL for database connectionencrypt (default: false, boolean): Whether to enable encryption (useful for cloud instances with encryption enabled by default)multiSubnetFailover (default: false, boolean): Whether the driver attempts parallel connections to the failover IP addresses during a multi-subnet failover for higher availability.SQLite if the default user-data store of Linkurious Enterprise.
"db": {
    "name": "linkurious",
    "options": {
      "dialect": "sqlite",
      "storage": "server/database.sqlite"
    }
}
"db": {
    "name": "linkurious",
    "username": "MYSQL_USER_NAME",
    "password": "MYSQL_PASSWORD",
    "options": {
      "dialect": "mysql",
      "host": "MYSQL_HOST",
      "port": 3306
    }
}
"db": {
    "name": "linkurious",
    "username": "MSSQL_USER_NAME",
    "password": "MSSQL_PASSWORD",
    "options": {
      "dialect": "mssql",
      "host": "MSSQL_HOST",
      "port": 1433
    }
}
"db": {
    "name": "linkurious",
    "username": "MARIADB_USER_NAME",
    "password": "MARIADB_PASSWORD",
    "options": {
      "dialect": "mariadb",
      "host": "MARIADB_HOST",
      "port": 3306
    }
}
The default storage system for Linkurious Enterprise is SQLite.
Configuring Linkurious Enterprise to work with MySQL is a really easy procedure if you don't need to migrate data from SQLite.
Migrating data from SQLite to an external database is possible but it is a procedure we would recommend only if restarting from scratch with the new configuration is not a viable option.
Our public resources contain a specific tool needed to perform the migration from SQLite to one of the supported databases, as well as the detailed list of steps to use and eventually configure the tool.
If you need help with the procedure please contact us at support@linkurio.us.
If you are using the SQLite database (by default), you only need to follow the standard Linkurious Enterprise backup procedure.
If you are using another database to store the Linkurious Enterprise user-data, please refer to one of the following guides:
The web server of Linkurious Enterprise delivers the application to end users through HTTP/S.
It is configured in the server configuration key within the configuration
file (linkurious/data/config/production.json):
Within the server key:
listenPort (default: 3000): The port of the web serverSome firewalls block network traffic ports other than 80 (HTTP).
Since only root users can listen on ports lower than 1024,
you may want reroute traffic from 80 to 3000 as follows:
sudo iptables -t nat -A PREROUTING -p tcp --dport 80 -j REDIRECT --to-port 3000
If you use SSL, you can add a second rule to redirect 3443 to 443:
sudo iptables -t nat -A PREROUTING -p tcp --dport 443 -j REDIRECT --to-port 3443
Within the server key:
baseFolder (default: /): The base path where Linkurious Enterprise will be foundIn some cases, you may want to host Linkurious Enterprise on a path other than root for a particular domain.
For example, if you want Linkurious Enterprise to be reachable at http(s)://HOST:PORT/linkurious you should
set baseFolder equal to linkurious.
Within the server key:
domain (default: "localhost"): The domain or sub-domain used to access the web server.
It is mandatory to edit it for publishing visualizations online.
It is also used to restrict the validity of cookies to a domain or sub-domain.publicPortHttp (default: listenPort): The public HTTP port of the web server.publicPortHttps (default: listenPortHttps): The public HTTPS port of the web server.In some cases, Linkurious Enterprise needs to generate links to itself (for example when generating a link to a widget). For that, the server needs to know its public domain and port to generate those links.
The public port can be different from the actual port if you use traffic rerouting
(using a firewall or a reverse-proxy). In the example above (traffic rerouting),
the actual HTTP port (listenPort) is 3000, but the public HTTP port (publicPortHttp)
is 80.
Within the server key:
cookieSecret (optional): Set the secret used as a seed to compute cookie strings.cookieDomain (optional): Set this value if you need your cookie to be set for a domain
different from domain.cookieHttpOnly (default: true): Set the httpOnly flag of your cookies, so that they
cannot be accessed using JavaScript.cookieSecure (default: false): Set the secure flag of your cookies so that they are
only served via HTTPS (note: if Linkurious Enterprise is behind a reverse proxy, see trustedReverseProxies).cookieSameSite (default: "lax"): set to "none" to allow cookies to be set when Linkurious Enterprise
is embedded in an iframe.trustedReverseProxies (optional): array of reverse proxies to trust, to be used when cookieSecure
is enabled and the server is running behind a reverse proxy. This will cause the server to
trust the following headers set by the reserve proxy: X-Forwarded-For, X-Forwarded-Host,
and X-Forwarded-Proto. Example value: ["loopback", "123.123.123", "192.168.1.0/16"].
The array can contain a mix of:"192.168.1.150")"192.168.0.0/16")"loopback" (for "127.0.0.1/8" + "::1/128")"linklocal" (for "169.254.0.0/16" + "fe80::/10")"uniquelocal" (for "10.0.0.0/8" + "172.16.0.0/12" + "192.168.0.0/16" + "fc00::/7")Within the server key:
allowOrigin: Define the cross-origin resource sharing (CORS) policy.
Accept cross-site HTTP/S requests by default. The value can be:"abc.com"): only requests from "abc.com" domain are allowed."*.abc.com"): request from all sub-domains of abc.com are allowed.["abc.com", "*.def.com"]): requests from abc.com and all sub-domains of def.com are allowed."*"): requests from any domain are allowed.Linkurious Enterprise can be embedded in another Web page via an iframe under certain technical conditions.
This can be tricky due to modern Web browser security mechanisms.
Follow these steps:
https://app.example.com (domain: example.com), then Linkurious Enterprise
must be served under another subdomain of example.com, e.g. https://linkurious.example.com.server.cookieSameSite to "none" in the
configuration (see why).server.allowFraming to true. This will tell Linkurious Enterprise to disable
the default iframe protection by not setting the X-Frame-Options:SAMEORIGIN HTTP header.Within the server key:
customHTTPHeaders (optional): For compliance, custom HTTP headers can be added.
These headers will be returned in each HTTP response from the Web server.Example:
"customHTTPHeaders": {
  "header1": "value1",
  "header2": "value2"
}
Note: Some header keys are reserved for Linkurious Enterprise and will be overwritten by the server to default values.
Within the ogma.settings.render key:
imgCrossOrigin (default: "anonymous"): Restrict the origin of images
displayed in visualizations to prevent running malicious code on the graphic card of users.
Display images from any origin by default. Read here to learn more.It is possible to disable the gzip compression for dynamic content that is returned by the Linkurious Enterprise server.
Within the server key:
disableCompression (default: false): Disable gzip compression for dynamic content when set to true.If you want to enable content-security-policy for Linkurious Enterprise, you need to use the custom HTTP Headers option of the Web server. The policies required for the application to work are:
default-src 'self': allow scripts, styles and images hosted by Linkurious Enterprise (referenced by URL)default-src 'unsafe-inline': allow code in <script> tags in pages hosted by Linkurious Enterprisedefault-src blob:: to allow running WebWorkers with Blob sources (required to run graph layouts)As a consequence, the recommended CSP policy is:
"customHTTPHeaders": {
  "Content-Security-Policy": "default-src 'self' 'unsafe-inline' blob:"
}
Within the server key:
listenPortHttps (default: 3443): The port of the web server if HTTPS is enabled. See the Install section to learn why you should not set 443 directly.useHttps (default: false): Encrypt communications through HTTPS if true. Requires a valid SSL certificate.forceHttps (default: false): Force all traffic to use HTTPS only if true.forcePublicHttps (default: false): Force all generated URL in Linkurious Enterprise to use HTTPS (useful when HTTPS is not enabled in Linkurious Enterprise but offered by an external reverse proxy).
The server will redirect HTTP GET requests to HTTPS and reject all other HTTP requests.certificateFile: The relative path to the SSL certificate (must be in PEM format, located within the linkurious/data folder).certificateKeyFile: The relative path to a private key of the SSL certificate (must be in PEM format, located within the linkurious/data folder).certificatePassphrase: The pass-phrase protecting the SSL certificate (if any).tlsCipherList (optional): The ciphers supported by any connection established by Linkurious Enterprise as a server or client. It expects a string in OpenSSL cipher list format. The default value is tls.DEFAULT_CIPHERS.External communications with the Linkurious Enterprise server can be secured using SSL without installing third-party software.
If the Linkurious Enterprise server, graph database, and the search index are installed on different machines, we recommend using secure communication channels between these machines (e.g. HTTPS or WSS). Please refer to the data-source documentation and search index documentation to learn how to enable HTTPS.
To use custom Certificate Authorities (CA), please check how to use additional Certificate Authorities in Linkurious Enterprise.
The TLS protocol versions supported by Linkurious Enterprise are v1.0, v1.1, v1.2 and v1.3. By default, TLS v1.0 and v1.1 are disabled.
If you want to change the enabled versions of the TLS protocol:
- Stop Linkurious Enterprise
- Open the file at
data/manager/manager.jsonand add a line above"server/app.js",(for example: add"--tls-min-v1.3",to disable all versions of TLS bellow v1.3)- After the change, save the file and restart Linkurious Enterprise.
Available options (source):
--tls-min-v1.0: only enable TLS v1.0 and above--tls-min-v1.1: only enable TLS v1.1 and above--tls-min-v1.2: only enable TLS v1.2 and above (default)--tls-min-v1.3: only enable TLS v1.3 and aboveTo customize the exact list of ciphers used by the TLS protocol, see tlsCipherList in the
server configuration above.
When Linkurious Enterprise is started for the first time, authentication has to be set up so that users can access the platform.
There are 2 possible authentication options:
By default, when you access Linkurious Enterprise for the first time, you
need to create a local administrator account, unless an
external authentication provider has been configured and
an external group is mapped into the admin group
(see group mapping).
In order to create this first admin account, you need
to provide a valid license as a proof of ownership
of your Linkurious Enterprise instance.
Once this local administrator account has been created, it can be used to connect to Linkurious Enterprise and create other user accounts (see how to create users).
Passwords of local users are hashed with the PBKDF2 algorithm and the following parameters:
When using an external source for authentication, users are automatically created in Linkurious Enterprise when they connect for the first time.
These shadow users allow to store specific data such as preferences, groups, and visualizations.
Passwords of external users are never stored within Linkurious Enterprise.
Linkurious Enterprise supports the following external authentication services:
If your company uses an authentication service that Linkurious Enterprise does not support yet, please get in touch.
If you enable a Single-Sign-On (SSO) capable authentication service (OAuth/OpenID Connect or SAML2), your users don't need to sign in directly in Linkurious Enterprise. They instead sign in by clicking the SSO button and are then redirected to the identity provider for authentication.
If an external source already organizes users into groups, it's possible to use this information to automatically map
external groups into Linkurious groups. To do so, you have to set the access.externalUsersGroupMapping configuration key
to be an object with the external group IDs as keys and the internal group IDs, group names, or a combination of both as values
(you can map both built-in and custom groups).
For example, if you want to provide group mapping for Microsoft Active Directory:
{ // under the access configuration key
  // ...
  "externalUsersGroupMapping": {
    "Administrators": 1 // any Active Directory admin is a Linkurious admin ("1" being the id of the admin built-in group)
    "DataAnalysts": "analyst" // any Active Directory data analyst will be assigned to the "analyst" custom group of each data source(s) containing a group with that name
    "ProductManagers": [3, "product manager"] // any Active Directory product manager will be assigned to the group with id "3" and to the "product manager" custom group of each data source(s) containing a group with that name
  }
  // ...
}
The built-in group names that you can use are the following:
adminread onlyread (which corresponds to "Read and run queries" in the UI)read and editread, edit and deletesource managerGroup name case sensitivity depends on the user-data-store vendor and collation.
For some identity providers, the external group IDs are an actual name; for others, it is an ID:
"818b6e03-15dd-4e19-8cb1-a4f434b40a04"access.ldap.groupField"Administrators" or the group distinguished name, e.g. "CN=Administrators,CN=Users,DC=linkurious,DC=local"To exclude some groups of users from signing in into Linkurious, set up a list of
authorized groups in the configuration key access.externalUsersAllowedGroups.
{ // under the access configuration key
  // ...
  "externalUsersAllowedGroups": [
    "CN=Administrators,CN=Users,DC=linkurious,DC=local",
    "CN=Analysts,CN=Users,DC=linkurious,DC=local"
  ]
  // ...
}
By default, when an external user is connected for the first time, their external groups are mapped once.
So any change in the user's group in the external source would not be reflected in the Linkurious Enterprise user.
However, setting autoRefreshGroupMapping to true makes an external user's groups
to be reset according to externalUsersGroupMapping, each time the external user signs in.
{ // under the access configuration key
  // ...
  "autoRefreshGroupMapping": true,
  // ...
}
Note that when autoRefreshGroupMapping is true updating external users' groups from within Linkurious Enterprise is not allowed.
When using SSO to sign in to Linkurious Enterprise, if the identity provider groups are mapped to more than one built-in group, Linkurious Enterprise will choose the one with the highest permissions per data-source and ignore the other groups. If
adminbuilt-in group is used, it will override the other groups.
If Linkurious Enterprise is connected to an LDAP service, users will be authenticated using the external service at each log-in.
If you have a LDAP service running in your network, you can use it to authenticate users in Linkurious Enterprise.
Contact your network administrator to ensure that the machine where Linkurious Enterprise is installed can connect to the LDAP service.
For OpenLDAP compatible providers, add or edit the existing ldap section inside the access configuration.
Allowed options in access.ldap:
enabled: true to enable this authentication strategyurl: URL of the LDAP serverbindDN (optional): "Domain Name" of the LDAP account used to search other accountsbindPassword (optional): Password of the LDAP account used to search other accountsbaseDN: Base "Domain Name" in which users will be searched. It can be a string or a non-empty array of stringsusernameField: Name of the LDAP attribute containing the user's nameemailField: Name of the LDAP attribute containing the user's e-mailgroupField (optional): Name of the LDAP attribute containing the user's groupThe bindDN and bindPassword are optional. If specified they will be used to bind to the LDAP server.
Example LDAP configuration:
"access": {
  // [...]
  "ldap": {
    "enabled": true,
    "url": "ldap://ldap.forumsys.com:389",
    "bindDN": "cn=read-only-admin,dc=example,dc=com",
    "bindPassword": "password",
    "baseDN": ["dc=example,dc=com"],
    "usernameField": "uid",
    "emailField": "mail",
    "groupField": "group"
  }
}
You can configure Linkurious Enterprise to connect to multiple LDAP services.
During the authentication process, Linkurious Enterprise will validate the user credentials against each LDAP service and use the identity resolved by the first successful attempt, following the order in which they appear in the configuration.
Example with multiple LDAP configurations:
"access": {
  // [...]
  "ldap": [
    {
        "enabled": true,
        "url": "ldap://linkurious.fr:389",
        "bindDN": "cn=read-only-admin,dc=example,dc=com",
        "bindPassword": "password",
        "baseDN": ["dc=example,dc=com"],
        "usernameField": "uid",
        "emailField": "mail",
        "groupField": "group"
    },
    {
        "enabled": true,
        "url": "ldap://linkurious.com:389",
        "bindDN": "cn=read-only-admin,dc=example,dc=com",
        "bindPassword": "password",
        "baseDN": ["dc=example,dc=com"],
        "usernameField": "uid",
        "emailField": "mail",
        "groupField": "group"
    }
  ]
}
For Microsoft Active Directory, add a msActiveDirectory section inside the access configuration.
Allowed options in access.msActiveDirectory:
enabled: true to enable this authentication strategyurl: URL of the Active Directory serverbaseDN: Base "Domain Name" in which users will be searcheddomain: (optional) Domain of your Active Directory servernetbiosDomain: (optional) NetBIOS domain of your Active Directory servertls.rejectUnauthorized: (optional) Whether the SSL certificate of your Active Directory server will be checkedsupportNestedGroups: (optional, default: true) Whether you want Linkurious to resolve nested hieararchy in parent groupsUsers can authenticate with their userPrincipalName or their sAMAccountName.
Use the domain configuration key to avoid your users to specify the domain part of their userPrincipalName.
Use the netbiosDomain configuration key to avoid your users to specify the NetBIOS domain part of their sAMAccountName.
Example Active Directory configuration:
"access": {
  // [...]
  "msActiveDirectory": {
    "enabled": true,
    "url": "ldaps://ldap.lks.com:636",
    "baseDN": "dc=ldap,dc=lks,dc=com",
    "domain": "ldap.lks.com",
    "netbiosDomain": "LINKURIO",
    "tls": {
      "rejectUnauthorized": true
    }
  }
}
In alternative is possible to use your on premises Active Directory in conjunction with Azure Active Directory to provide SSO to your users. Please refer to Prerequisites for Azure AD Connect for more information and to SSO with Azure AD to know how to setup Azure AD as an identity provider.
You can configure Linkurious Enterprise to connect to multiple Active Directory services.
During the authentication process, Linkurious Enterprise will validate the user credentials against each Active Directory service and use the identity resolved by the first successful attempt, following the order in which they appear in the configuration.
Example with multiple Active Directory configurations:
"access": {
  // [...]
  "msActiveDirectory": [
    {
        "enabled": true,
        "url": "ldaps://ldap.lks.us:636",
        "baseDN": "dc=ldap,dc=lks,dc=us",
        "domain": "ldap.lks.us",
        "netbiosDomain": "LINKURIOUS",
        "tls": {
          "rejectUnauthorized": true
        }
    },
    {
        "enabled": true,
        "url": "ldaps://ldap.lks.fr:636",
        "baseDN": "dc=ldap,dc=lks,dc=fr",
        "domain": "ldap.lks.fr",
        "netbiosDomain": "LINKURIOUS"
    }
  ]
}
Linkurious Enterprise supports Microsoft Azure Active Directory as an external authentication provider.
To set up Linkurious Enterprise authentication with Microsoft Azure Active Directory, follow these steps:
Linkurious in Azure Active Directory on Azure PortalDirectory.Read.All access right to the new app (notice: an Azure admin's approval is needed)authorizationURL, e.g. https://login.microsoftonline.com/60d78xxx-xxxx-xxxx-xxxx-xxxxxx9ca39b/oauth2/authorizetokenURL, e.g. https://login.microsoftonline.com/60d78xxx-xxxx-xxxx-xxxx-xxxxxx9ca39b/oauth2/tokenclientID, e.g. 91d426e2-xxx-xxxx-xxxx-989f89b6b2a2clientSecret, e.g. gt7BHSnoIffbxxxxxxxxxxxxxxxxxxtyAG5xDotC8I=tenantID, (optional, required only for group mapping) e.g. 60d78xxx-xxxx-xxxx-xxxx-xxxxxx9ca39boauth2 section inside the access section in linkurious/data/config/production.jsonExample access.oauth2 configuration with Microsoft Azure Active Directory:
"access": {
  // [...]
  "oauth2": {
    "enabled": true,
    "provider": "azure",
    "authorizationURL": "https://login.microsoftonline.com/XXXXXXXX-XXXX-XXXX-XXXX-XXXXXXXXXXXX/oauth2/authorize",
    "tokenURL": "https://login.microsoftonline.com/XXXXXXXX-XXXX-XXXX-XXXX-XXXXXXXXXXXX/oauth2/token",
    "clientID": "XXXXXXXX-XXX-XXXX-XXXX-XXXXXXXXXXXX",
    "clientSecret": "XXXXXXXXXXXXXXXXXXXXXXXXXXXXXXXXXXXXXXXXXXX",
    "azure": {
      "tenantID": "XXXXXXXX-XXXX-XXXX-XXXX-XXXXXXXXXXXX"
    }
  }
}
The OAuth2 redirect URL of Linkurious Enterprise is the following:
http(s)://HOST:PORT/api/auth/sso/return.
Linkurious Enterprise supports Google as an external authentication provider with Single Sign-On.
Since Google implements the OpenID Connect standard, it can be configured as an OpenID Connect provider in Linkurious Enterprise.
To set up Linkurious Enterprise authentication with Google, follow these steps:
authorizationURL, e.g. https://accounts.google.com/o/oauth2/v2/authtokenURL, e.g. https://www.googleapis.com/oauth2/v4/tokenclientID, e.g. 1718xxxxxx-xxxxxxxxxxxxxxxx.apps.googleusercontent.comclientSecret, e.g. E09dQxxxxxxxxxxxxxxxxSNoauth2 section inside the access section in linkurious/data/config/production.jsonTo limit the access to the Google accounts from your domain, use
the hd query parameter in the authorizationURL with your domain as value.
Example access.oauth2 configuration with Google:
"access": {
  // [...]
  "oauth2": {
    "enabled": true,
    "provider": "openidconnect",
    "authorizationURL": "https://accounts.google.com/o/oauth2/v2/auth?hd=YOUR_DOMAIN",
    "tokenURL": "https://www.googleapis.com/oauth2/v4/token",
    "clientID": "XXXXXXXXXX-XXXXXXXXXXXXXXXX.apps.googleusercontent.com",
    "clientSecret": "XXXXXXXXXXXXXXXXXXXXXXX"
  }
}
The OAuth2 redirect URL of Linkurious Enterprise is the following:
http(s)://HOST:PORT/api/auth/sso/return.
This redirect url will need to be added in the Authorized redirect URls section of the credentials section on your Google Developers console
Linkurious Enterprise supports any OpenID Connect compatible provider as external authentication providers.
OpenID Connect is an identity layer on top of the OAuth2 protocol. It allows applications (like Linkurious Enterprise) to verify the identity of End-User based on the authentication performed by an Authorization Server, as well as to obtain basic profile information about the End-User in an interoperable manner.
To set up Linkurious Enterprise authentication with an OpenID Connect provider, you need to obtain the following parameters from the provider:
authorizationURL, e.g. https://accounts.google.com/o/oauth2/v2/authtokenURL, e.g. https://www.googleapis.com/oauth2/v4/tokenclientID, e.g. 1718xxxxxx-xxxxxxxxxxxxxxxx.apps.googleusercontent.comclientSecret, e.g. E09dQxxxxxxxxxxxxxxxxSNExample access.oauth2 configuration with any OpenID Connect provider:
"access": {
  // [...]
  "oauth2": {
    "enabled": true,
    "provider": "openidconnect",
    "authorizationURL": "https://accounts.google.com/o/oauth2/v2/auth",
    "tokenURL": "https://www.googleapis.com/oauth2/v4/token",
    "clientID": "XXXXXXXXXX-XXXXXXXXXXXXXXXX.apps.googleusercontent.com",
    "clientSecret": "XXXXXXXXXXXXXXXXXXXXXXX"
  }
}
The OAuth2 redirect URL of Linkurious Enterprise is the following:
http(s)://HOST:PORT/api/auth/sso/return.
To set up group mapping in OpenID Connect is necessary to specify additional configuration keys:
openidconnect.userinfoURL, e.g. https://XXXXXXXXXX.oktapreview.com/oauth2/v1/userinfoopenidconnect.scope, e.g. openid profile email groupsopenidconnect.groupClaim, e.g. groupsFor example if you want to set up OIDC with Okta:
"access": {
  // [...]
  "oauth2": {
    "enabled": true,
    "provider": "openidconnect",
    "authorizationURL": "https://XXXXXXXXXX.oktapreview.com/oauth2/v1/authorize",
    "tokenURL": "https://XXXXXXXXXX.oktapreview.com/oauth2/v1/token",
    "clientID": "XXXXXXXXXXXXXXXXXXXXXXX",
    "clientSecret": "XXXXXXXXXXXXXXXXXXXXXXX",
    "openidconnect": {
      "userinfoURL": "https://XXXXXXXXXX.oktapreview.com/oauth2/v1/userinfo",
      "scope": "openid profile email groups",
      "groupClaim": "groups"
    }
}
Linkurious Enterprise supports any SAML2 compatible provider as external authentication providers.
To set up Linkurious Enterprise authentication with a SAML2 provider, you need to obtain the following parameters from the provider:
url: The URL of the SAML2 endpoint of the identity provider (e.g. "https://example.com/adfs/ls"`),identityProviderCertificate: The certificate of the identity provider in PEM format (e.g. "/Users/example/linkurious/samlIdentityProvider.pem")groupAttribute (optional): The attribute in which the groups of the users is stored (e.g. "Groups")emailAttribute (optional): The attribute in which the email of the users is storedgroupAttribute is the attribute of the SAML response containing the array of groups a user belongs to.
emailAttribute is the attribute of the SAML response that should contain the email address if the NameID format
of the SAML response is not already an email.
Example access.saml2 configuration with any SAML2 provider:
"access": {
  // [...]
  "saml2": {
    "enabled": true,
    "url": "https://example.com/adfs/ls",
    "identityProviderCertificate": "/Users/example/linkurious/saml.pem",
    "groupAttribute": "Groups"
  },
}
To complete the login process, you need to configure your identity provider
to return the SAML response to Linkurious Enterprise at the following URL:
http(s)://HOST:PORT/api/auth/sso/return.
Please note that encrypted assertions are not supported by Linkurious Enterprise.
In particular, ADFS (Active Directory Federation Services) is a SAML2 provider that offers Single-Sign-On towards an Active Directory service, see more on Microsoft documentation.
To set up Linkurious Enterprise authentication with ADFS, Linkurious Enterprise has to be configured as a Relying Party Trust in ADFS (see how to configure the ADFS on the Microsoft documentation).
To set up group mapping, the list of groups associated to a user should be passed in the SAML2 response. See how to configure a claim for the groups on the Microsoft documentation.
The authentication is configured within the access configuration key
in the configuration file (linkurious/data/config/production.json):
authRequired (default: true): Whether to require authentication
(see below how to enable or disable authentication).
guestMode (default: false): Enable the guest mode.
loginTimeout (default: Infinity): Seconds of inactivity after which a user is logged out.
dataEdition (default: true): Enable the creation, edition, and deletion of nodes and edges in all data-sources.
Permissions can be fine-tuned for each group, see the documentation about users and groups.
If set to false, all edition requests sent through Linkurious Enterprise to the data-sources will be rejected.
widget (default: true): Enable to publish visualizations online.
Published visualizations are always accessible by anonymous users.
externalUsersGroupMapping (optional): How to map external groups to Linkurious Enterprise groups
(see how to configure group mapping).
externalUsersAllowedGroups (optional): List of external groups of users allowed to log in into Linkurious Enterprise.
externalUserDefaultGroupId (optional): Default group id automatically set for new external users
when no other rule is set in externalUsersGroupMapping. This configuration setting should not be used when autoRefreshGroupMapping
is true, otherwise it may result in users with no groups to have no access to the data-source.
autoRefreshGroupMapping (default: false): If true, when an external user logs in, their groups are reset
according to externalUsersGroupMapping and are also not allowed to be updated.
ldap (optional): The connection to the LDAP service (see how to configure LDAP).
msActiveDirectory (optional): The connection to the Microsoft Active Directory service
(see how to configure Active Directory).
oauth2 (optional): The connection to an OAuth2/OpenID Connect identity provider
(see how to configure Azure AD, Google or a generic OpenID Connect provider).
saml2 (optional): The connection to a SAML2 identity provider (see how to configure SAML2 / ADFS).
floatingLicenses (default: Infinity): The maximum number of users that can connect to Linkurious Enterprise at the same time.
To access Linkurious Enterprise when authRequired is true, users need accounts in Linkurious Enterprise.
Administrators can create accounts directly in Linkurious Enterprise (see how to create users)
or rely on an external authentication service.
Linkurious Enterprise supports the following external authentication services:
If your company uses an authentication service that Linkurious Enterprise does not support yet, please get in touch.
When opting for external authentication, it is recommended to have at least one local administrator account configured as a fallback in case the third party authentication provider is unavailable.
Authentication can be disabled by setting authRequired to false.
When user authentication is disabled, all actions are performed under
the special account named Unique User. The unique user has unrestricted
access and does not require a password, so anyone can access the platform.
We strongly discourage you to disable user authentication, as this leaves your data accessible to anyone. This option should only be considered in the case of a standalone local installation for evaluation or demonstration purposes.
If local authentication is disabled, it can be enabled from Linkurious Enterprise user interface.
Once local authentication is enabled, users need an account to access Linkurious Enterprise. Administrators can create accounts directly in Linkurious Enterprise (see how to create users).
To enable authentication use the Web user interface via the Admin > Users menu:
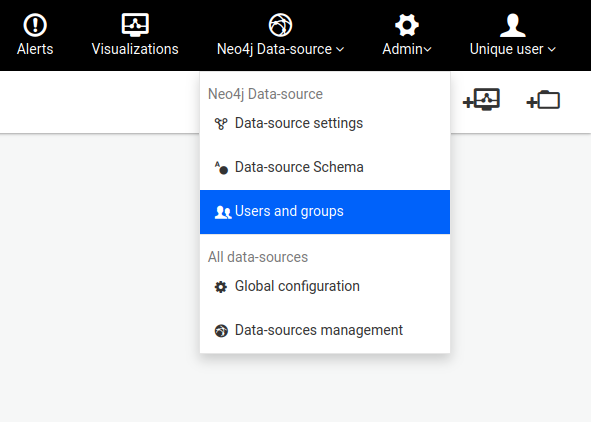
The following screen will be prompted if authentication is disabled. Click Enable Authentication.
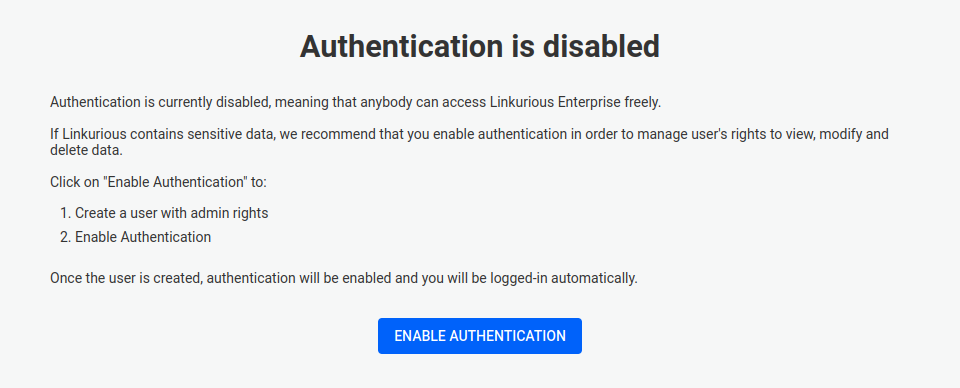
Create an admin account and click Save and enable.
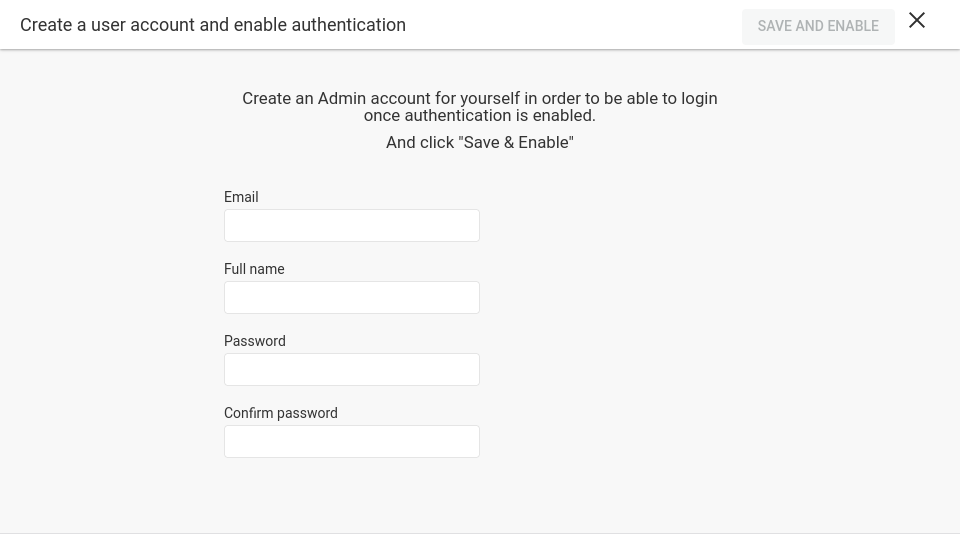
When access.floatingLicenses is defined, this is the behavior when a new user tries to log
into the server while it is full:
This page is accessed via Admin > Users & Groups in the main menu. The page lists all users, both local and external.
User management operations available to Administrators are the following:
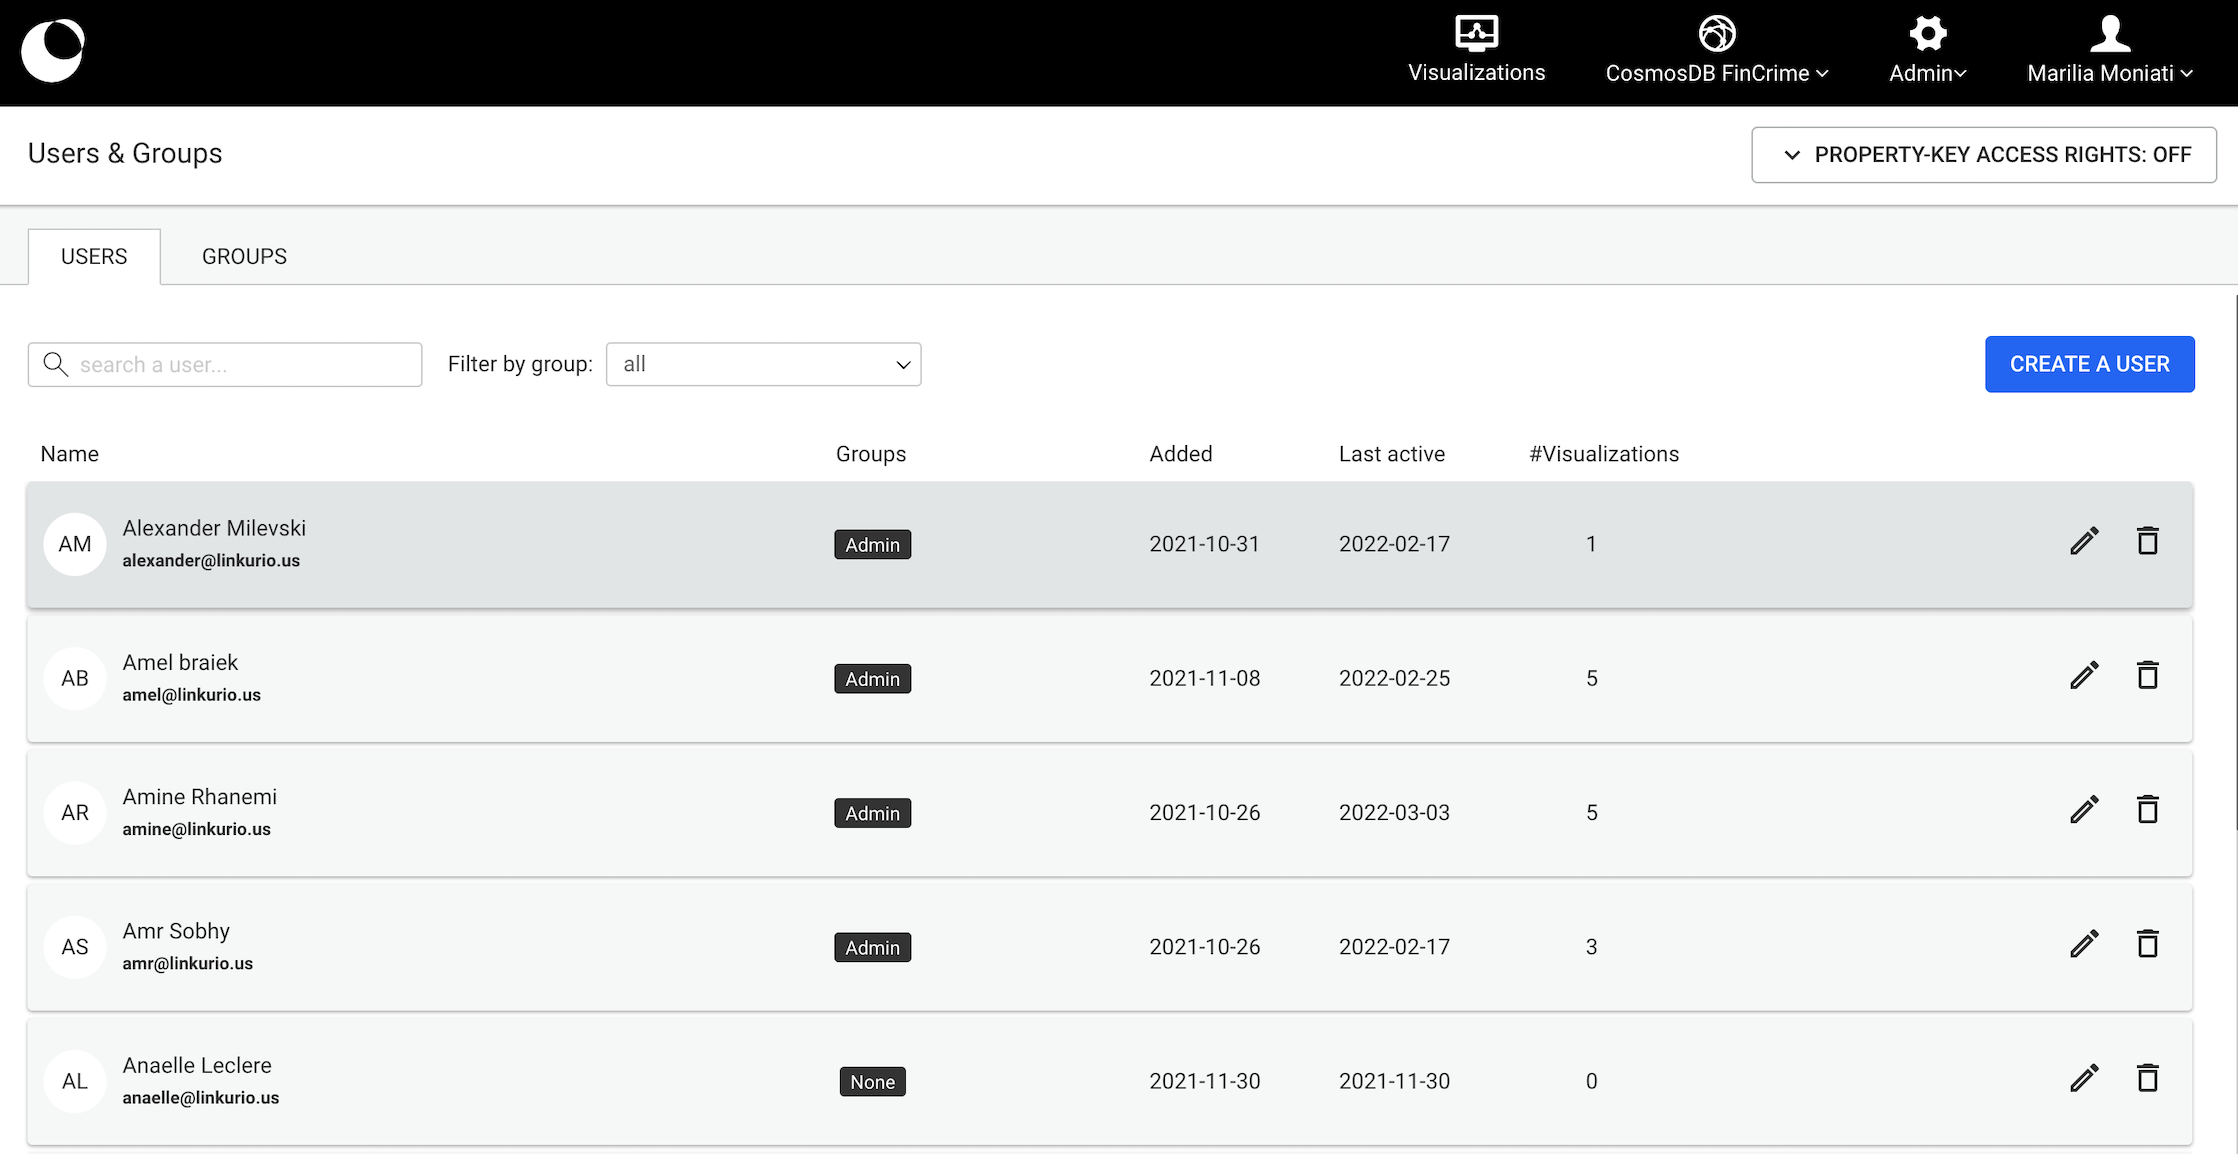
When deleting a user who has shared assets, admins are able to transfer these to an eligible user. Shared assets are visualisations, widgets, queries, custom actions or alerts which have been shared with at least one other user. Eligible users, are all admins and users who share the same access right group(s) as the to-be-deleted user.
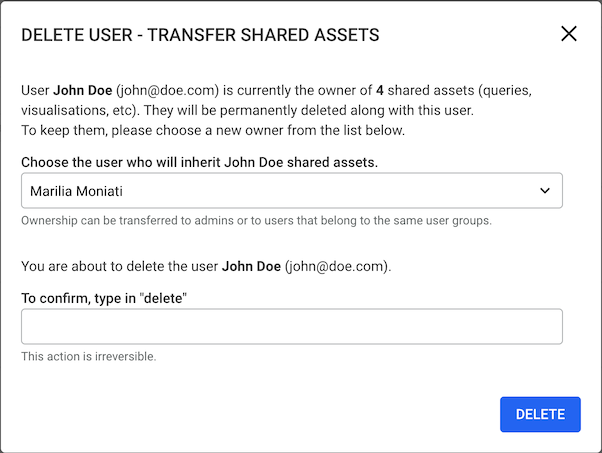
Below, useful information on the characteristics of each asset and their sharing options can be found:
Visualisations
A visualisation can be shared to all the users who have access to the datasource. The owner of a visualisation is able to set the access rights for each user who has access to the visualisation. A visualisation is considered a shared asset when it's shared with at least one user.
Widgets: If a visualisation has a widget, even if the visualisation is not shared, when the widget is transferred to a user, so is the visualisation.
Visualisation folders cannot be shared explicitly with users but they are transferred when they include a shared visualisation which is handed over. ( note this does not appear in the number of shared assets which is shown in the deletion modal )
Alerts, Custom Actions and Queries
In order to be able to access Linkurious Enterprise, users need to be assigned to at least 1 user group.
A user can be assigned to:
Group assignment can be done either while creating or editing a user account.
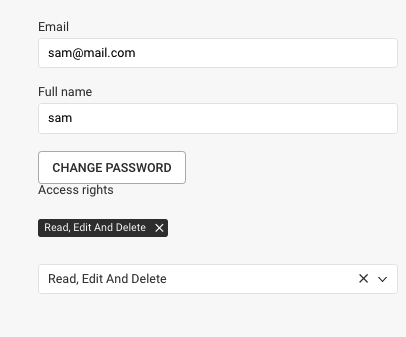
Assigning users to groups can be automated if you are using external authentication, using group mapping.
Linkurious Enterprise relies on a role-based access control model:
This page is accessed via Admin > Users & Groups in the main menu.
This page lists:
Group management operations available to the Administrators are the following:
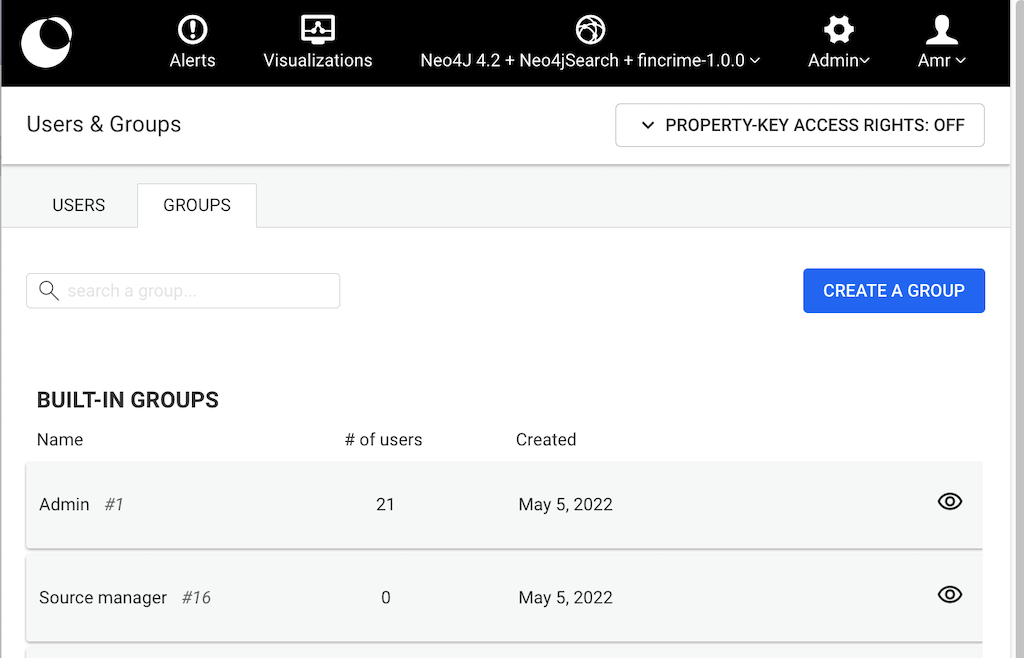
Creating a group is a 2-step process:
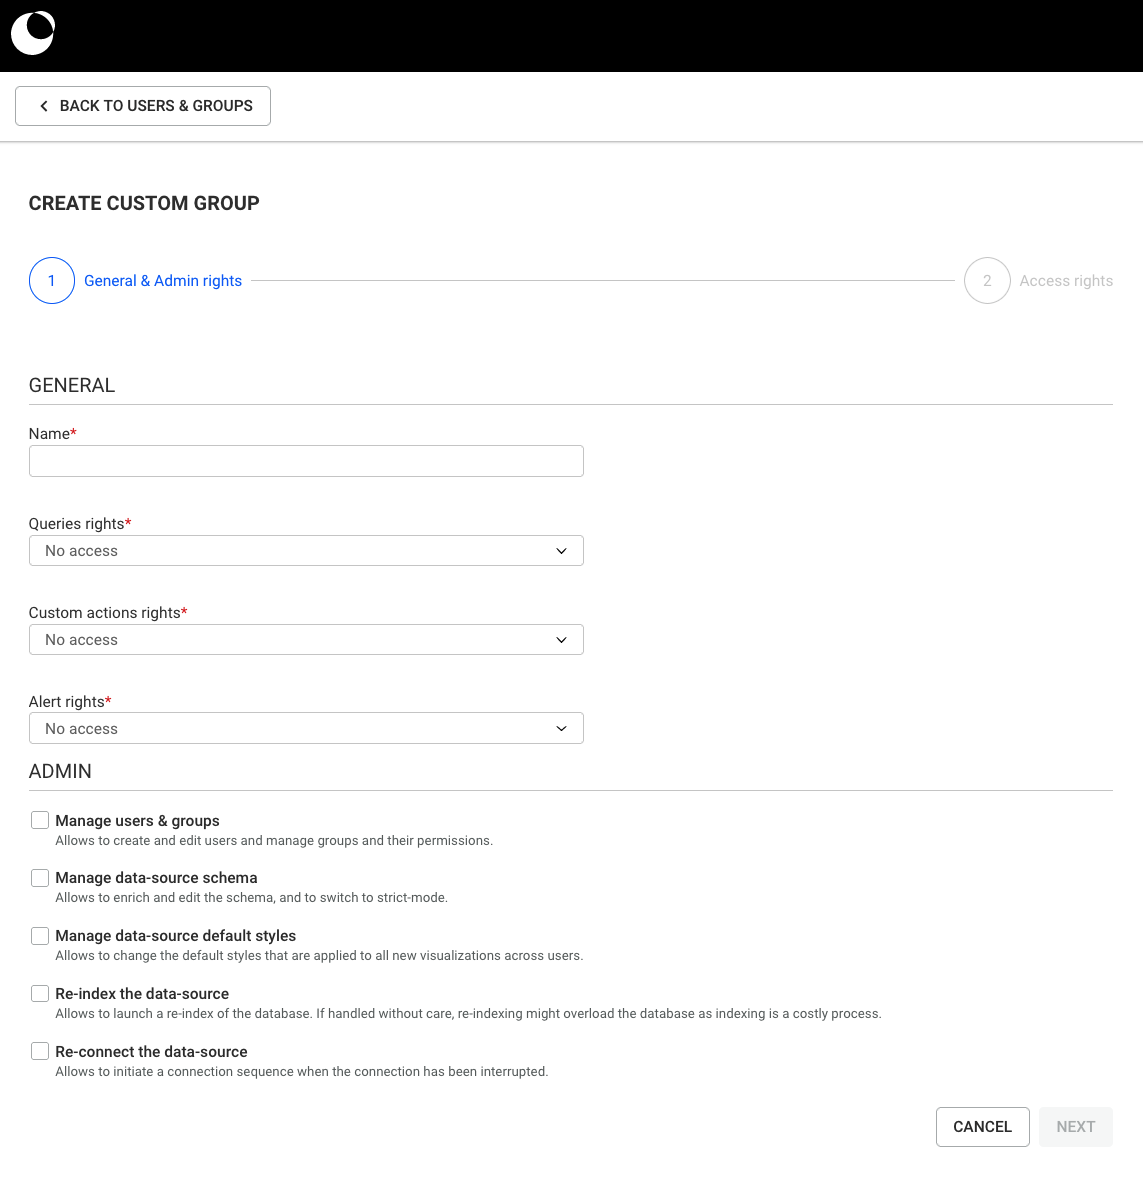
Queries access-rights
No access: the user group cannot execute queries (and cannot create them).Can run queries: the user group can execute read and write queries it was shared with, but cannot create them.Can create read-only queries and run queries:Can create read/write queries and run queries:Write queries are identified by keywords in their code:
- Cypher:
SET,CREATE,MERGE,DELETE,REMOVE,FOREACH,LOAD,DROP,CALL- Gremlin:
addProperty,property,addE,addV,drop,remove,clear
Custom actions access-rights
No access: the user group cannot execute custom actions (and cannot create them).Can run custom actions: the user group can execute custom action it was shared with but cannot create them.Can create and run custom actions:Alert access-rights
No access: the user group cannot access the Alerts (and cannot create them).Process alerts: the user group can access the Alerts, process the cases but cannot create new Alerts.Create and process alerts: the user group can process existing Alerts and can create new Alerts.Admin access-rights
Manage users & groups: the user group can create and edit users and manage groups and their permissions.Manage data-source schema: the user group can enrich and edit the schema, and to switch to strict-mode.Manage data-source default styles: the user group can change the default styles that are applied to all new visualizations across users.Re-index the data-source: the user group can launch a re-index of the database. If handled without care, re-indexing might overload the database as indexing is a costly process.Re-connect the data-source: the user group can initiate a connection sequence when the connection has been interrupted.For users that belong to multiple groups, access-rights are cumulative. In other words, a user can do something if at least one of their groups allows them to do it.
For example if user belongs to 2 groups: one having No access and the
other Process Alerts for the Alert rights, then they have the right
to Process Alerts because one of their groups allows them to do so.
There are 2 available options. You can read about them in their dedicated sections:
NONE: The user can't access (search or display) nodes (resp. edges) of that category (rest. type).READ: The user can search display nodes (rest.edges) of that category (resp. type).EDIT: The user can edit properties of nodes (rest. edges) of that category (resp. type).CREATE AND DELETE: The user can: 
Foo belong to the groups Accounting and SalesAccounting has NO ACCESS access right on node-category CONTRACTSales has EDIT access right on node-category CONTRACTAs a result: user Foo has EDIT access on node-category CONTRACT

To define property-key access rights, the administrator needs to create (or edit) a custom group: after the access-rights configuration page, with the property-key access rights feature switched on, a second panel will be displayed.
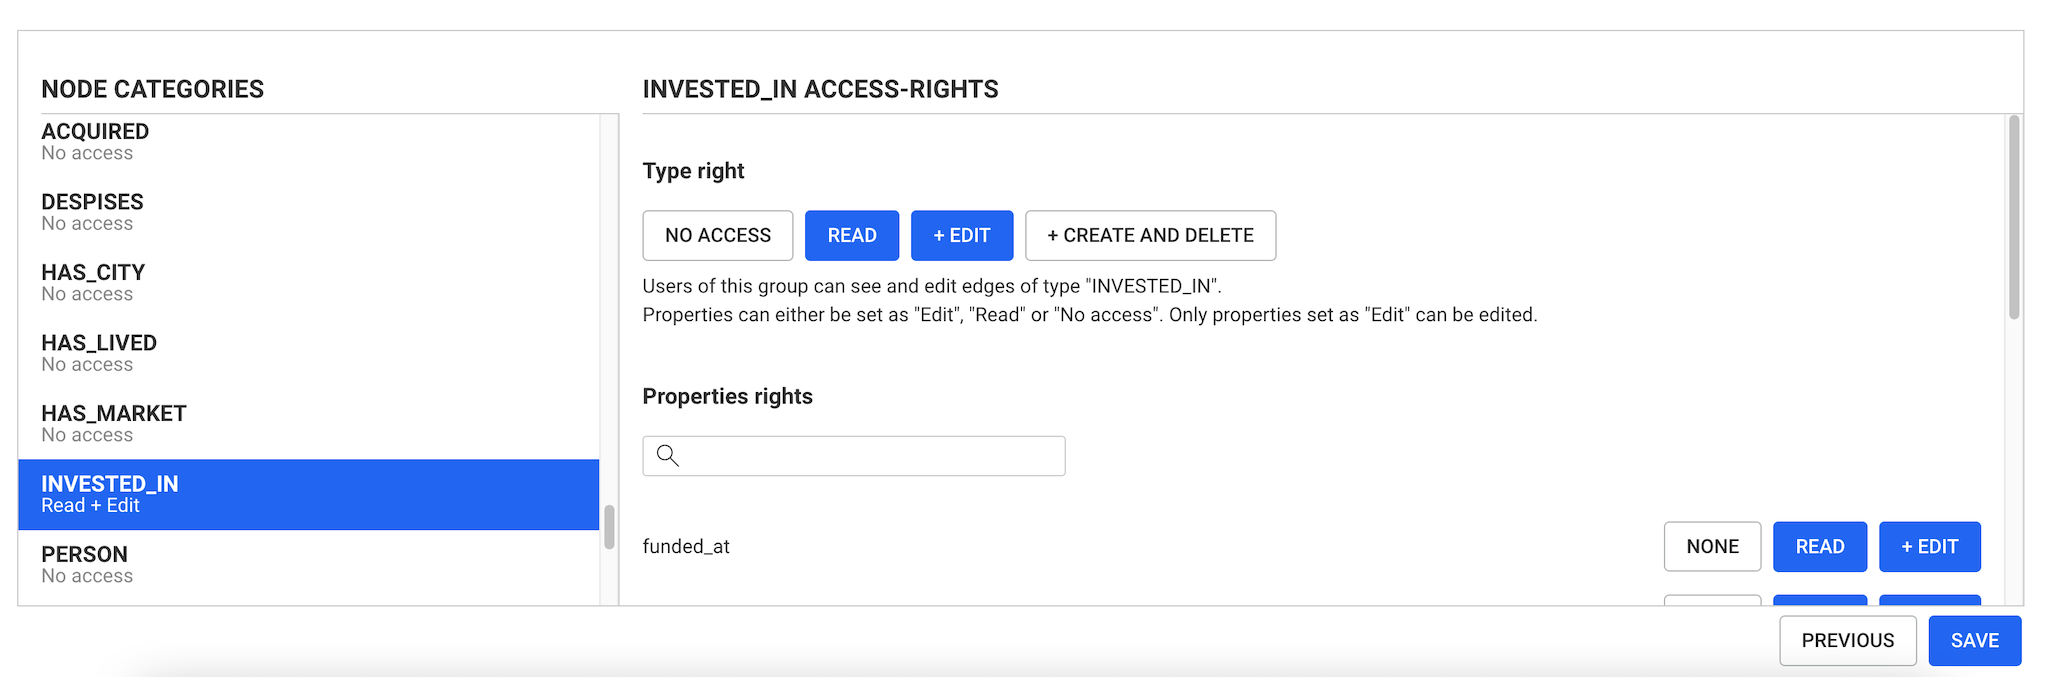
From here:
For each node category (resp. edge type), the administrator is able to set one of the following access-rights (exactly the same as for Standard access rights):
NONE: The user can't access (search or display) nodes (resp. edges) of that category (rest. type).READ: The user can search display nodes (rest.edges) of that category (resp. type).EDIT: The user can edit properties of nodes (rest. edges) of that category (resp. type).CREATE AND DELETE: The user can: For each property the administrator is able to set one of the following access rights:
NO ACCESS: neither the property nor its value can be seen by this user group. READ: the property value is displayed to this user group but cannot be edited.EDIT: the property value is dipsplayed to this user and can be edited.Access rights are cumulative (see example below).
Foo belong to the groups Accounting and SalesAccounting has: READ access right on node-category COMPANYREAD access right on the property address of the category COMPANYSales has: EDIT access right on node-category COMPANYNO ACCESS access right on the property address of the category COMPANYAs a result, user Foo has:
EDIT access right on node-category COMPANYREAD access right on the property address of the category COMPANYThe Guest mode is a way to share graphs with people who do not have an account on Linkurious Enterprise.
Key characteristics:
Standard user interface:
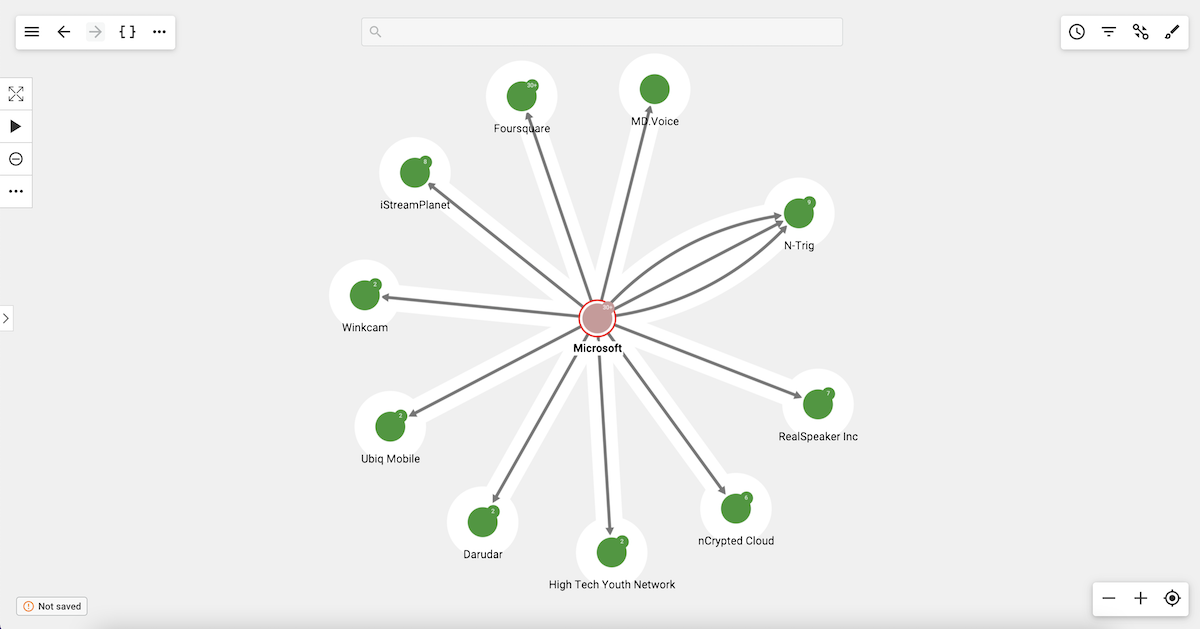
Guest mode user interface:
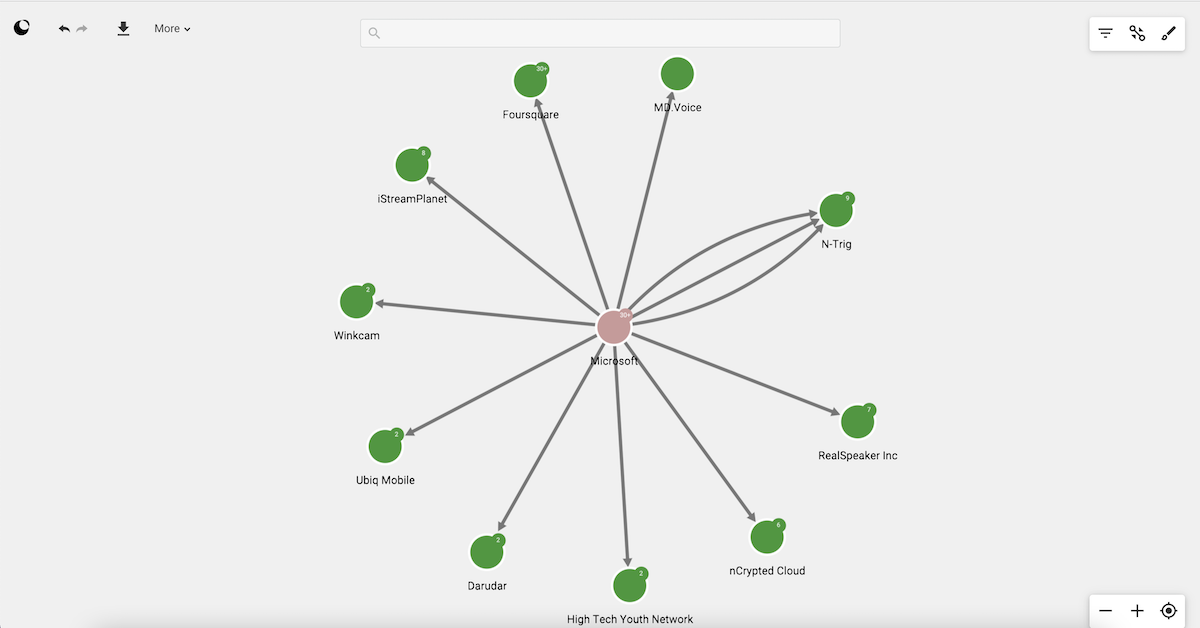
By default, the Guest mode is disabled. Enabling the Guest mode is done on a per-source basis so that you can manage the access rights associated with the Guest mode at the source level.
Enabling it is a 3-steps process:
guest@linkurio.us. By default it is not associated
with any user group. Assign the Guest user
to the Read-Only group, or any custom group if you need to restrict
its rights (see the security warnings below).Once enabled, the Guest mode is available at http://your-domain.com/guest
(replace your-domain.com with the actual host and port of your server).
By default, guest users won't be allowed to search, export and use the design, filter and edge grouping panel.
If you want to allow guest users to use these features, you can go to the Configuration screen (Menu > Admin > Configuration) and, under the Guest Mode configuration, change the following values:
uiWorkspaceSearch (default false): Whether to allow to searchuiExport (default false): Whether to allow the exportuiLayout (default simple): Whether to allow guest users to have the same UI for layouts as logged-in users (regular), a simpler UI (simple) or no possibility to layout at all (none)uiDesign (default false): Whether to allow the design paneluiFilter (default false): Whether to allow the filter paneluiEdgeGrouping (default false): Whether to allow the edge grouping panelAll people who have access to /guest will be able to browse the whole
database (in read-only mode), even if nobody has explicitly shared a
specific visualization with them. You may want to check who has access
to /guest before enabling the Guest mode.
If you have assigned the Guest user to the Read Only built-in user
group, all node categories and edge types will be available to see by
the people who can access /guest. If the database contains sensitive
data, you should create a custom group
with limited rights on the data and assign the Guest user to that group.
Even if the Guest user is assigned to a group that has Write or Delete permissions, Guest mode users will not be able to write or edit data.
When initialized with a visualization, the Guest mode allows the user to expand the graph beyond the content of that visualization. Consider restricting the Guest user access rights if that is an issue.
Accessing /guest directly will return an empty workspace.
Using parameters in the URL you can populate the Guest mode workspace with:
/guest?populate=visualizationId&item_id=123/guest?populate=nodeId&item_id=123/guest?populate=expandNodeId&item_id=123/guest?populate=searchNodes&search_query=paris&search_fuzziness=0.8/guest?populate=queryId&item_id=123/guest?populate=queryId&item_id=123&query_parameters={"param1":"value1"}The Guest user sees the current state of a visualization. Any change to a visualization from an authenticated user will be automatically applied to the public link shared to the Guest user.
Linkurious Enterprise uses a data schema to deliver some of its features. However, most graph databases are schema-less. As a consequence, Linkurious Enterprise automatically detects the data schema from each data-source. The automatically detected schema is:
The schema can be extended manually. An administrator can:
The schema has two modes:
The Partial mode is flexible and incremental, whereas the Strict schema is stable and normative. Therefore the Partial mode is a better fit in early projects when the data schema is poised to change. The Strict mode is a better fit for production-ready projects that require a more controlled environment.
IMPORTANT
Statements made in the schema DO NOT alter the data in the database:
- Setting a property type in Linkurious Enterprise will not change the type of the corresponding values in the graph database (see section about the property types).
- Switching search/visibility options for a node-category, edge-type or property in Linkurious Enterprise will not remove or change the data stored in the graph database.
- Switching to strict mode in Linkurious Enterprise will not remove or change the data stored in the graph database.
The schema can be reached through the Admin menu.
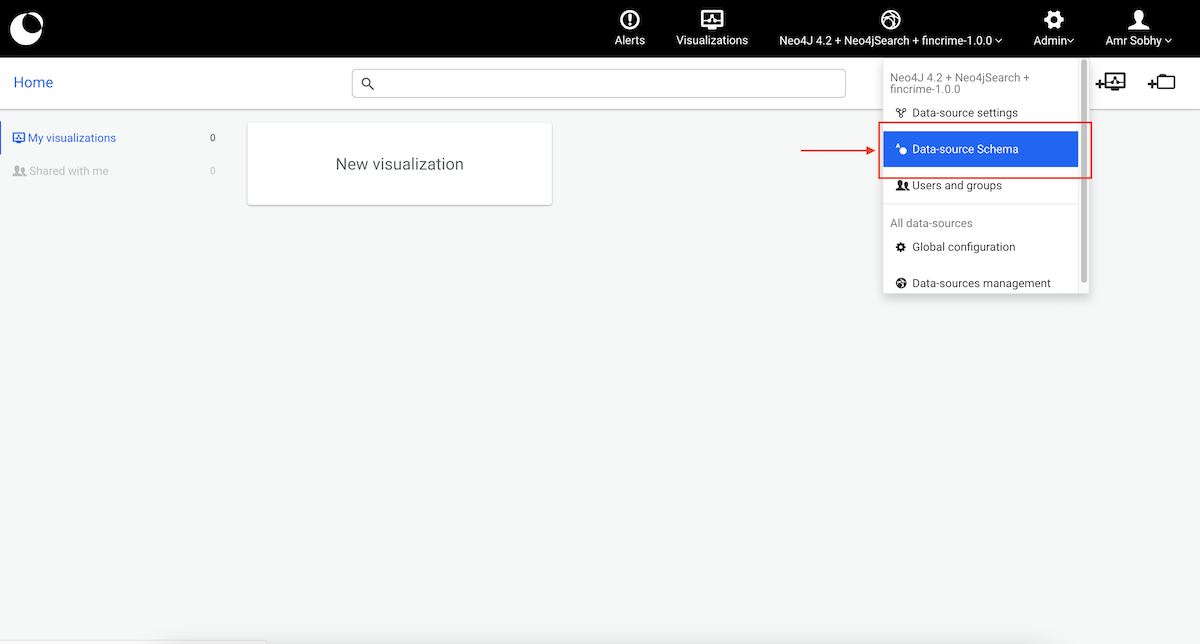
The schema is presented as two columns:
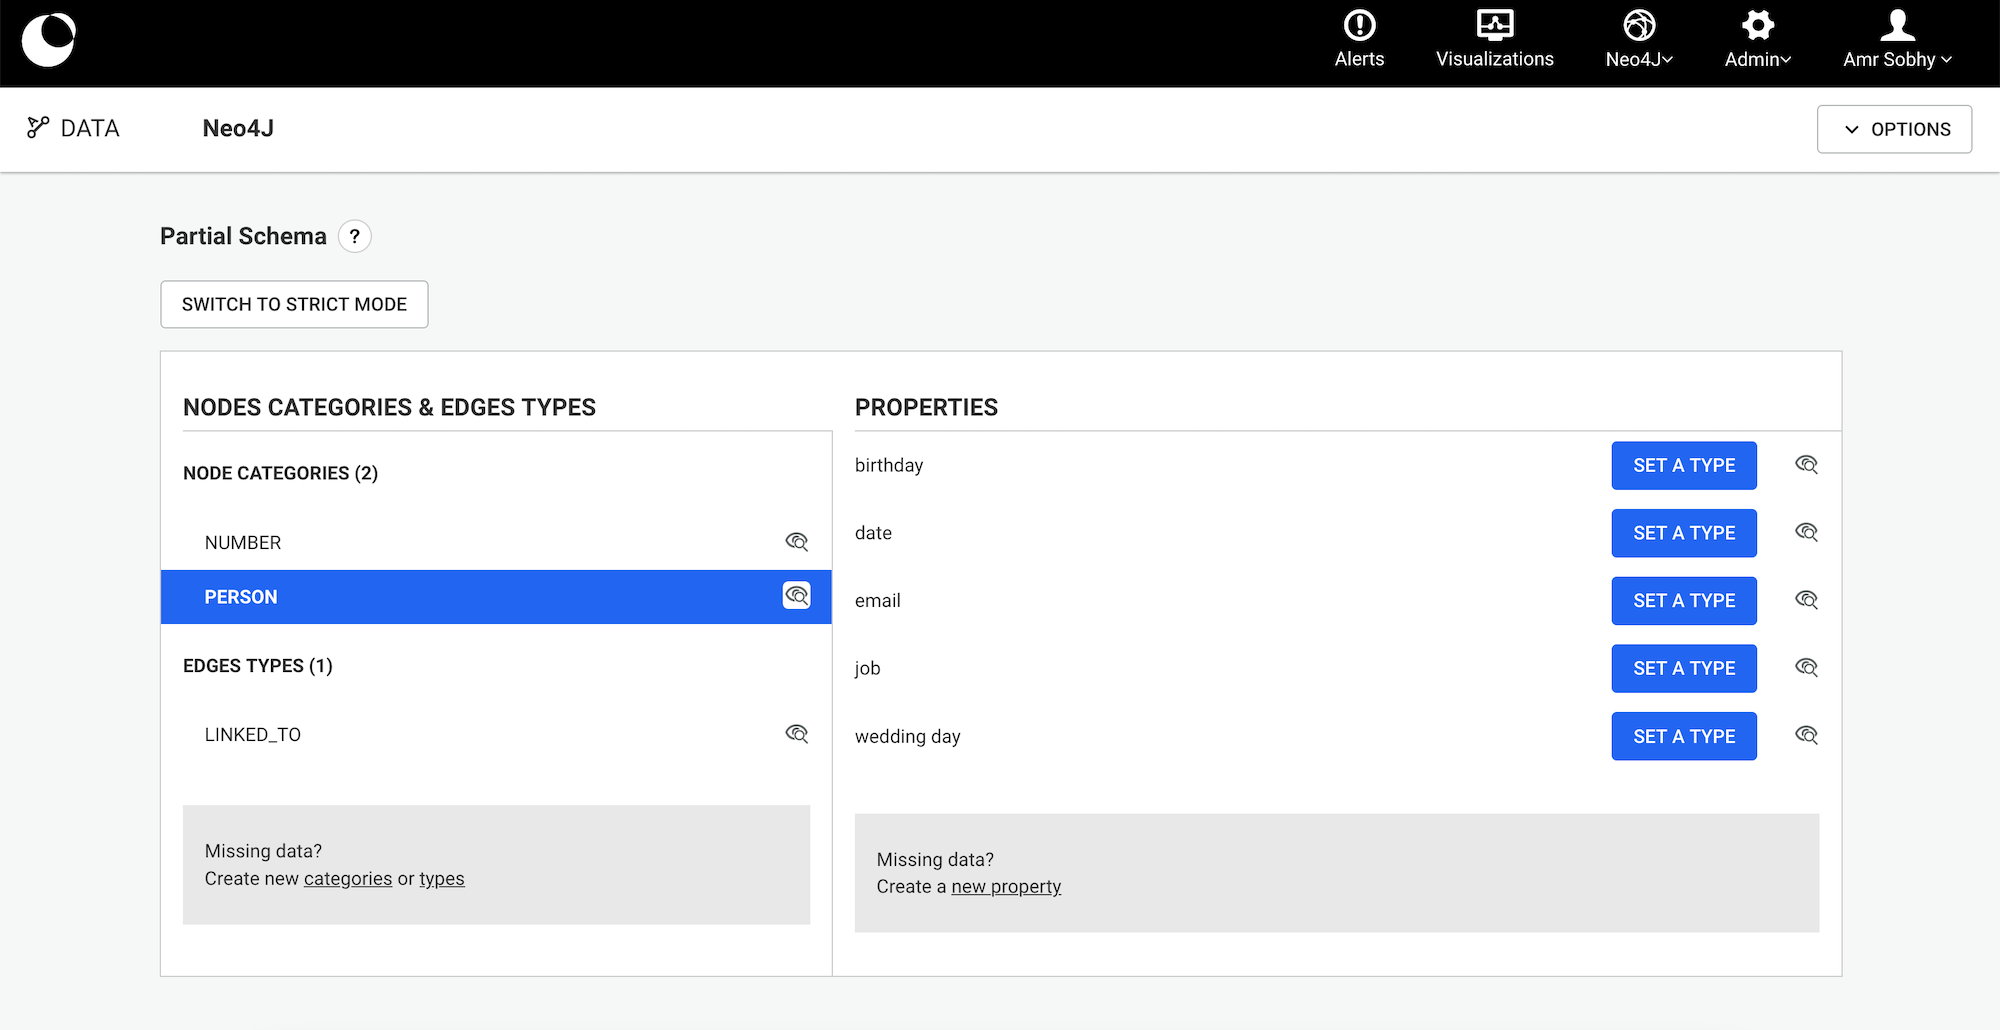
The "eye" icon next to node categories, edge types and properties allows to switch the visibility to View & Search, Only view or No access. See the dedicated section for more details.
The schema may be incomplete. Or you may want to add a category, type or property that is not yet in the data. You can create them manually through action links available at the bottom the list.
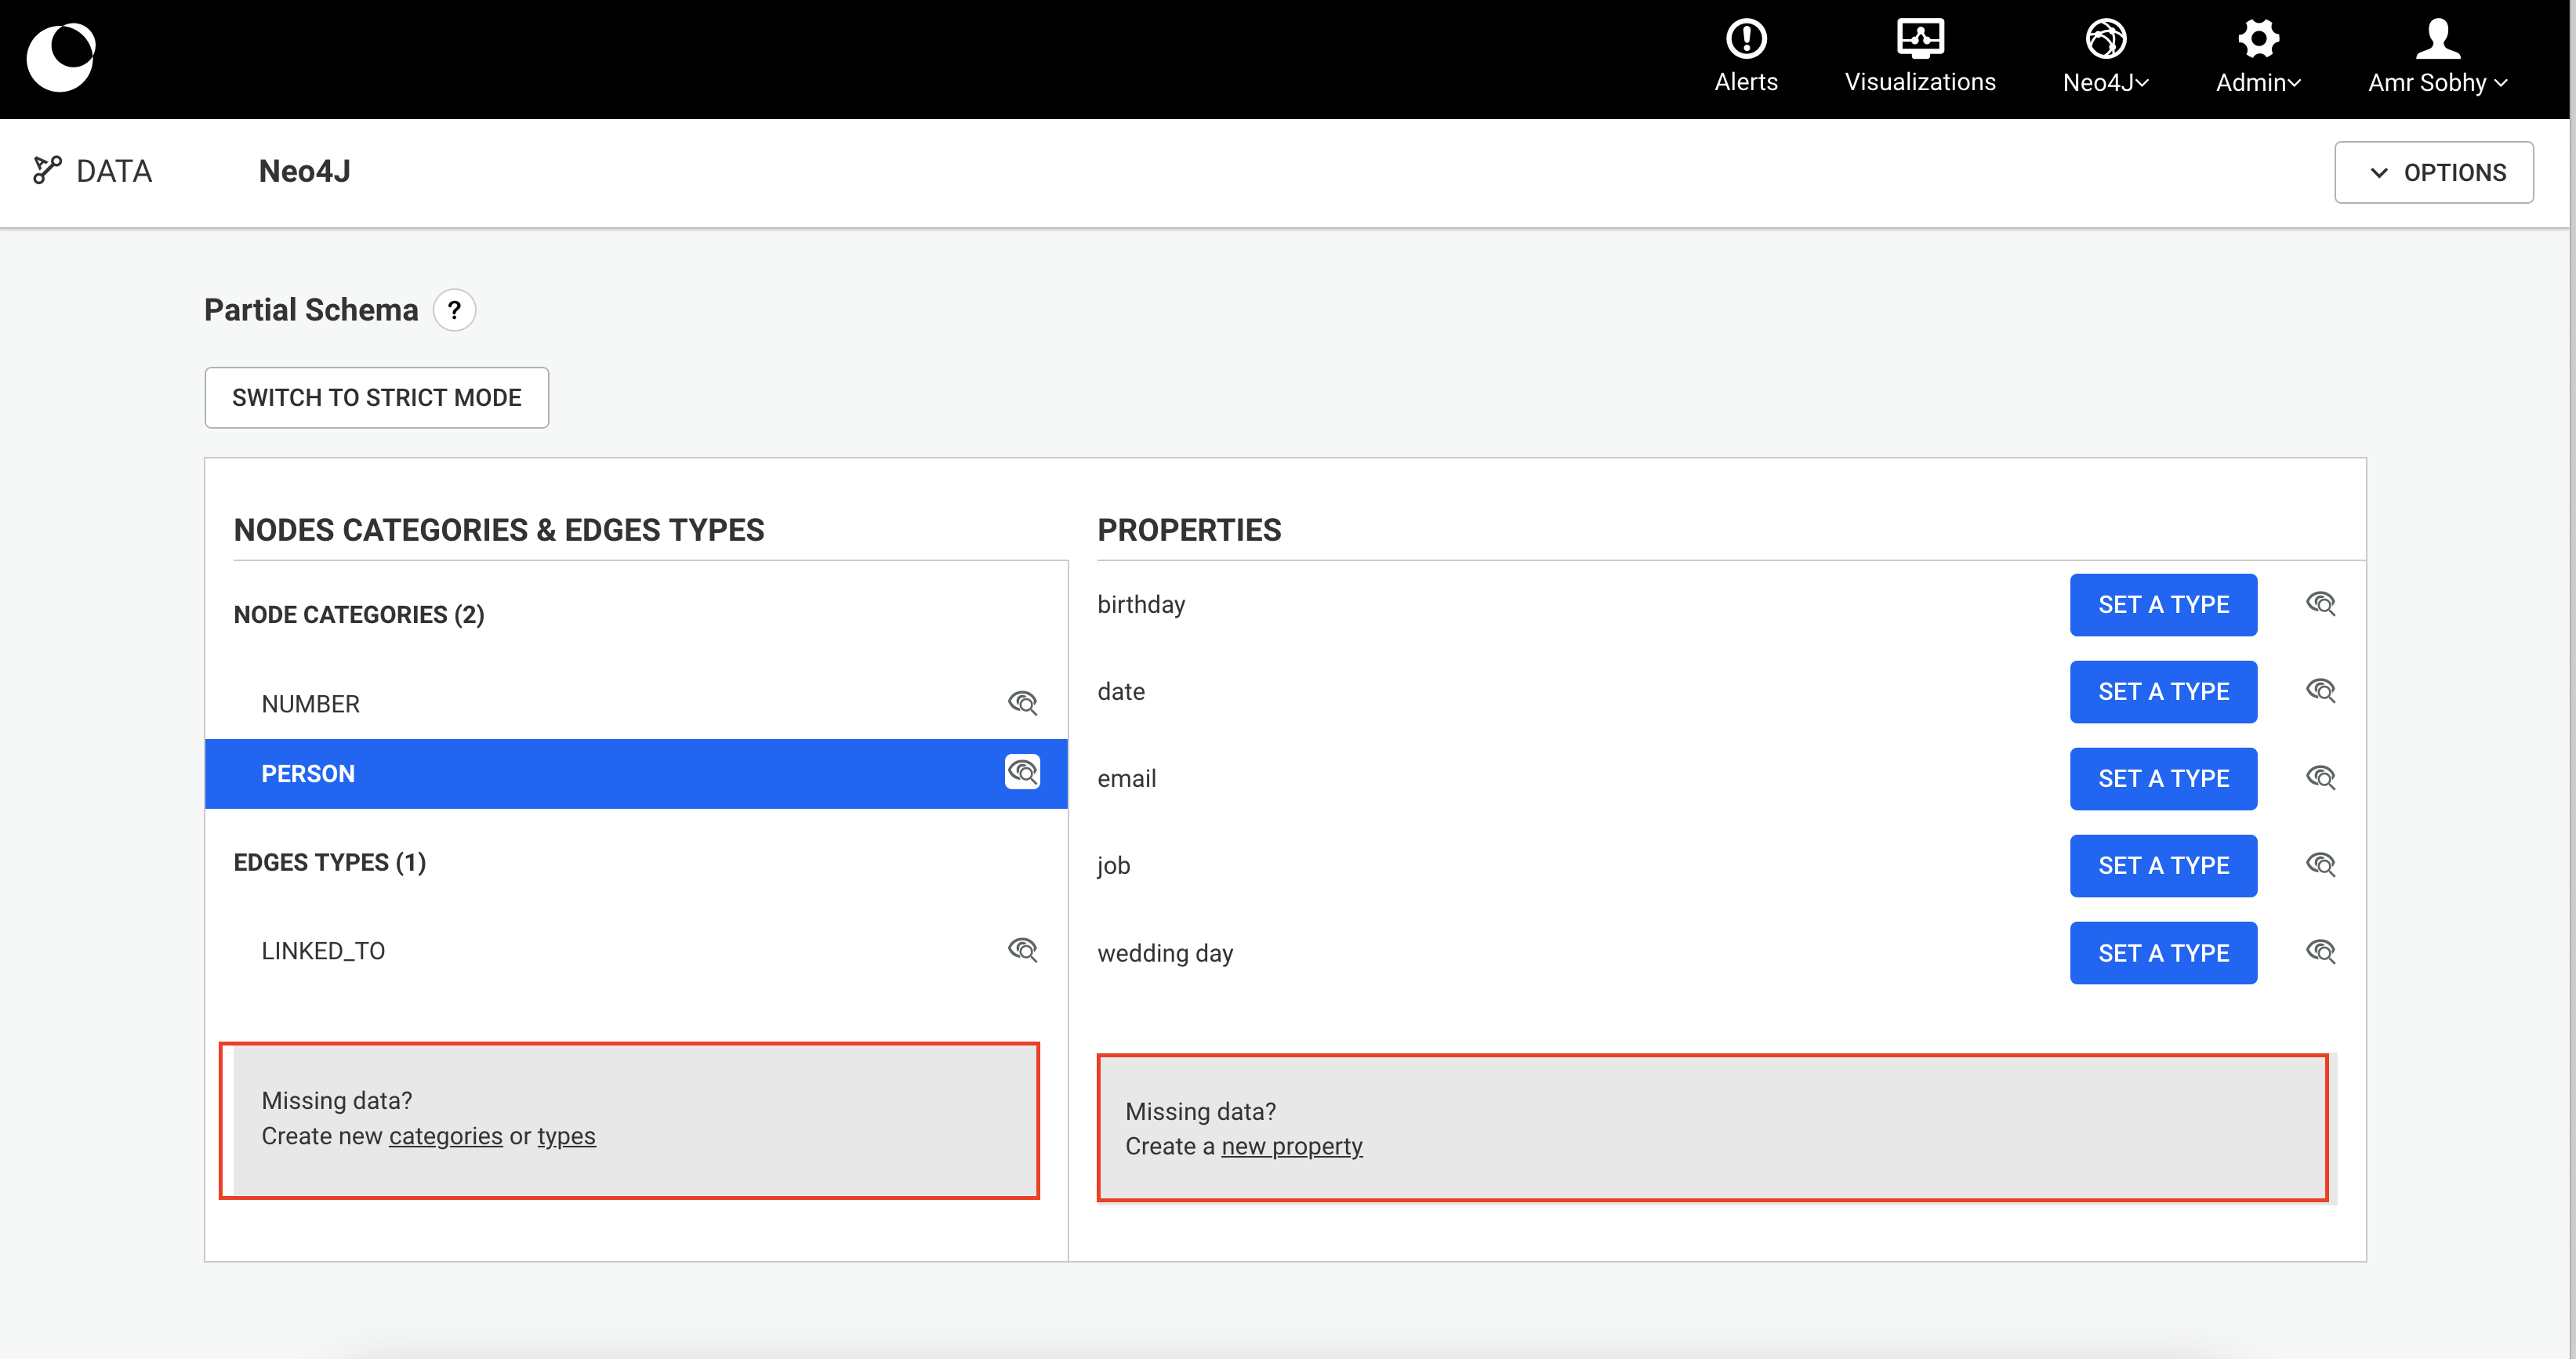
Some node-categories or edge-types are unlikely to be searched for. As a consequence they pollute the search results.
You can disable the search by clicking on the "eye" icon and select Only view option. The nodes or the edges will then be not searchable but stay visible.
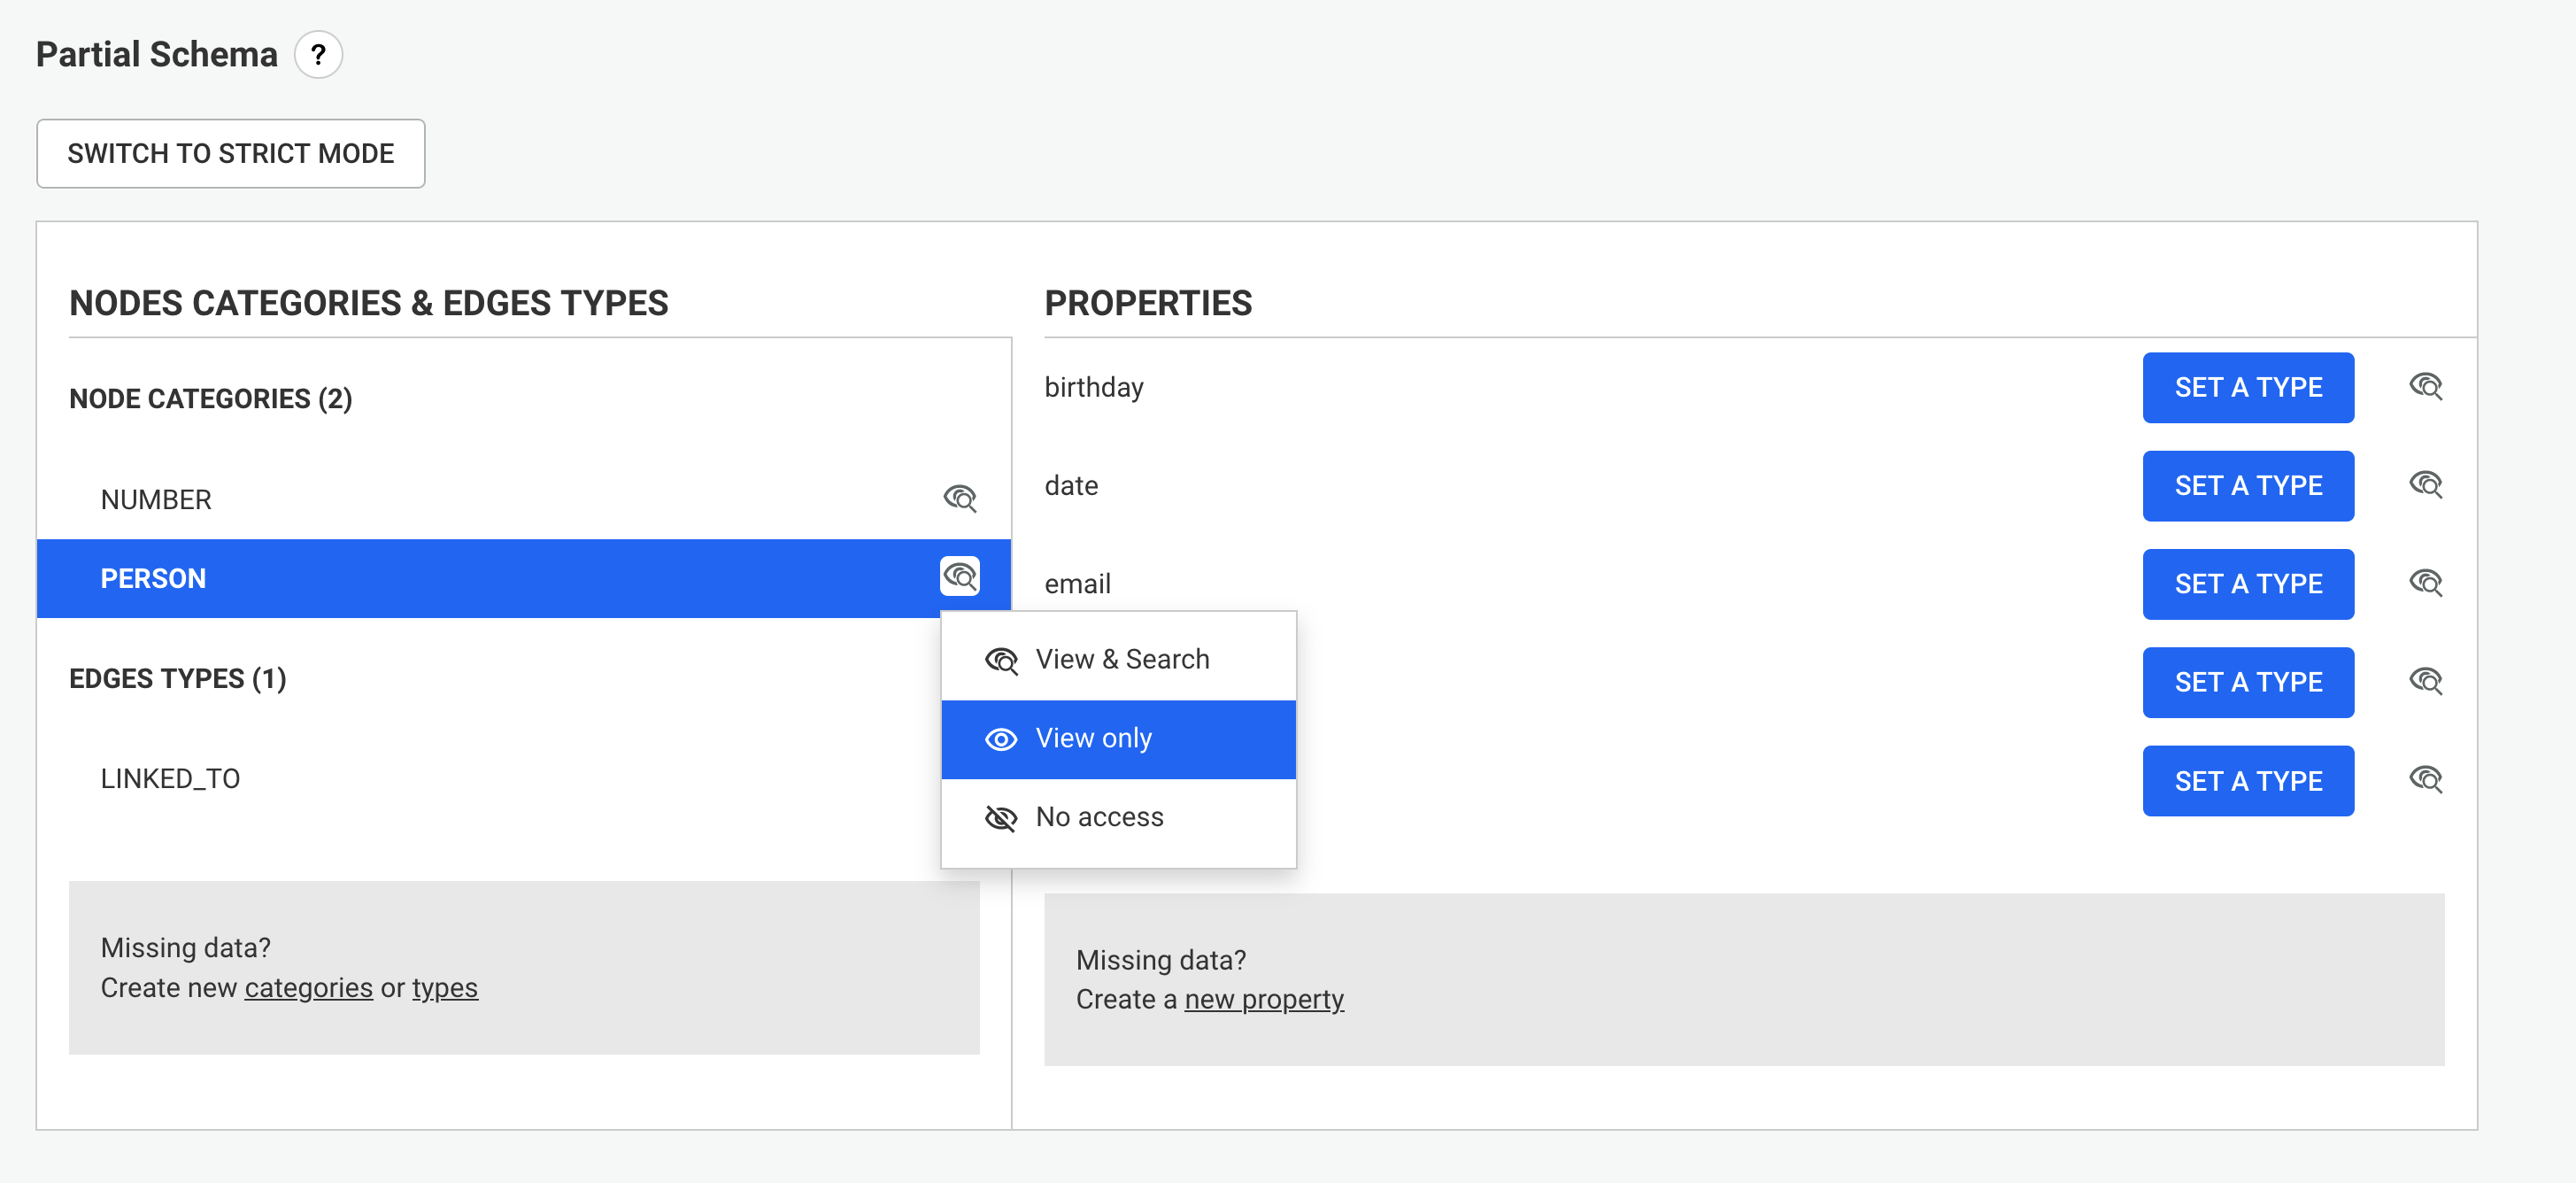
You can also remove them from the search by selecting No access option. The nodes or the edges will then be not searchable and not visible.
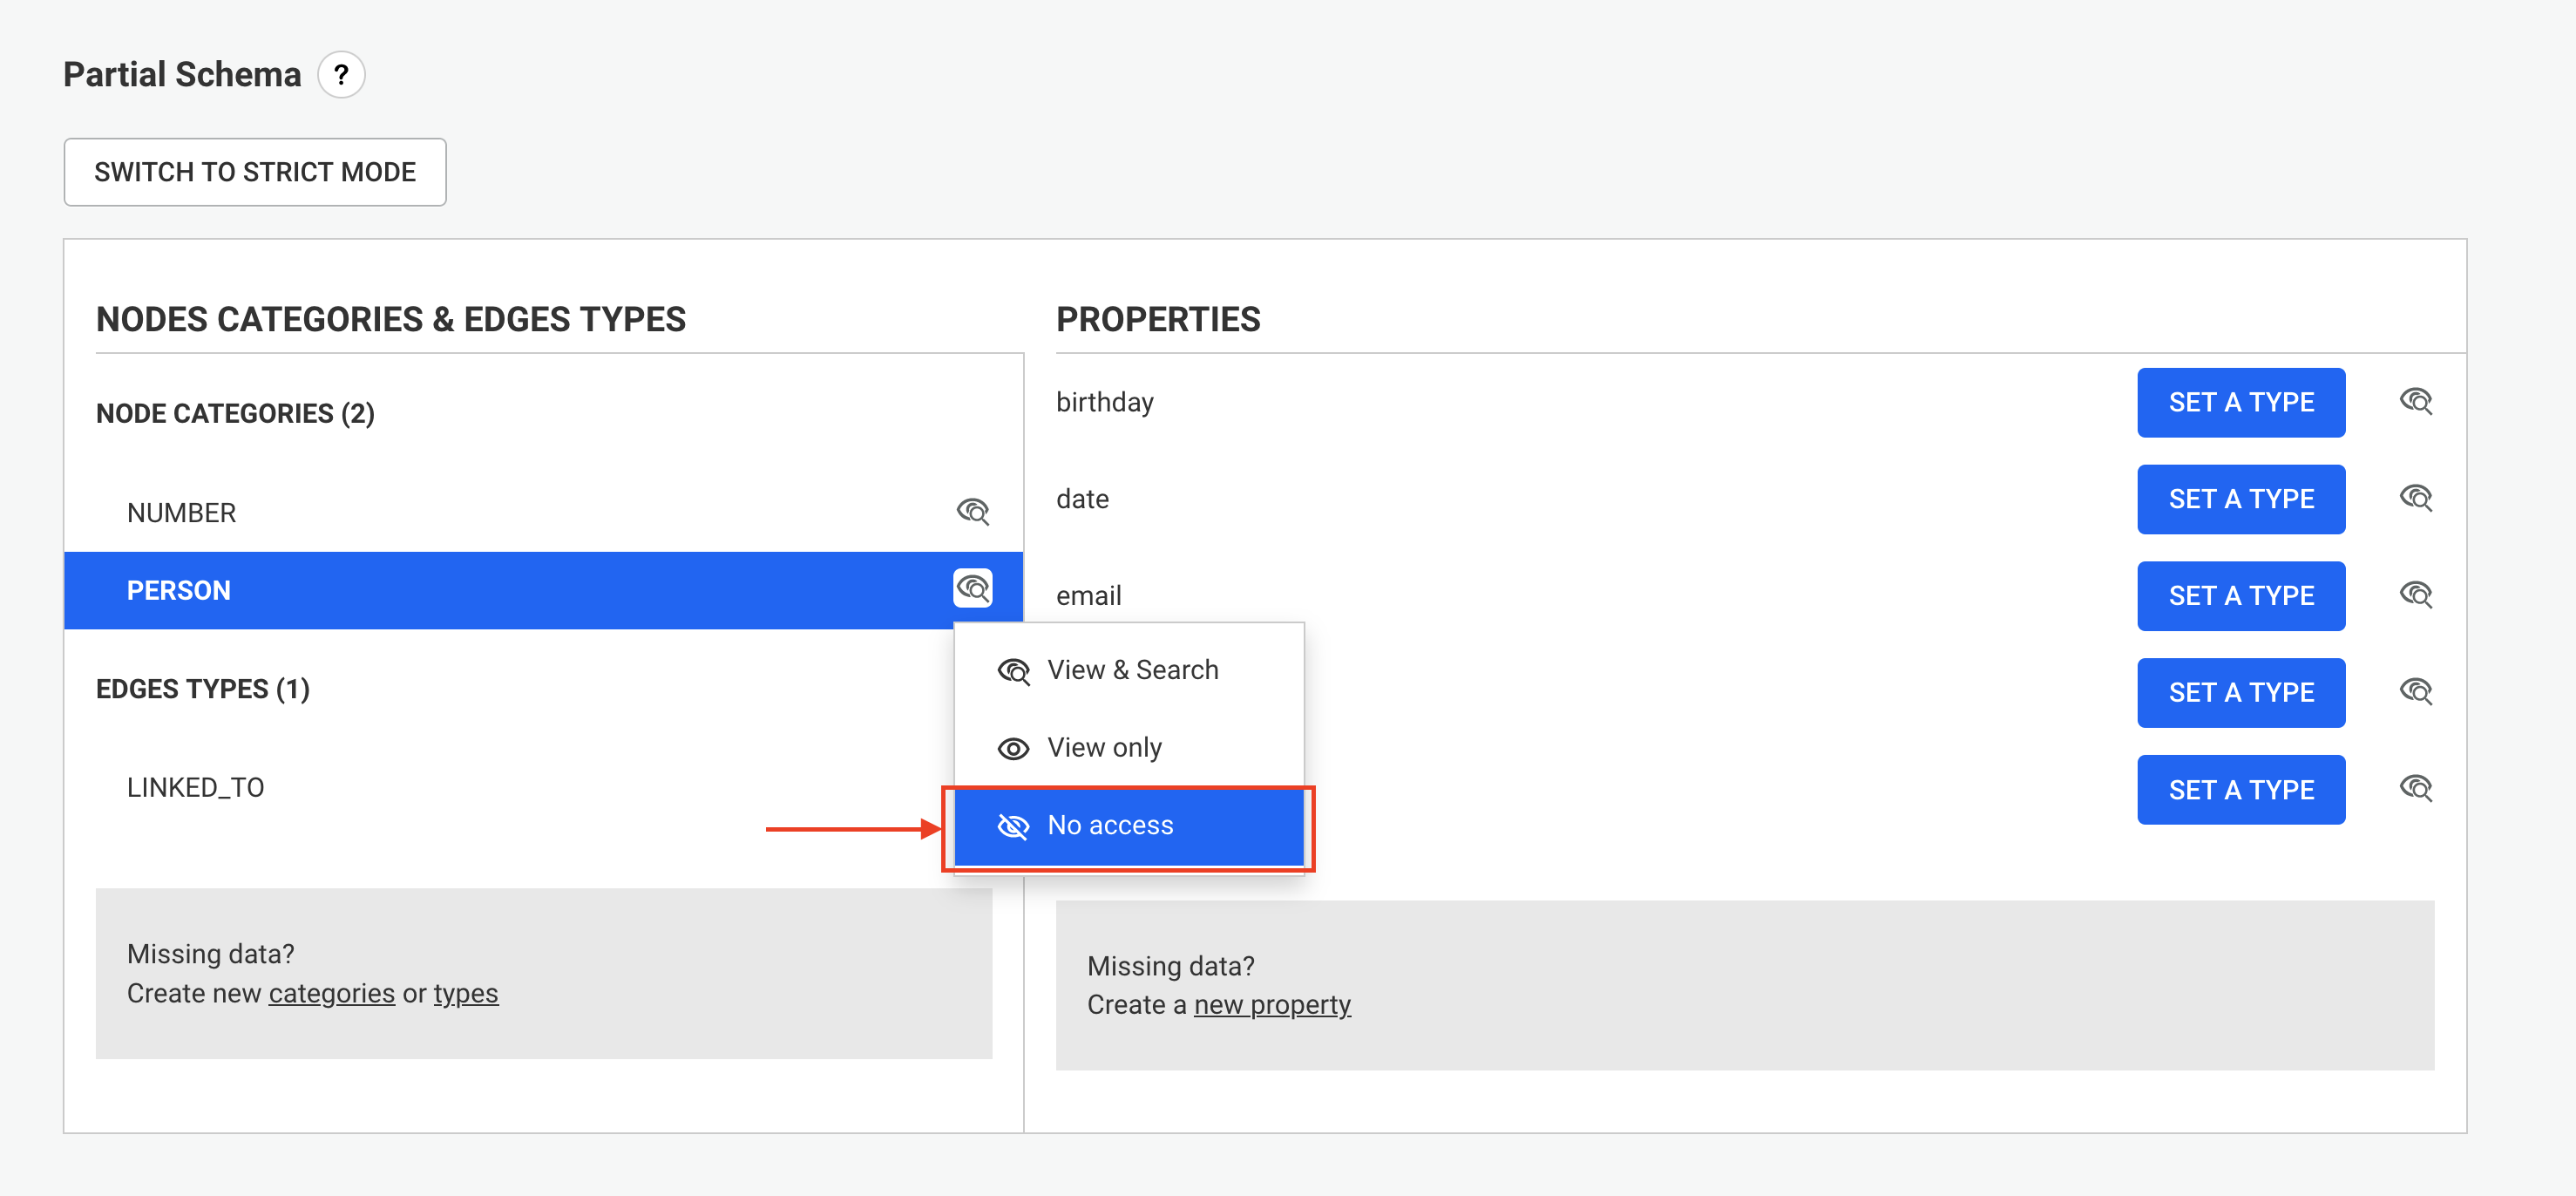
The "eye" icon will be updated by the selected search/visibility option
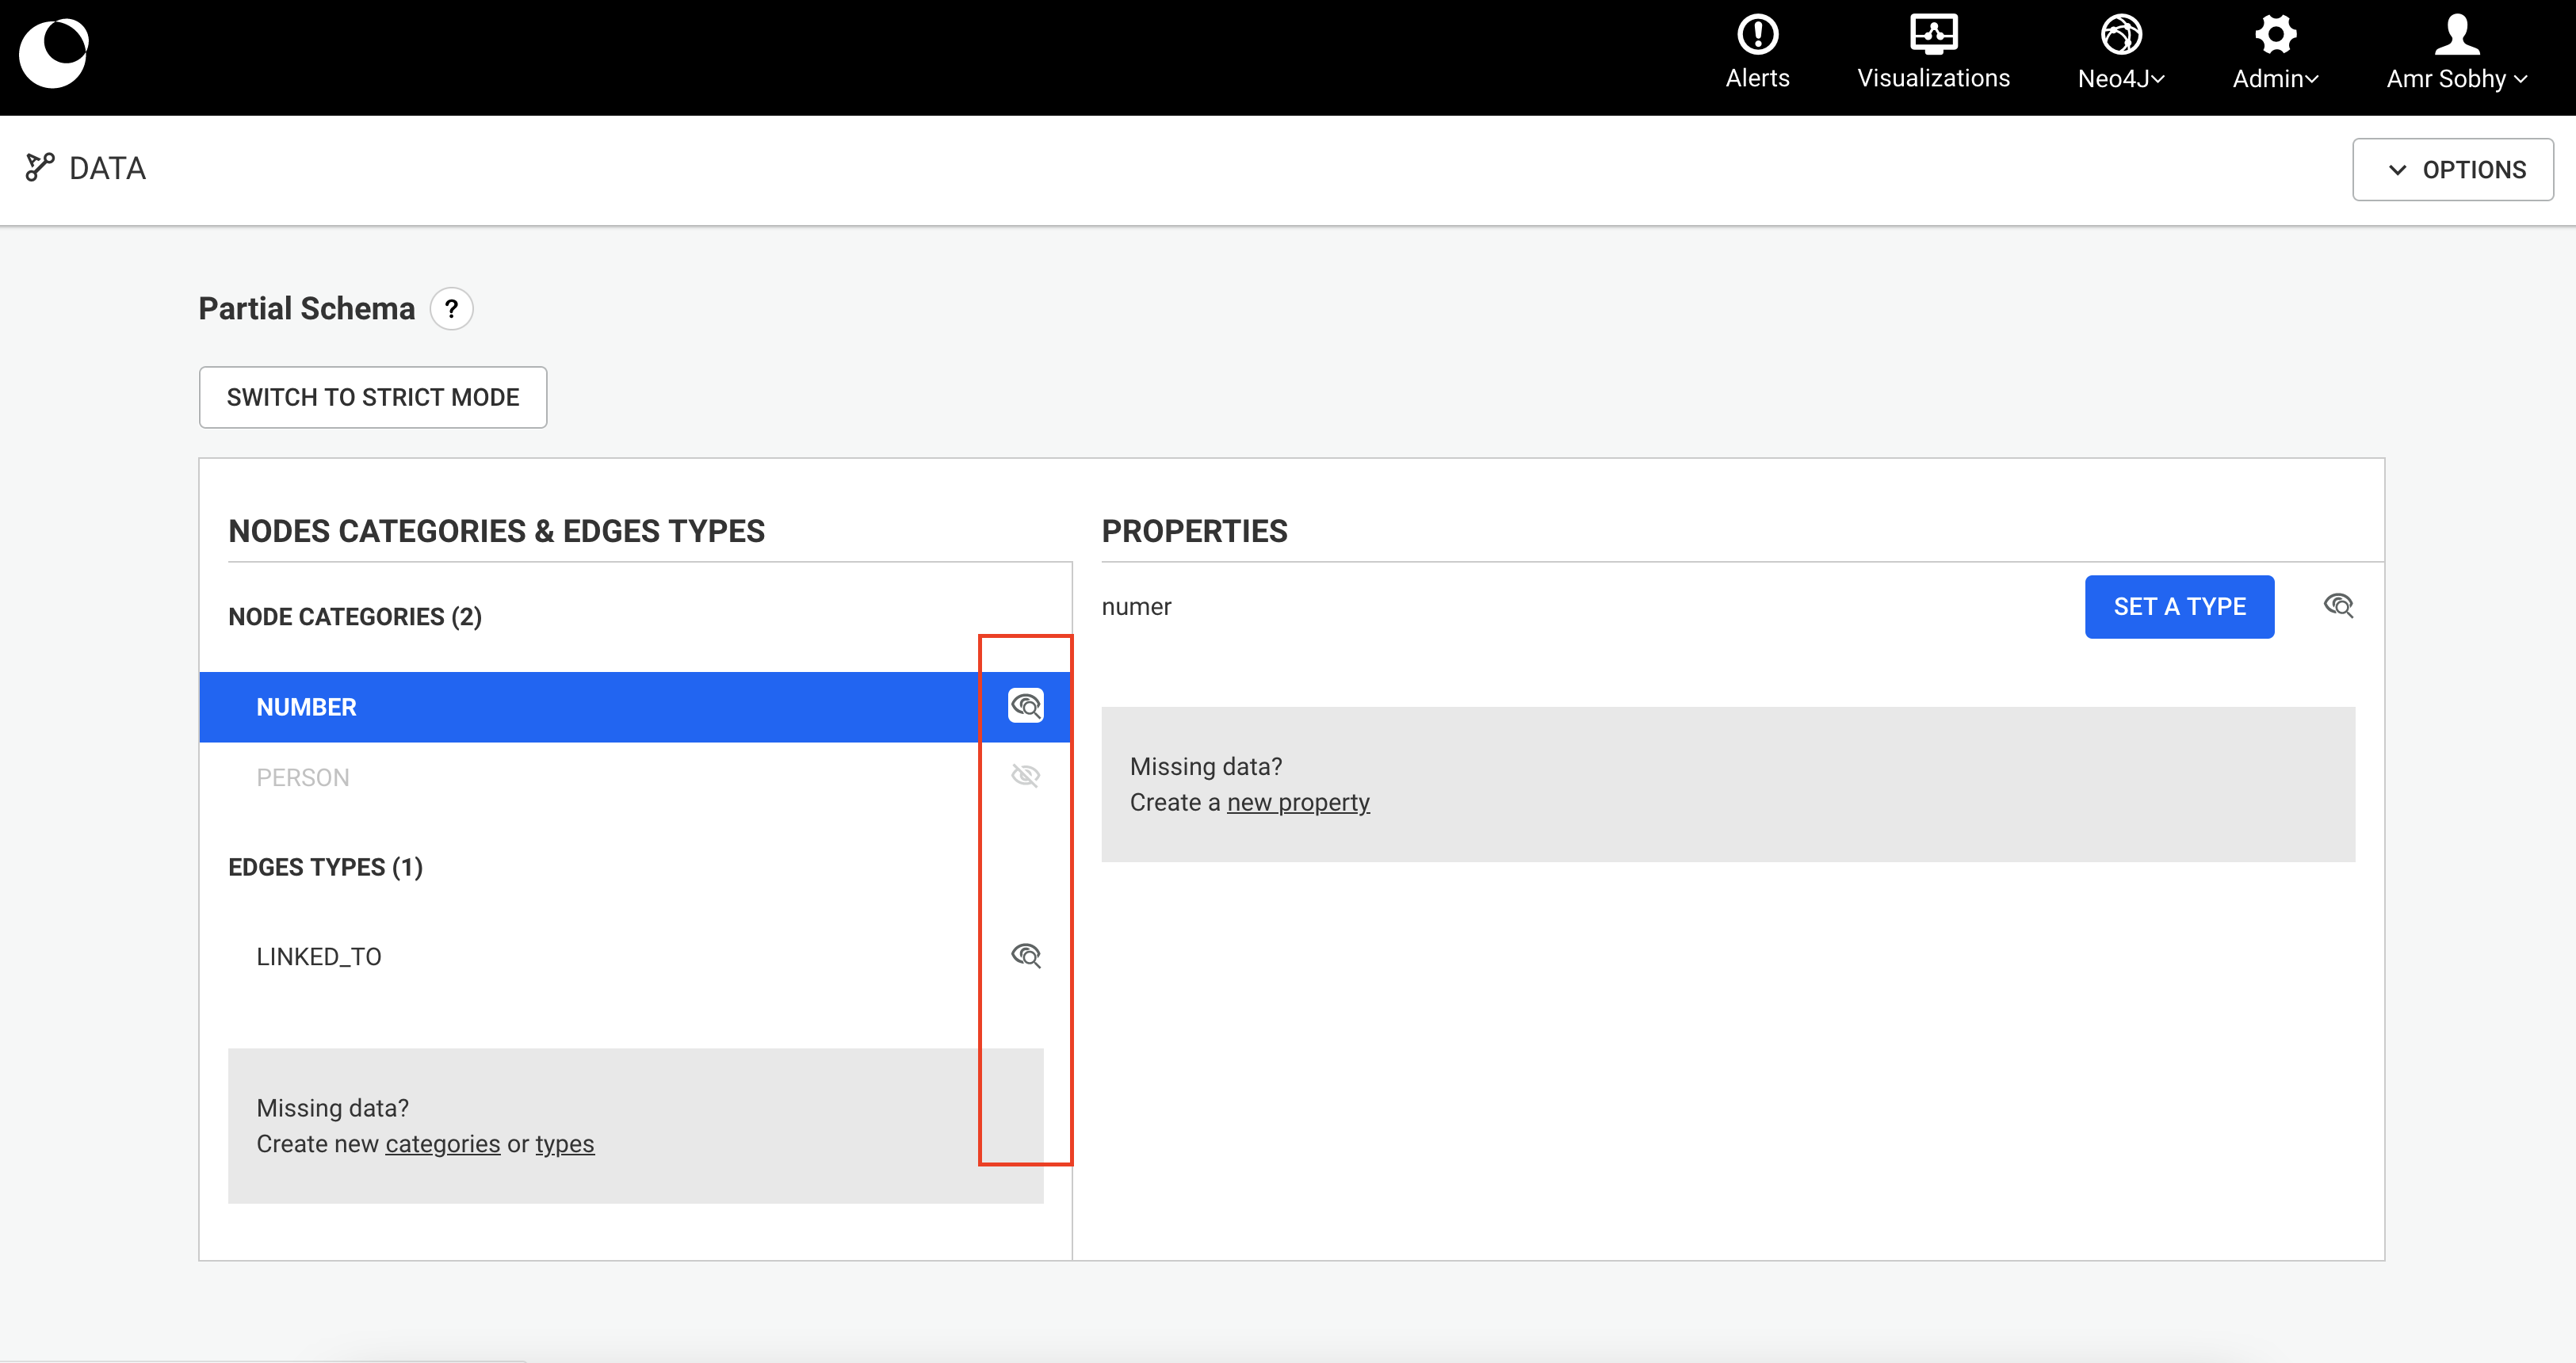
The button "Switch to strict mode" allows you to switch to a strict mode. See the dedicated section for more information.
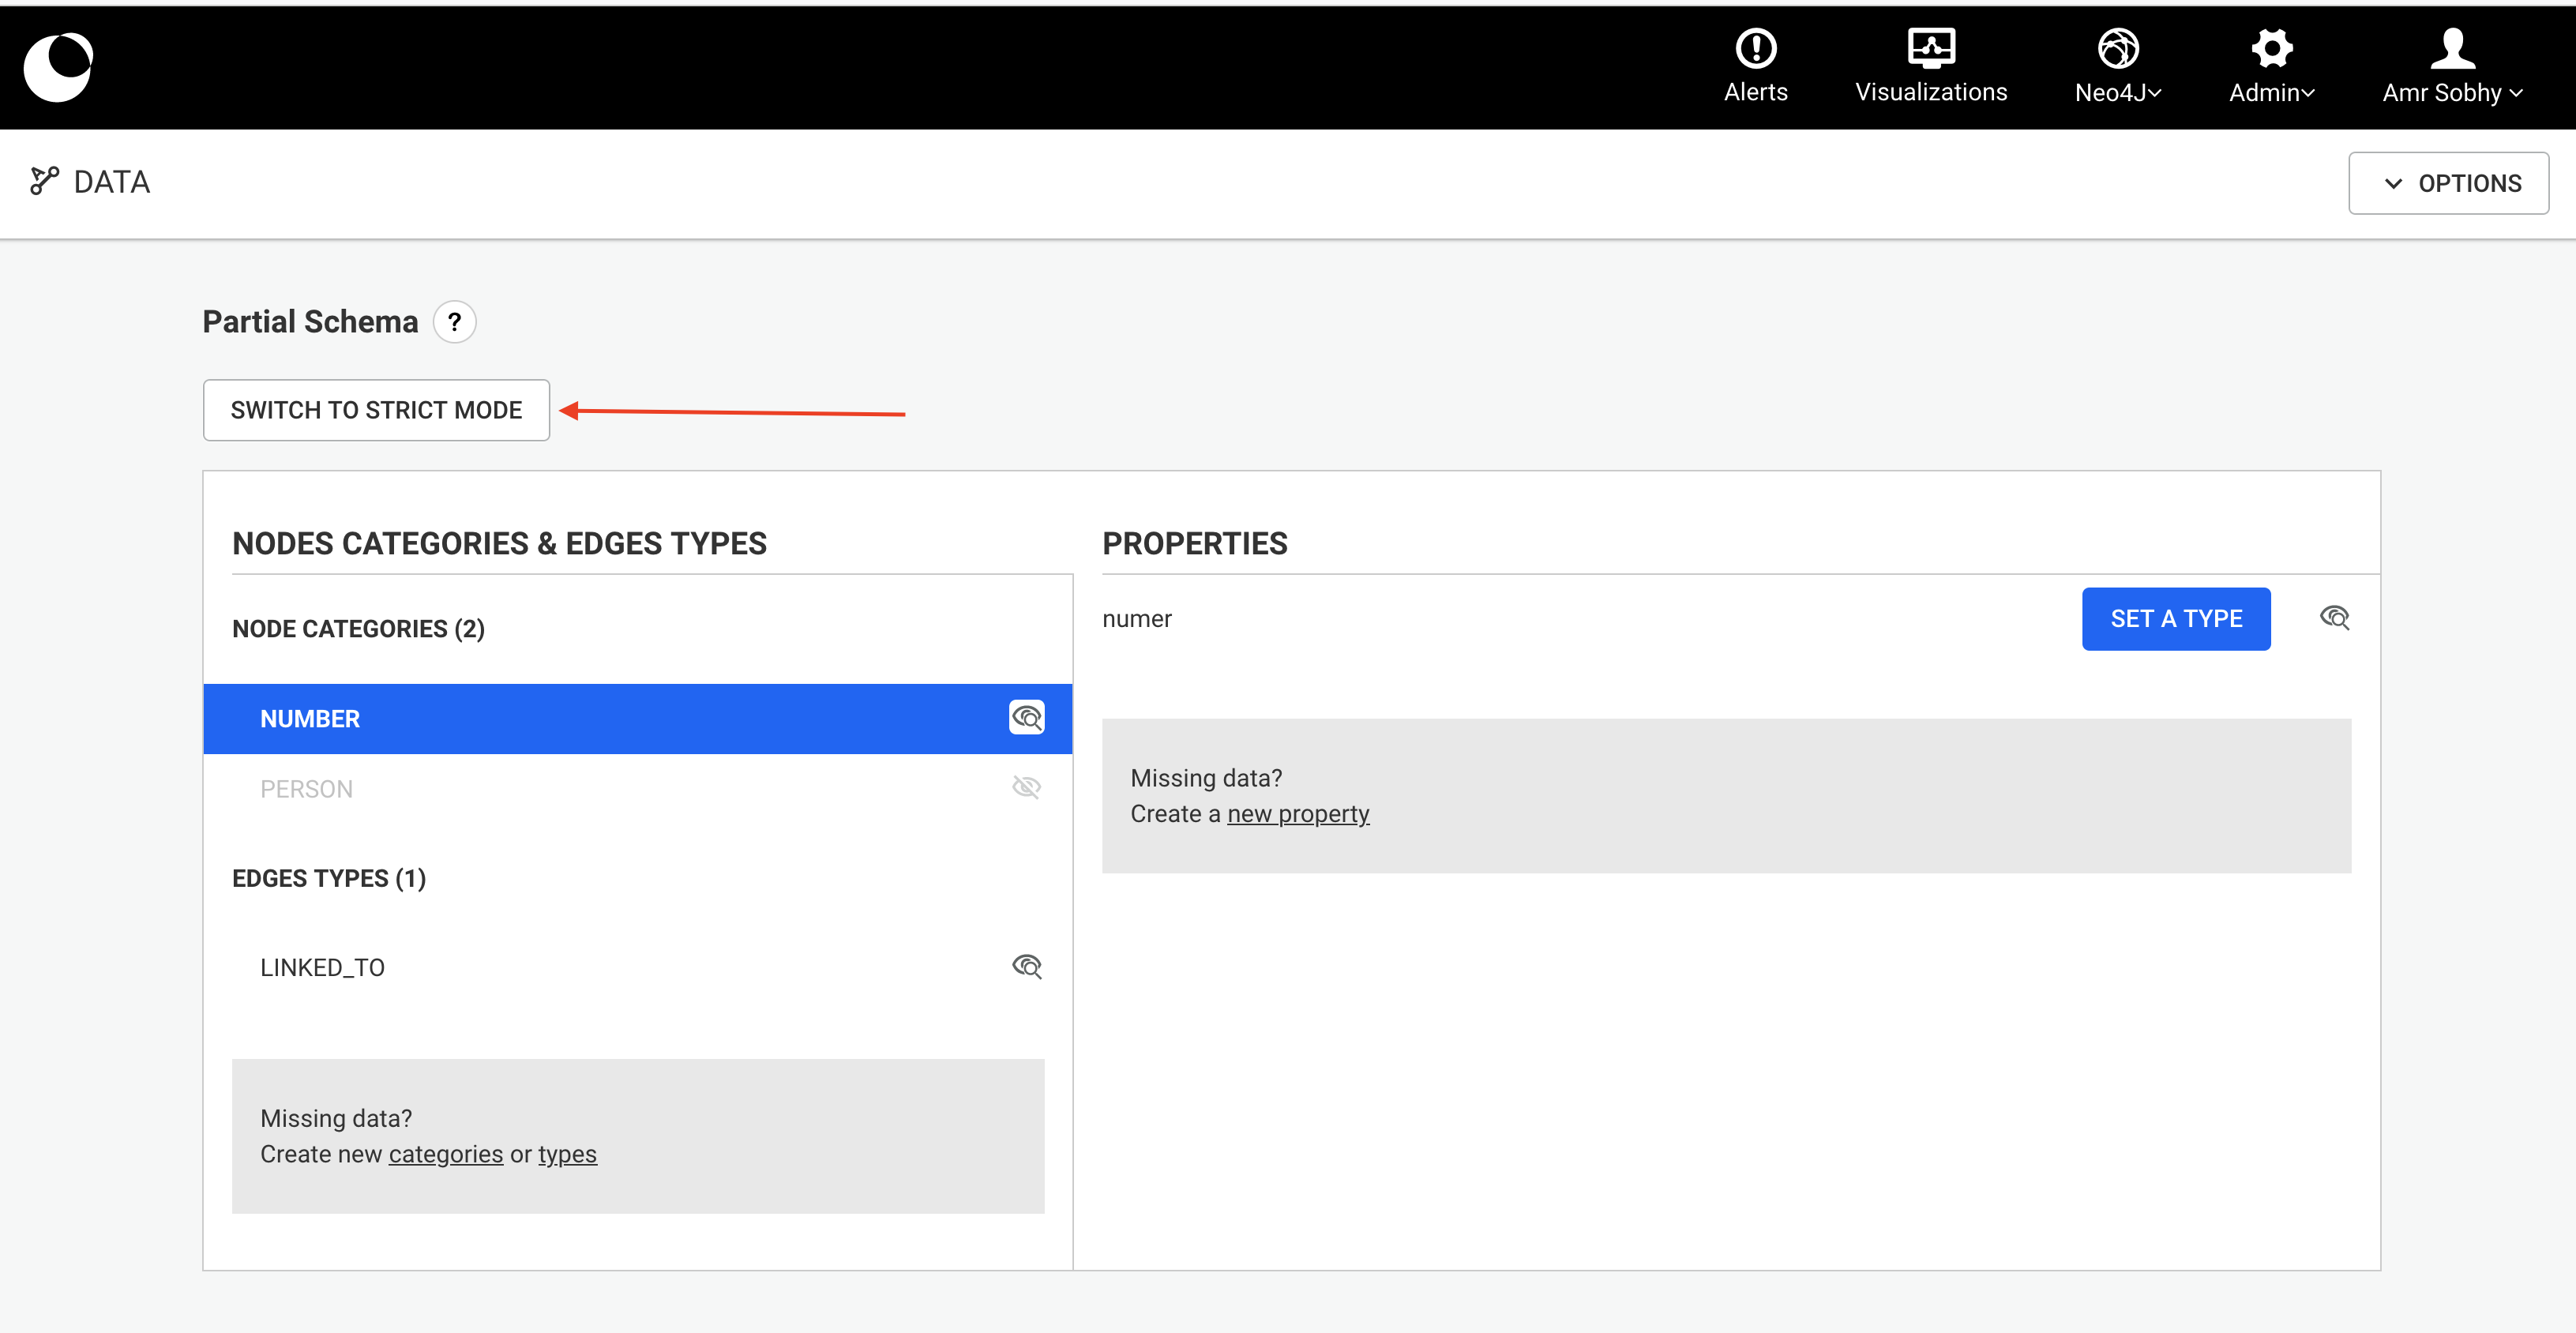
If the schema has changed a lot and you want to start fresh, it is possible to "Reset the schema": this will remove any schema declaration, and trigger a new sampling of the database.
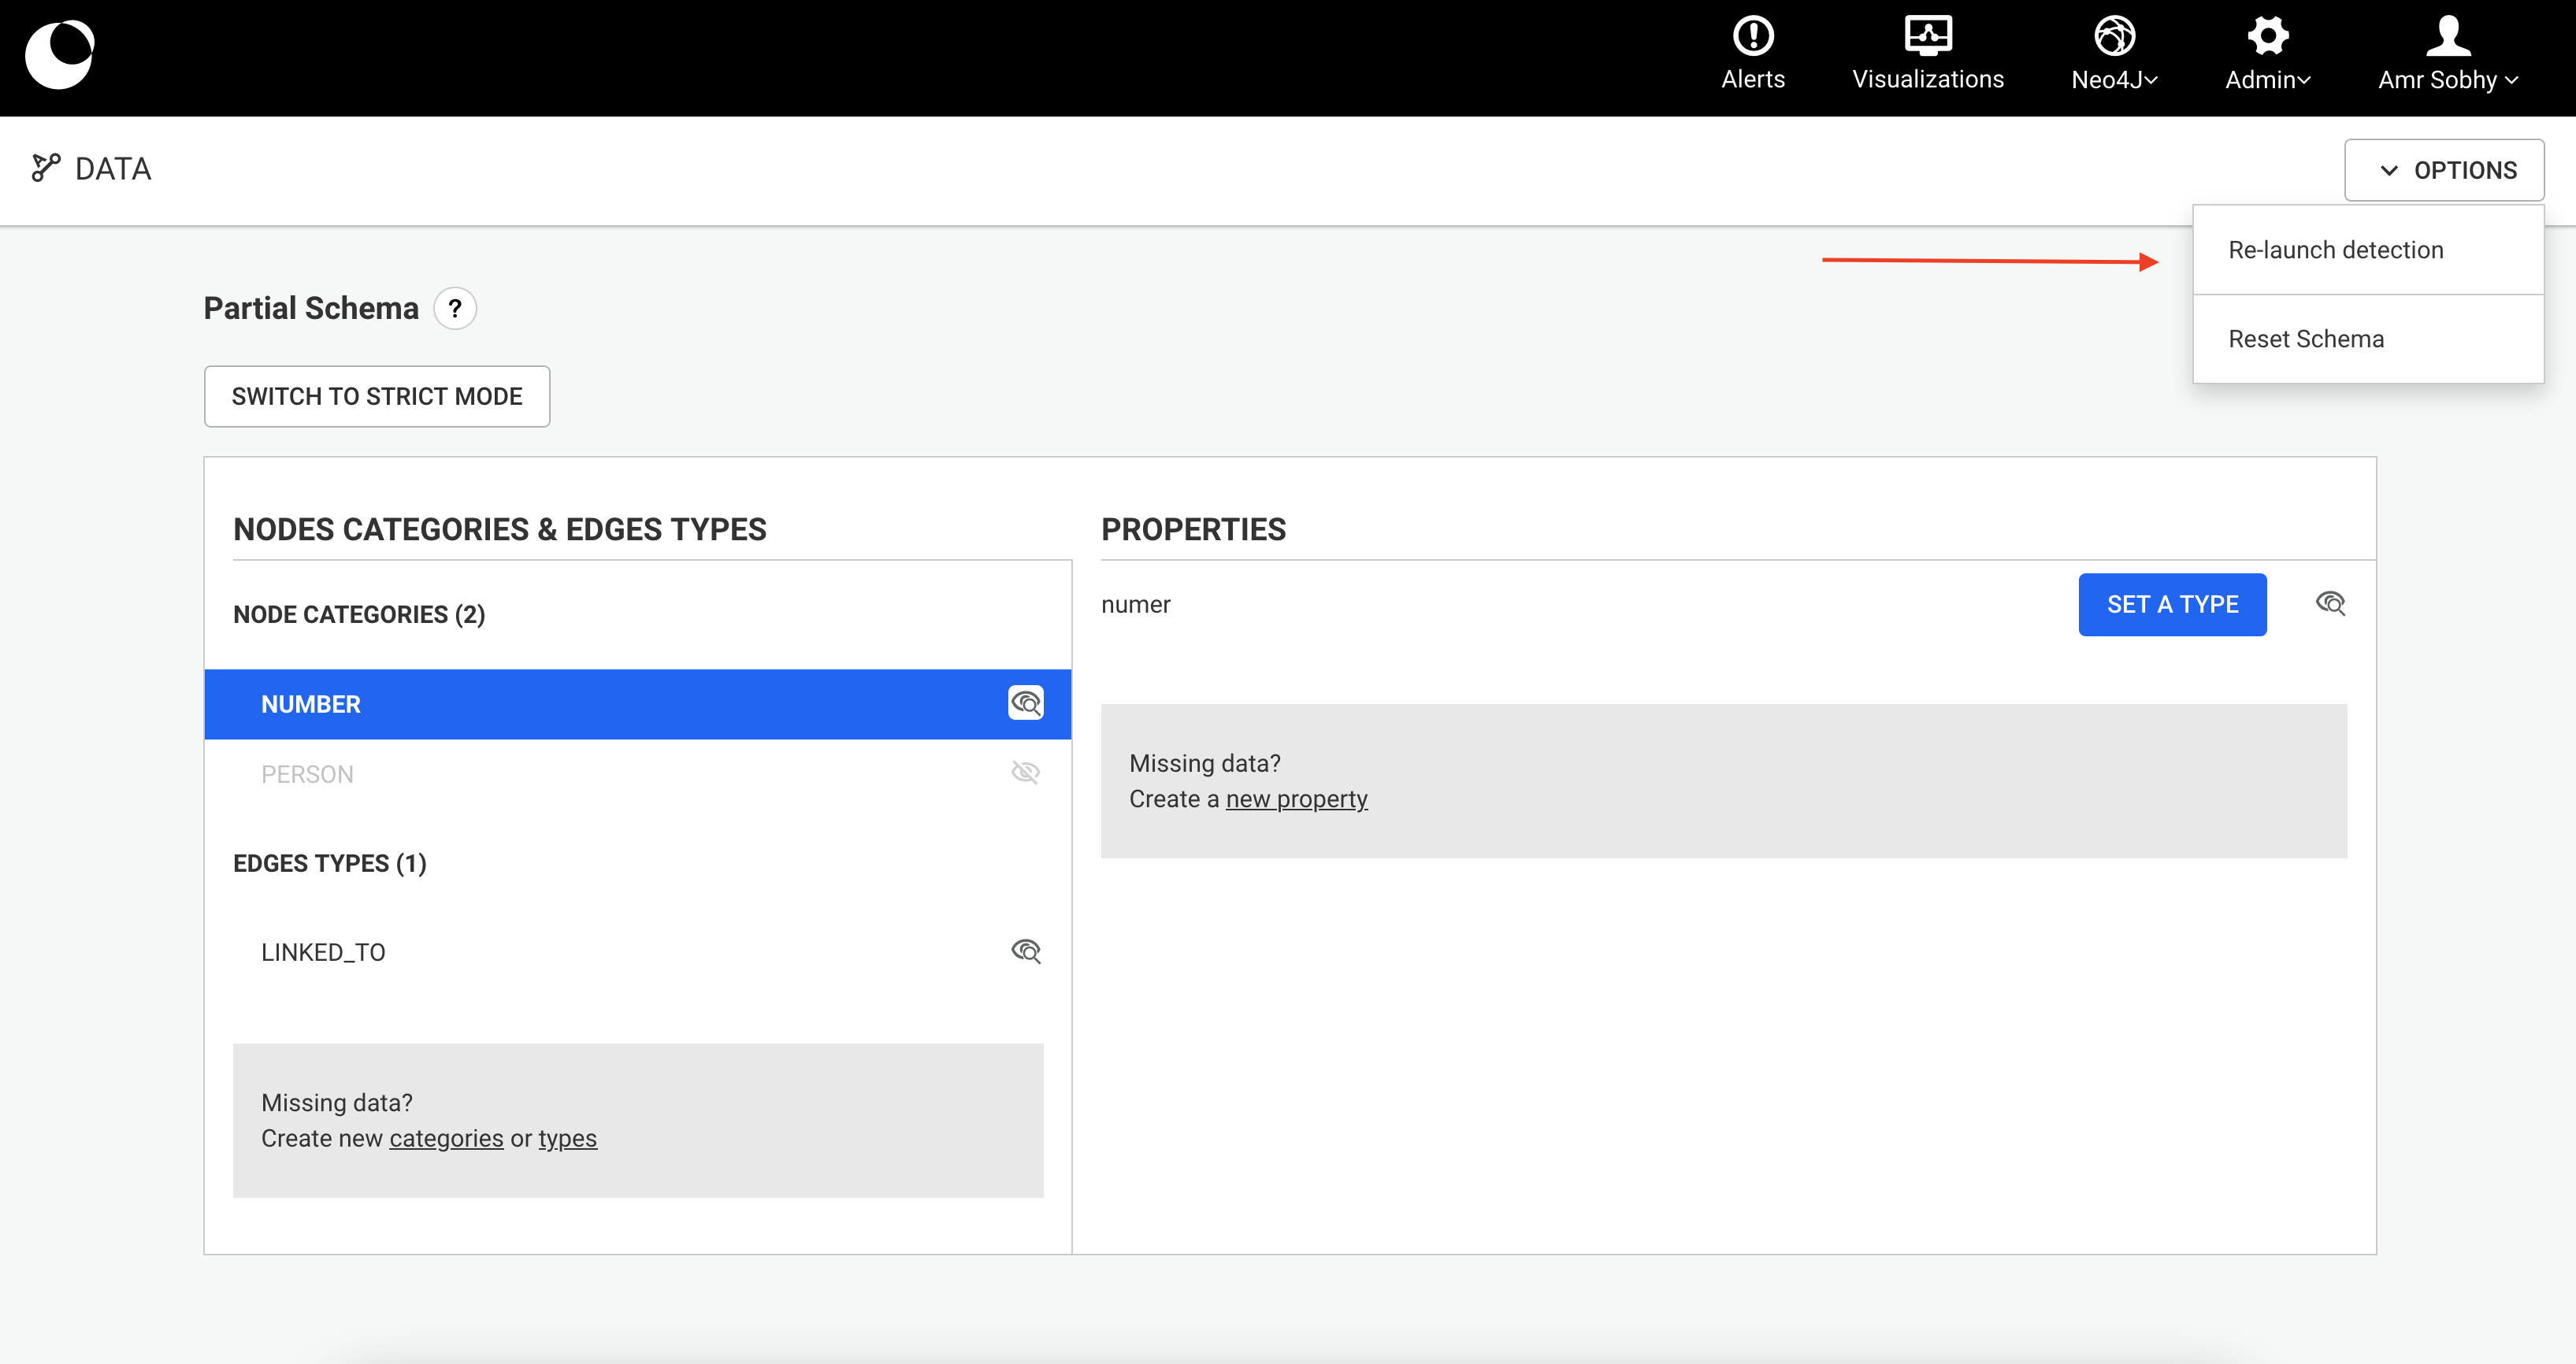
If the schema is too incomplete (due for example to a recent import in the graph database with lots of new node categories / edge types / properties) it's possible to launch manually another sampling round to detect the missing categories / types / properties, using the Re-launch detection option in the Options menu.
The sampling of the database will scan only part of the database. The larger the sample, the more accurate but the longer the detection.
The default setting for the sampling size is 500 nodes per node category, 500 edges per edge type.
You can change this by editing the value of sampledItemsPerType in the Advanced section of the configuration (via Admin > Global configuration).
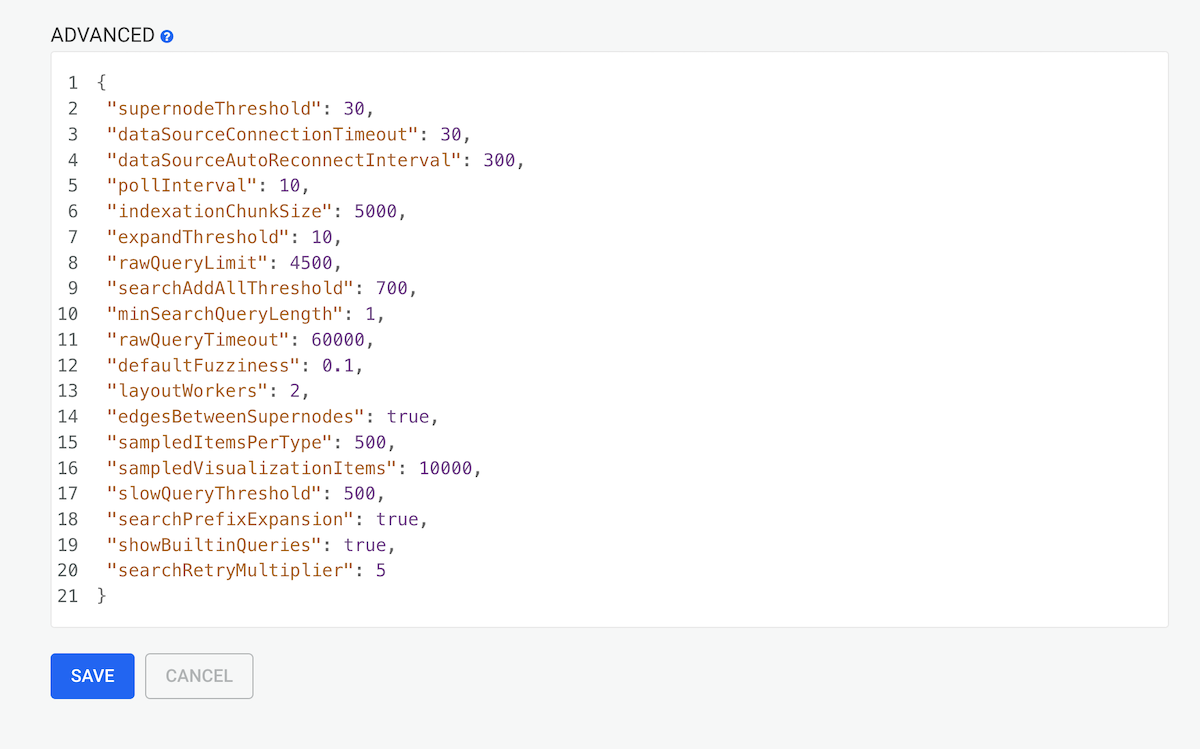
When Linkurious indexes your data, it will only index nodes and edges whose categories and properties are marked as searchable.
On the Linkurious interface to set a category/ property to be searchable, you need to select the (view & search) option, However if you want a category/ property to be non-searchable you need to select the (view-only) option.
If for example in the schema I declare:
In search, I will be able to search by "last_name" but not by "first_name". In case, I want to enable search also by "first_name", I will need to mark this property as searchable, however if I do this after the indexation has occurred, I will see a warning in the schema configuration page telling me that there are inconsistencies I will need to solve in order to search for some properties. In order to fix the issue, a full indexation is required.

In case a property has been changed from searchable to visible, another information is shown, telling us that, the current search index is not optimized, which means there are more properties indexed than what are really needed to search. Running a full indexation should optimize the search index.
The type of a property can be set by clicking on the "Set a type" button next to a property's name. A popup allows you to choose a type.
Once a property type has been set, the type is displayed next to the property name, and it is possible to change it using the "Edit" link.

IMPORTANT
Setting a property type in Linkurious Enterprise will not change the type of the corresponding values in the graph database. The consequences are explained below for each property type.
Setting a property type as String does not require any additional information:
Once a property type has been set as a String, all values for that property are processed as a String.
In the Workspace Filter panel:
Setting a property type as Number does not require any additional information:
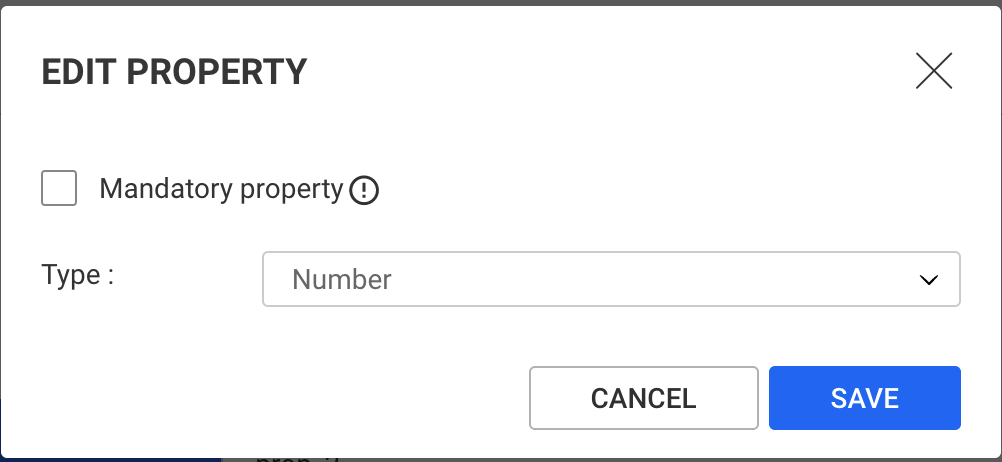
Once a property type has been set as a Number, values for that property fall into 2 categories:
In the Workspace Property panel, invalid values are displayed as string with a warning.
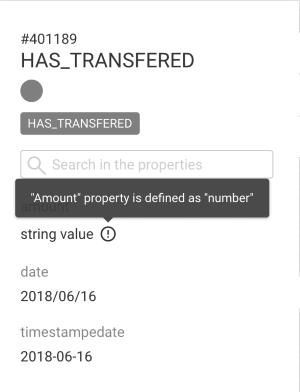
In the Workspace Filter panel:
When editing or creating a node/edge, properties set as Number can only accept a valid number.
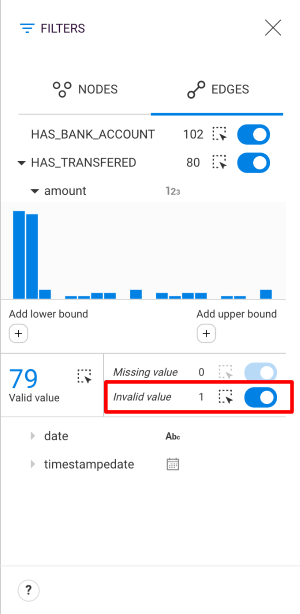
Setting a property type as "Enum" requires to enter a list of authorized values:
, or click on the "Add" button.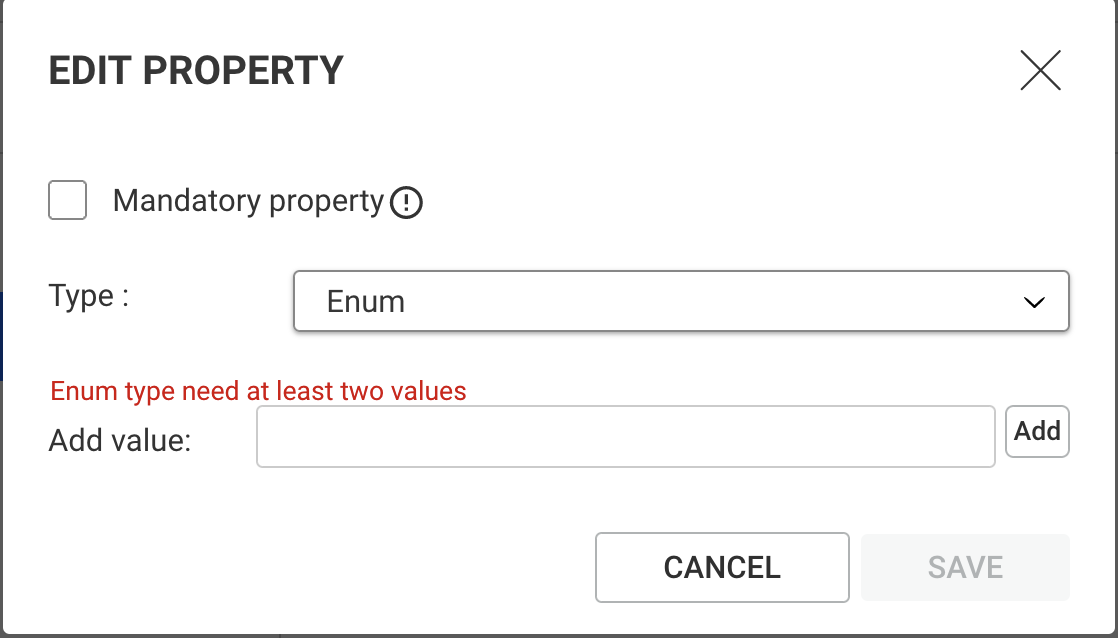
Once a property type has been set as Enum, values for that property fall into 2 categories:
In the Workspace Property panel, invalid values are displayed as string with a warning.
In the Workspace Filter panel:
When editing or creating a node/edge, the user pick the value of an Enum property from the list of the authorized values.
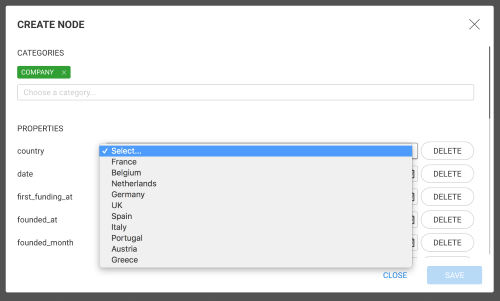
Setting a property type as True/false does not require any additional information:
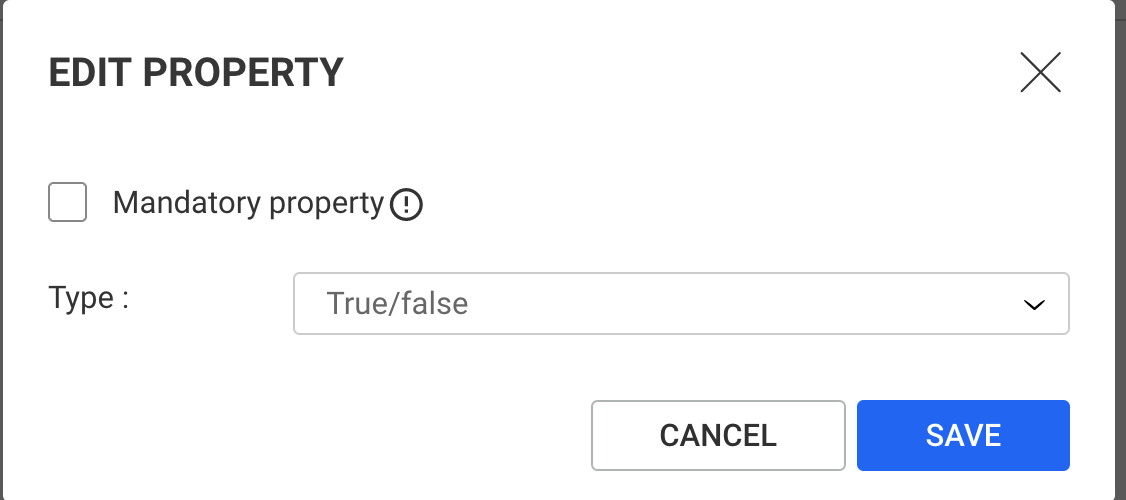
Once a property type has been set as a True/false, values for that property fall into 2 categories:
In the Workspace Property panel, invalid values are displayed as string with a warning.
In the Workspace Filter panel:
When editing or creating a node/edge, the user picks the value of a True/false property from a list containing "true" and "false".
Setting a property type as Date requires to select the storage format of the date in the graph database:
Native: the value is stored as native date (available only with Neo4j since version 3.5)
yyyy-mm-dd, dd/mm/yyyy, mm/dd/yyyy: the values are stored as String in the graph database according to one of these formats.
Timestamp (in milliseconds), Timestamp (in seconds): the values are stored as Numbers in the graph database. They represent a date as the number of milliseconds (or seconds) elapsed since January 1st, 1970 GMT and the date to be encoded.
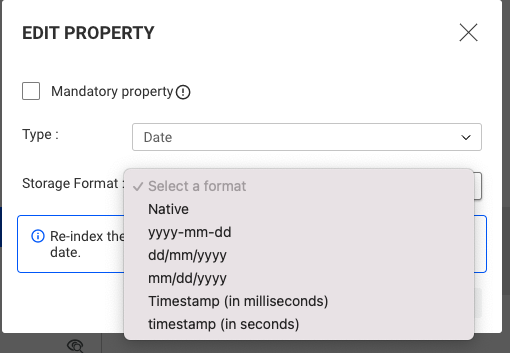
Once a property type has been set as Date, values for that property fall into 2 categories:
In the Workspace Property panel:
Anywhere a date value is displayed (including the Property panel):
yyyy-mm-dd regardless of their storage format.In the Workspace Filter panel:
When editing or creating a node/edge, the user picks the value of a Date property from a Date picker.
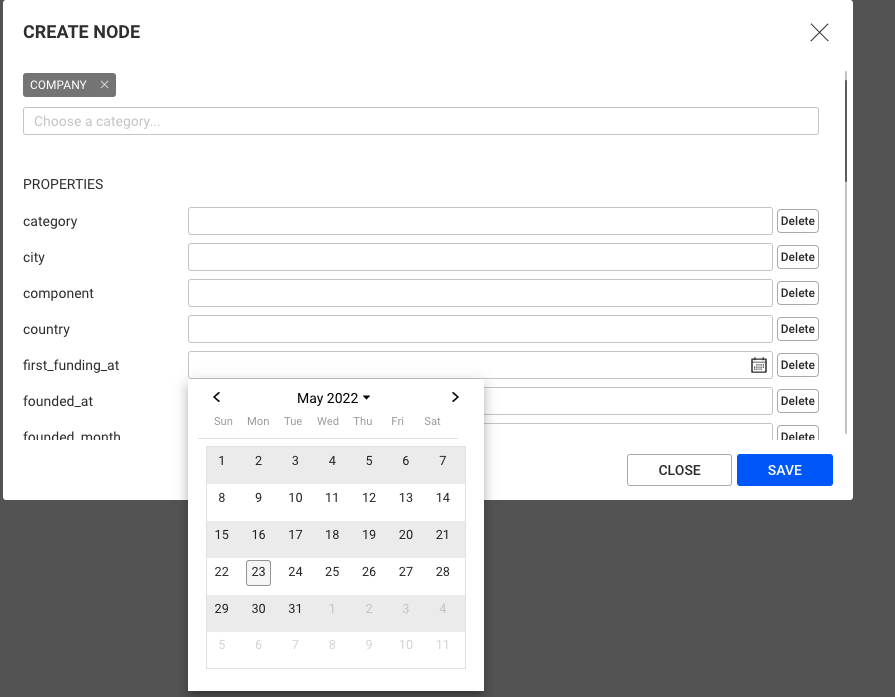
Setting a property type as Datetime requires to select the storage format of the date in the graph database:
Native: the value is stored as native date-time (available only with Neo4j since version 3.5)
YYYY-MM-DDThh:mm:ss: the values are stored as String in the graph database according to one of this format.
Timestamp (in milliseconds), Timestamp (in seconds): the values are stored as Numbers in the graph database. They represent a date as the number of milliseconds or seconds between January 1st 1970 and the date to be encoded.
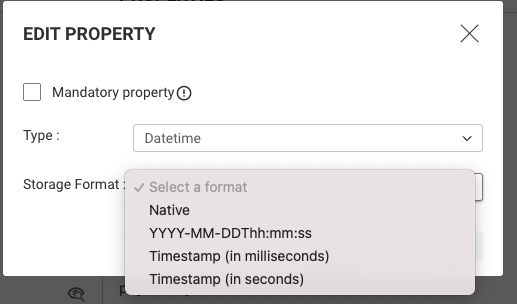
In case the Date-time is stored as Native type in Neo4j, there are 2 possible options:
DateTime object: these object contain an explicit time zone which is used.LocalDateTime object: these objects do not contain an explicit time zone, the default time zone configured in Linkurious Enterprise is assumed.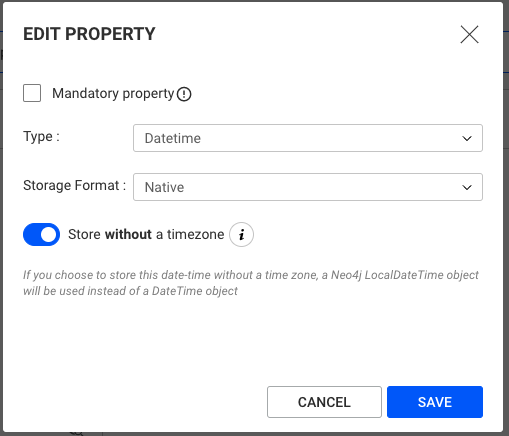
Once a property type has been set as Datetime, values for that property fall into 2 categories:
In the Workspace Property panel:
Anywhere a date value is displayed (including the Property panel):
YYYY-MM-DDThh:mm:ss regardless of their storage format.In the Workspace Filter panel:
When editing or creating a node/edge, the user picks the value of a Datetime property from a Date picker.
Setting a property type as Currency requires to select the currency symbol and the display format of values in Linkurious Enterprise:
[Symbol] #,###.##: Currency symbol is displayed first, comma is used as thousands separator and dot as decimal separator.
#.###,## [Symbol]: Currency symbol is displayed last, dot is used as thousands separator and comma as decimal separator.
# ###,## [Symbol]: Currency symbol is displayed last, space is used as thousands separator and comma as decimal separator.
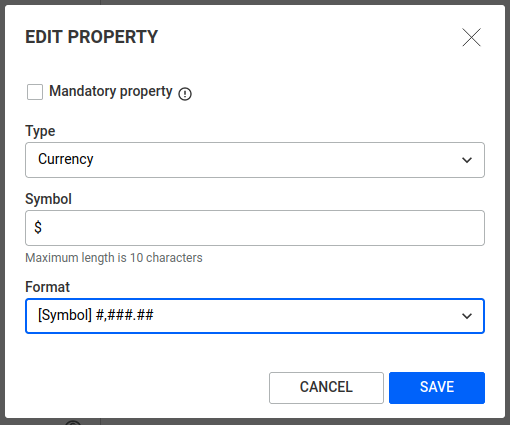
Once a property type has been set as Currency, values for that property fall into 2 categories:
In the Workspace Property panel, invalid values are displayed as string with a warning.
In the Workspace, displayed currency values are formatted according to their property type configuration.
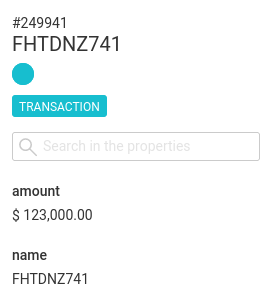
In the Workspace Filter panel:
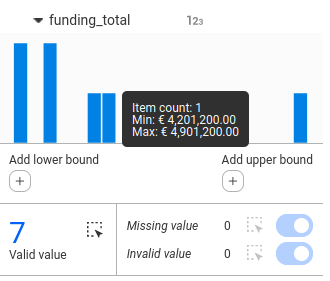
When editing or creating a node/edge, properties set as Currency can only accept a valid number.
Each property can be set as "Mandatory" by clicking the corresponding checkbox in the property type popup.
Consequences of making a property mandatory:
In the Workspace Property panel:
- The property key is always displayed.
- If the item at hand does not have this property, the property is displayed with a warning that the value is missing.
When editing or creating a node/edge, the value of a mandatory property cannot be empty.
When nodes have multiple categories, it is possible that a property can be given 2 different types. For example:
When such conflicts arise:
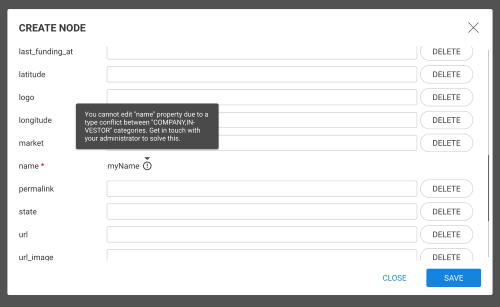
The schema allows to switch the search/visibility options for node-categories and edge-types by clicking on the "eye" icon next to the category/type name.
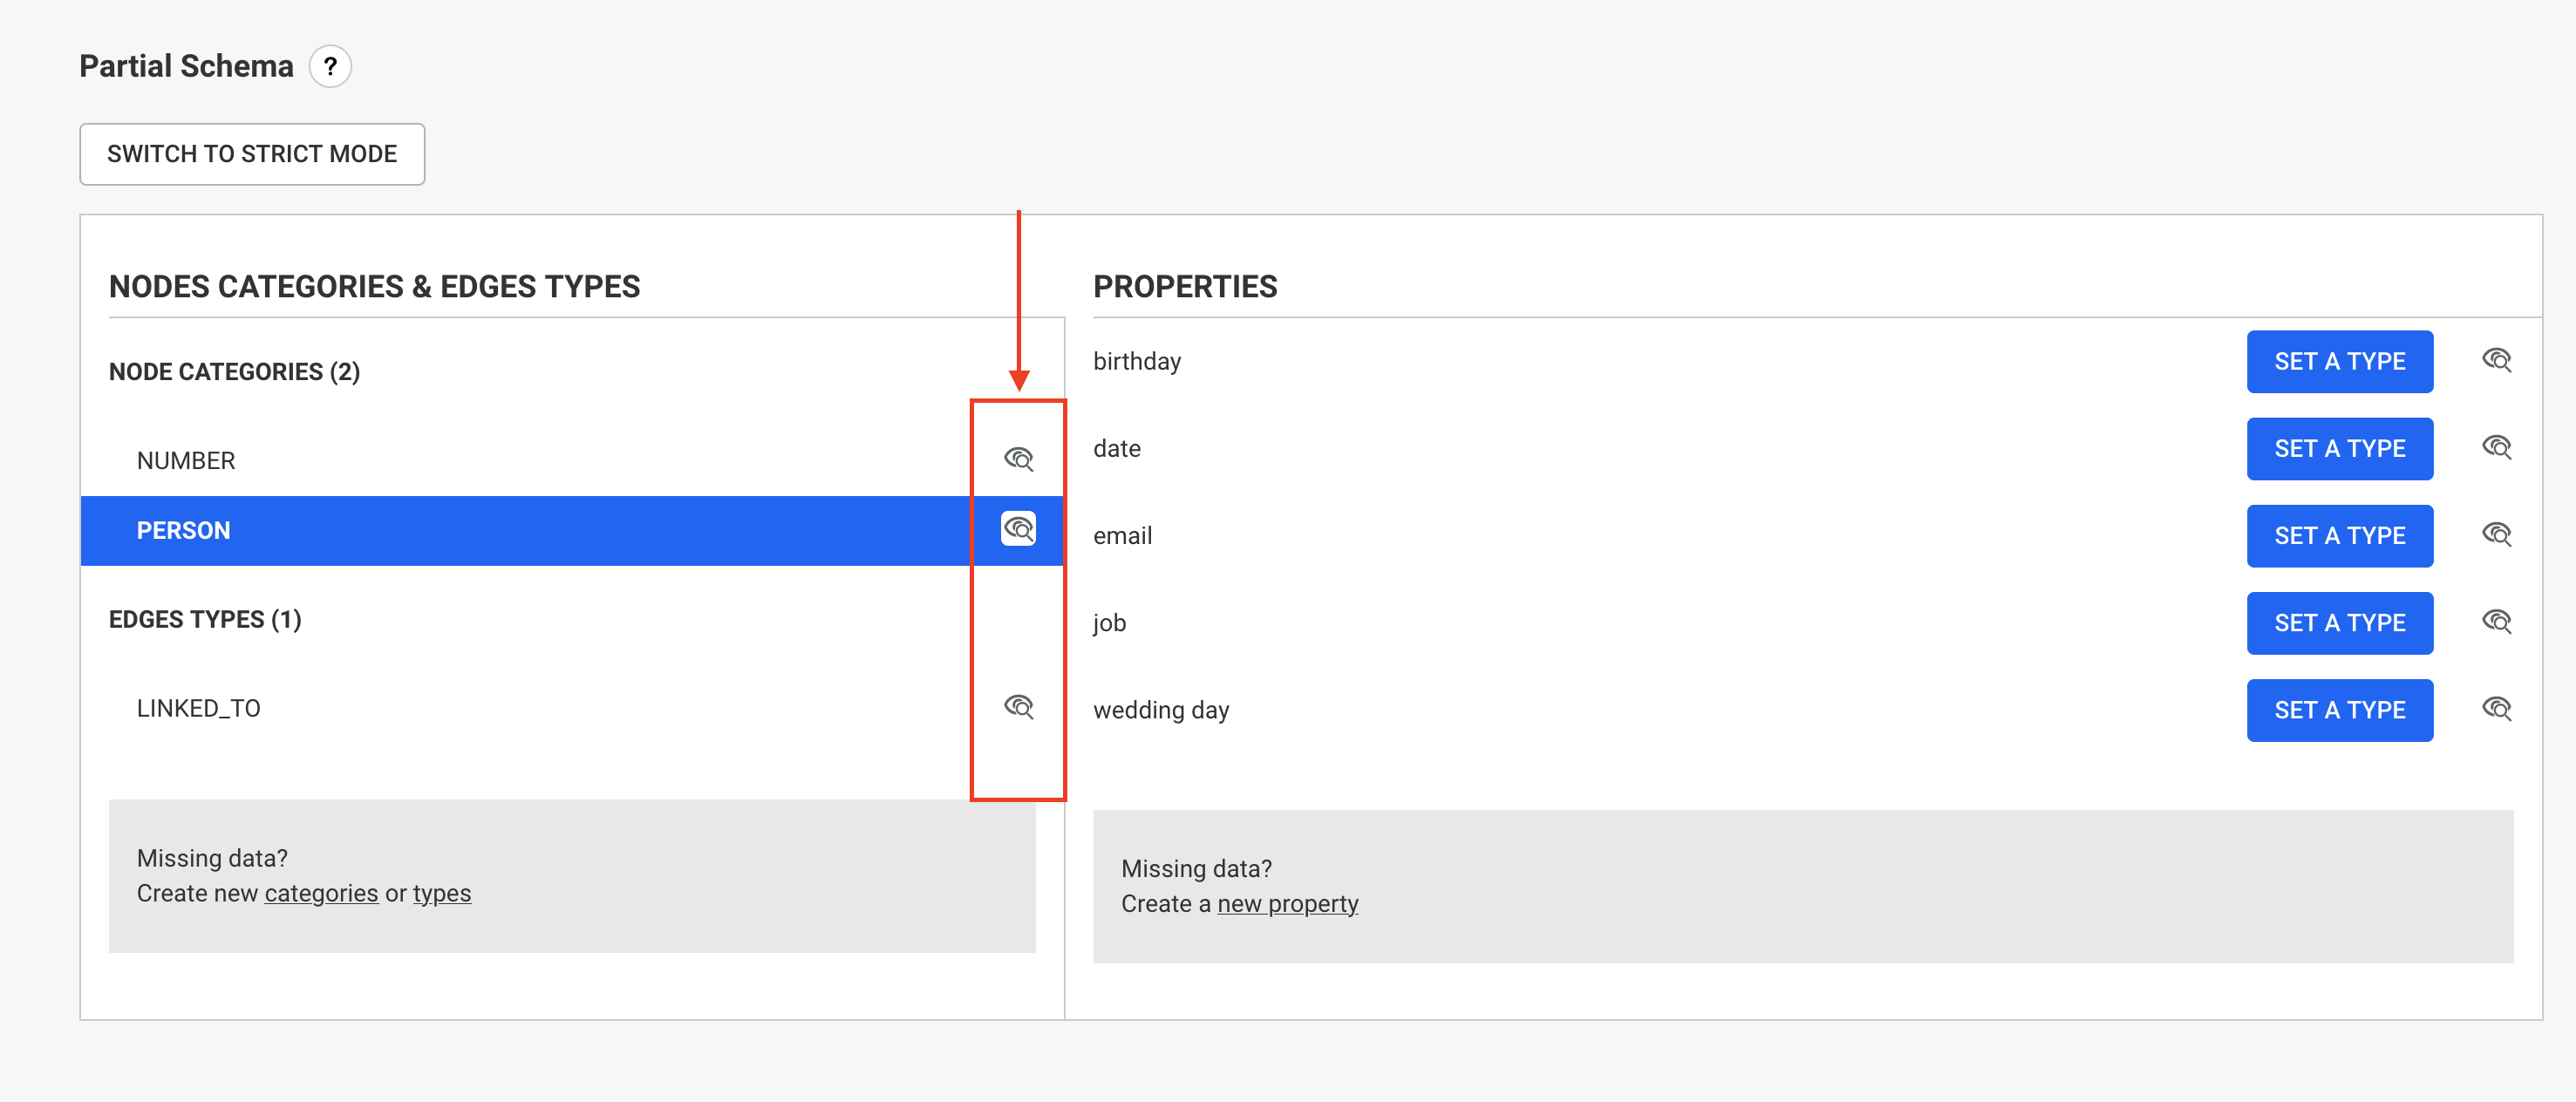
Node-categories and edge-types search option can be set to "Search & view", "View only" or "No access"
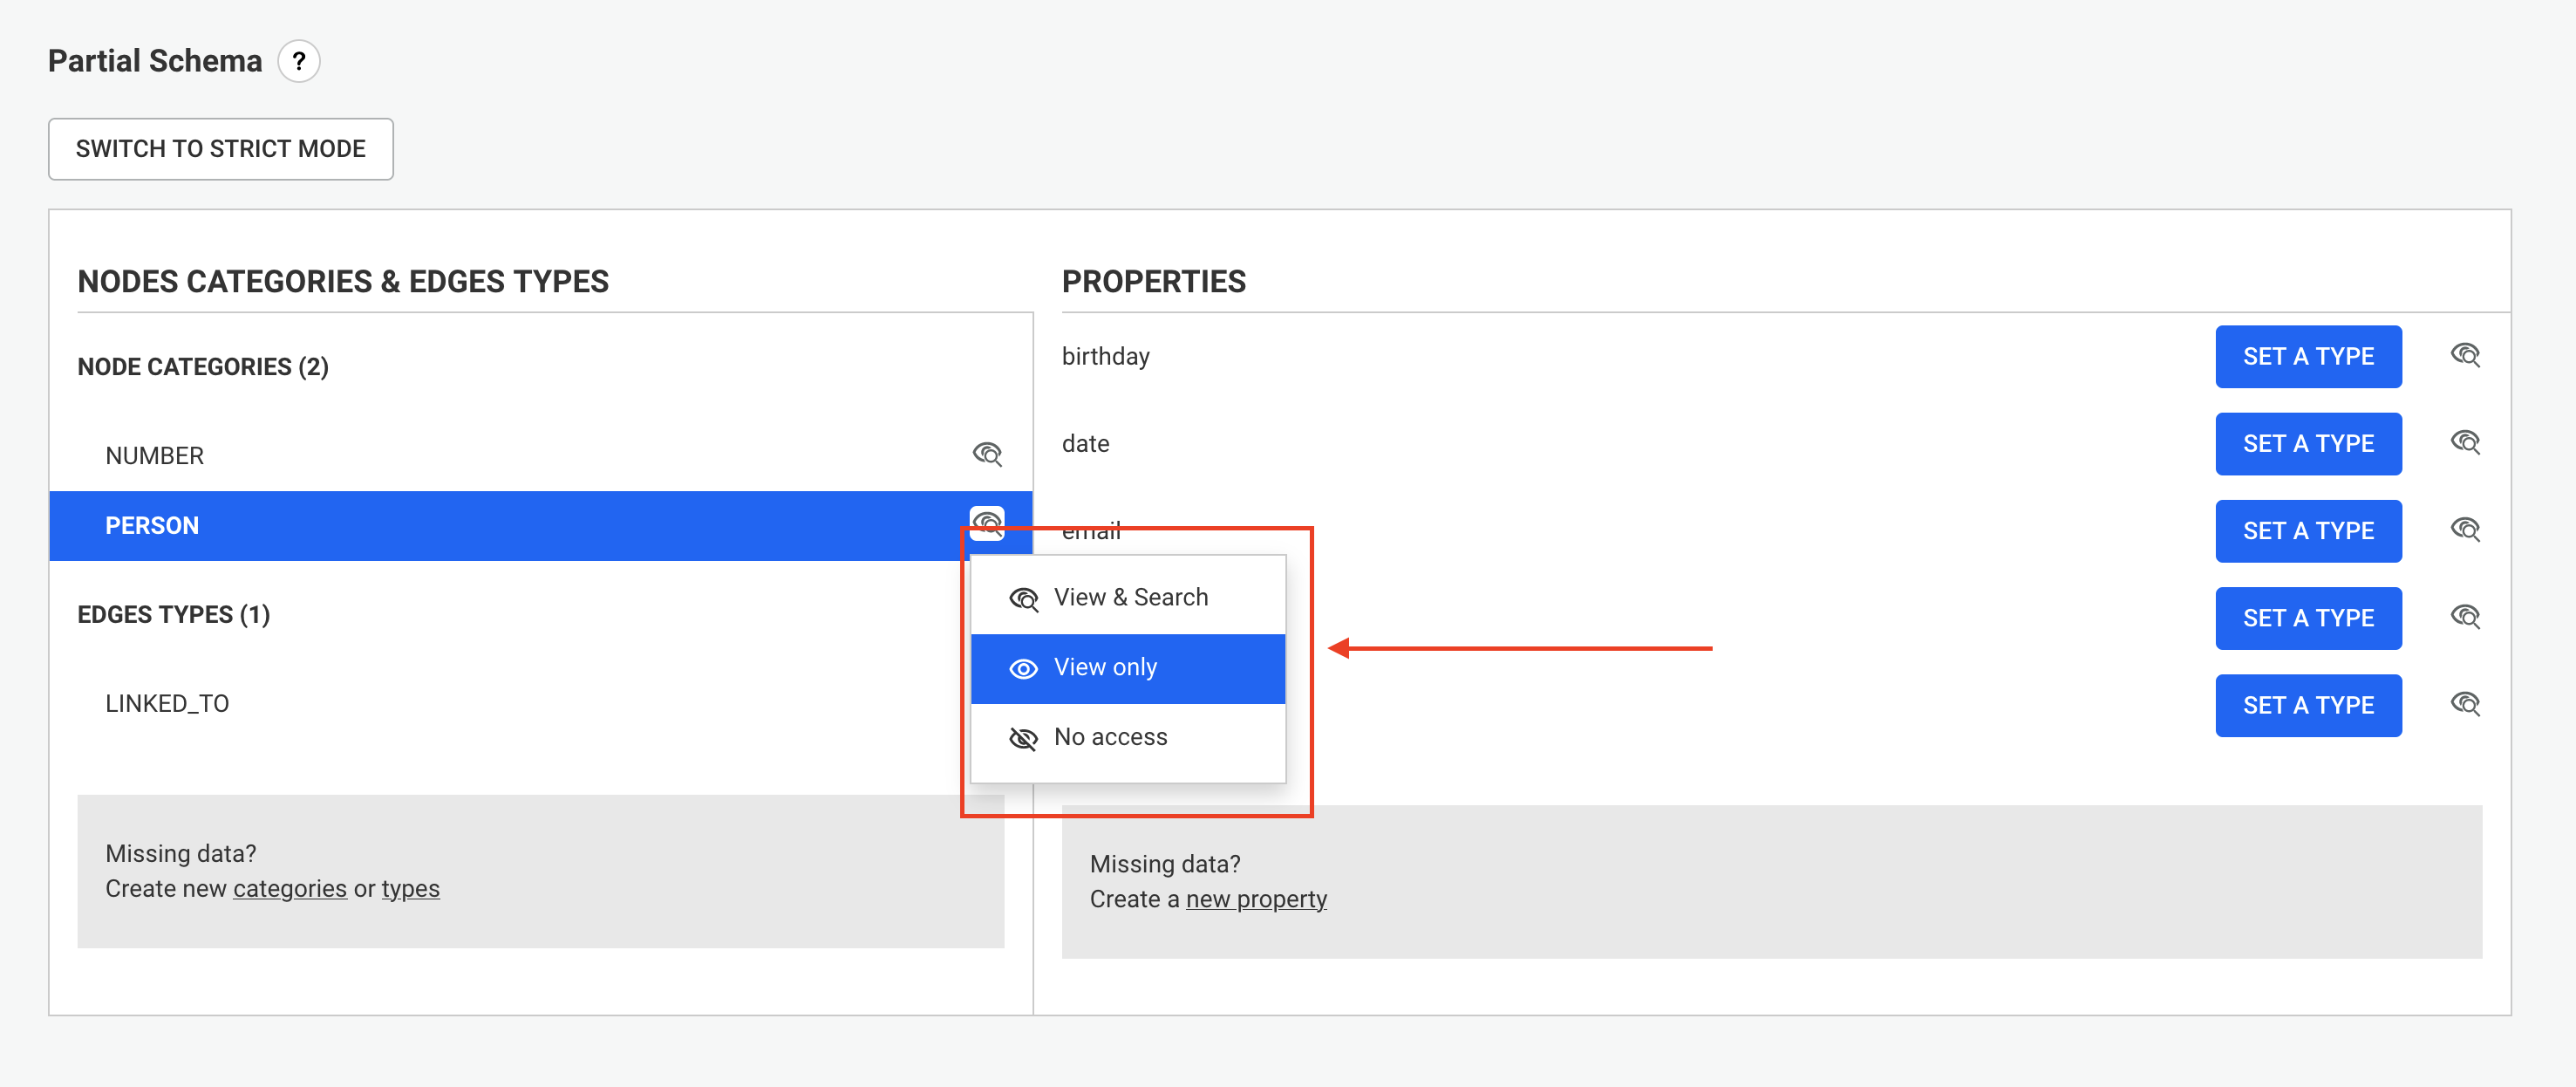
Switching the visibility off of a node-category (or an edge-type) can be useful when some data is stored in the database for technical reasons but is useless for the users.
Switching a node-category (or an edge-type) to "Only view" will make them not searchable, but they can still appear in the visualisation as result of a query or of a graph expansion.
Switching a node-category (or an edge-type) to "No access" is equivalent to setting it to the "No Access" access right for all existing and future User Groups. Nobody will have access to this category / type.
When switching a node-category (or an edge-type) to "No access", a warning is displayed, since it may be used in some existing visualizations, and may impact users.
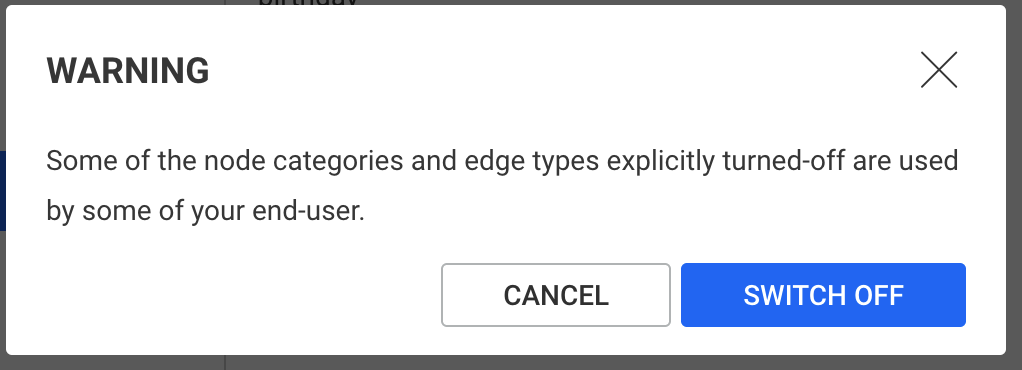
Switching a property search options can be done by clicking on the "eye" icon next to the property name.
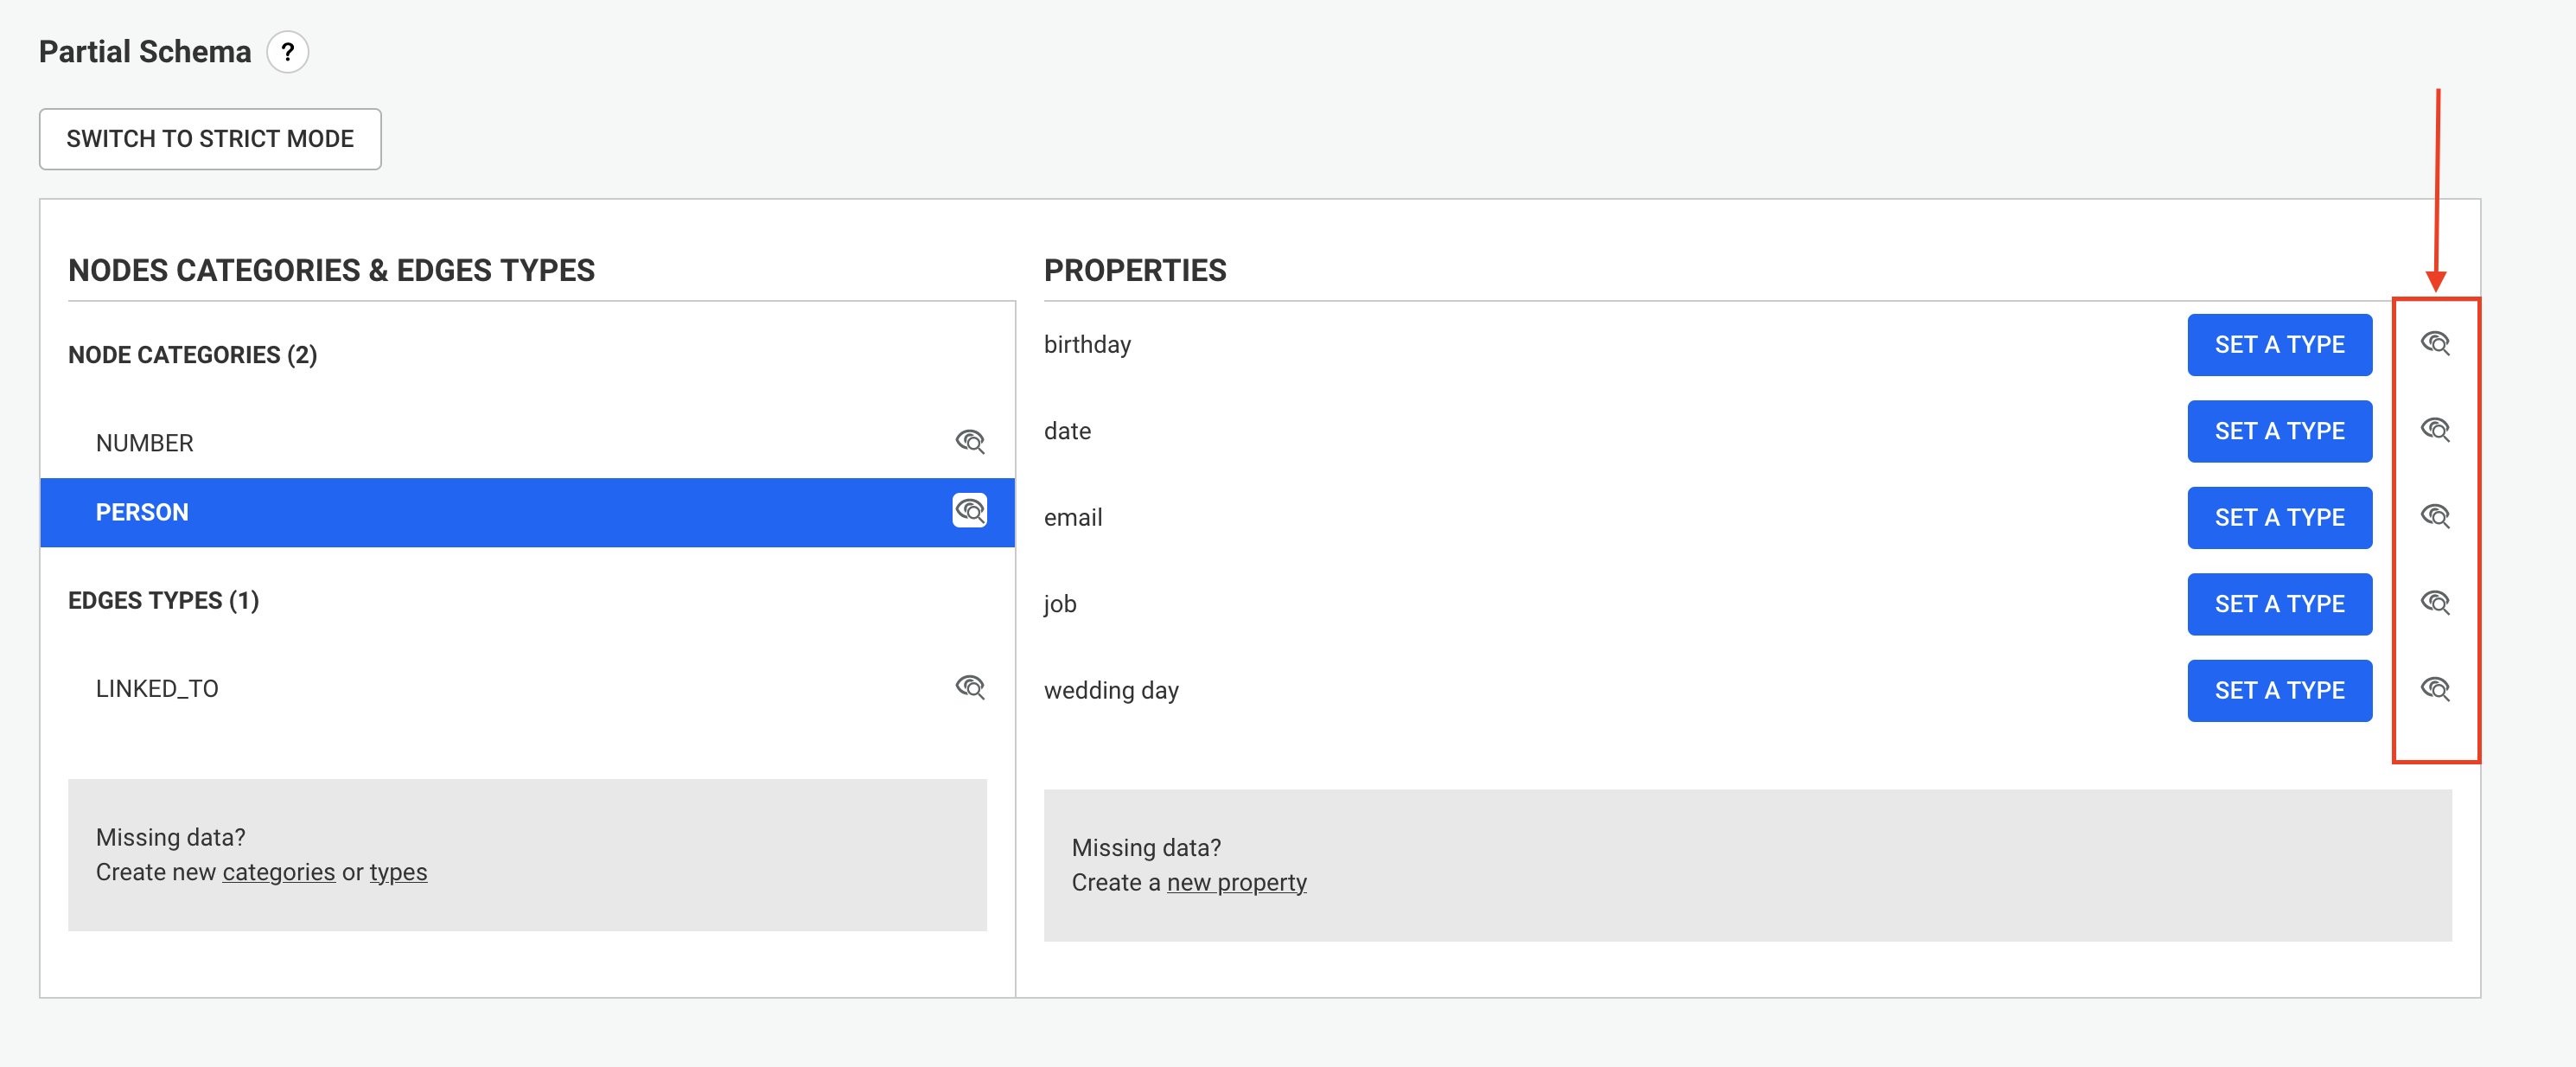
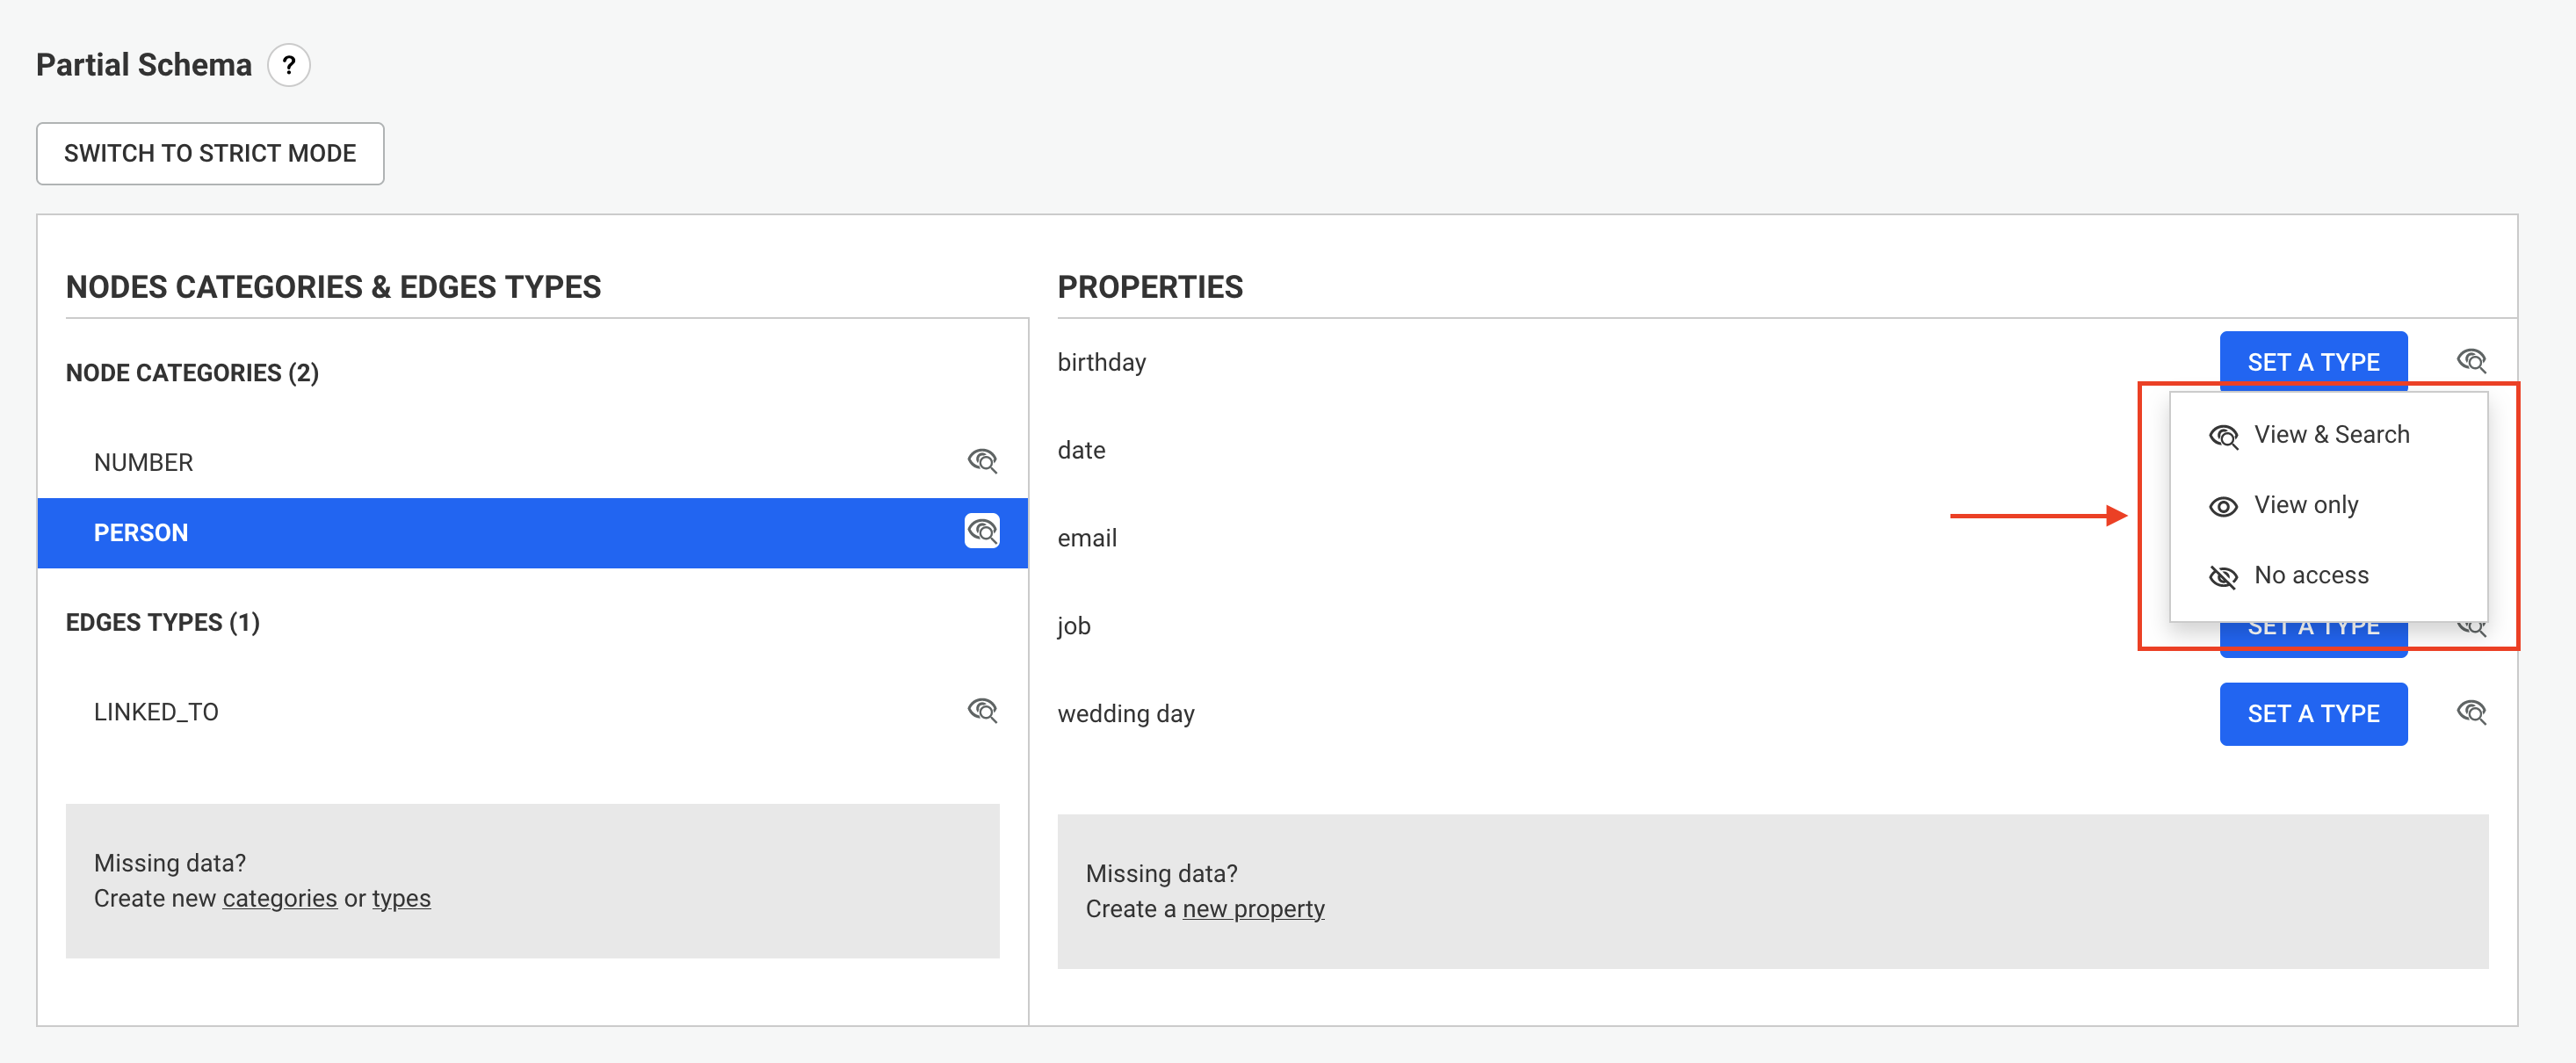
Properties can be hidden from all users by switching them to "No access". A "No access" property:
Properties can be only visible and not searchable by switching them to "Only view". A "Only view" property:
Contrary to the "partial mode", when in "strict mode", you cannot deviate from the data schema when creating or editing a node or an edge.
More specifically, since all properties are typed, you cannot enter a value that is inconsistent with the schema or add arbitrary properties to nodes and edges.
A property must be declared in the schema first, before being available to users.
The schema can be switched to "strict mode" by clicking on the "Switch to strict mode" button.

The "strict mode" requires to have types declared for all properties. As a consequence, when enabling "strict mode", all properties that do not have a type are switched to No access.
When switching to "strict mode", a warning is displayed with the list of properties that are being automatically switched to No access.
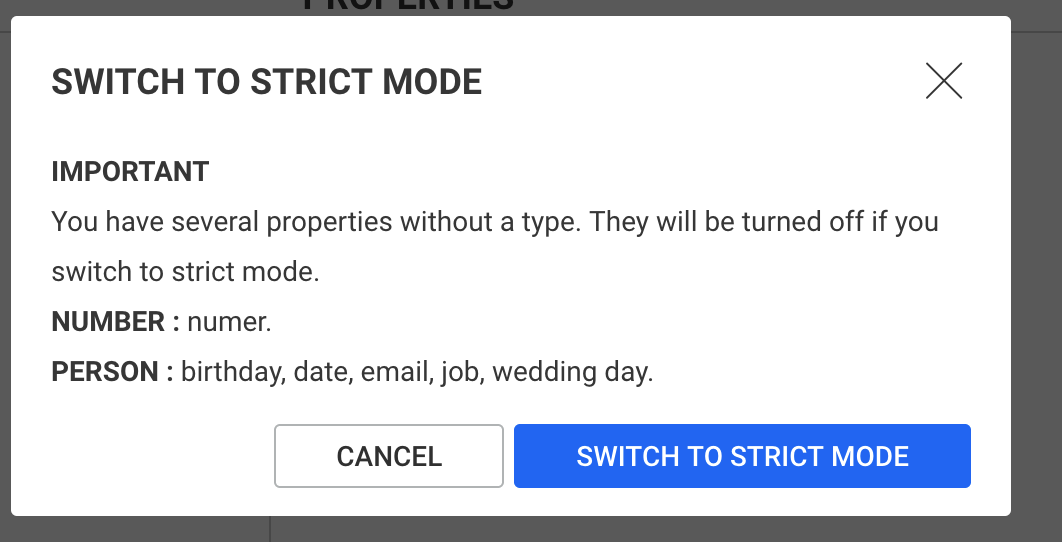
A schema in "strict mode" cannot evolve without an explicit action from the administrator. That means that any node-category, edge-type or property that would be detected after switching to "strict mode" would be added to the schema but be switched to No access by default.
A schema administrator can add new node-categories, edge-types or properties manually.
A schema in "strict mode" should be stable, so it is non-editable by default. To enable schema edition, the schema administrator needs to click on the corresponding toggle button.

The Alerts feature is a rule-based detection approach that identifies specific patterns in the graph database.
For each alert, Linkurious Enterprise will analyze the patterns resulting from the detection rule (the query) to combine them in cases allowing the analysts to perform investigations more efficiently.
Alerts are currently only supported via Neo4j. If you are using a different graph vendor, please get in touch.
On the Alert page, either click the "New alert" card or the "Create New Alert" button on the upper-right area of the screen to create a new alert.
There are two main sections on the Alert Creation modal: first, the general settings where you can setup the name, frequency and the sharing options of the alert. Then you can configure the query and the target of the alert.
On the first section of the "Alert Creation" modal, we can name the alert and set the frequency at which the query will be run by Linkurious Enterprise. You can also in this section configure the sharing settings of the alert:
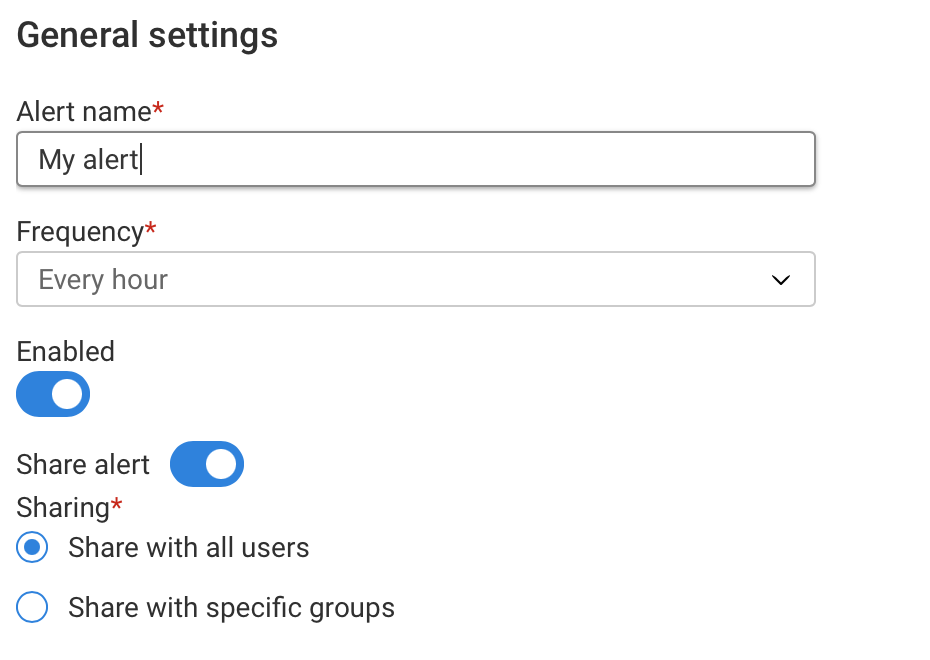
The query is a description of the graph pattern used for detection. Linkurious Enterprise will periodically execute this query (see Alert Settings) and assign each detection result to a case.
The user experience will vary depending on the way results are returned by the query (see more details in the following example section).
To learn how to write Cypher queries, check out the Cypher documentation.
The "Preview" button verifies that the query is correct and shows a preview of the first few detection results.
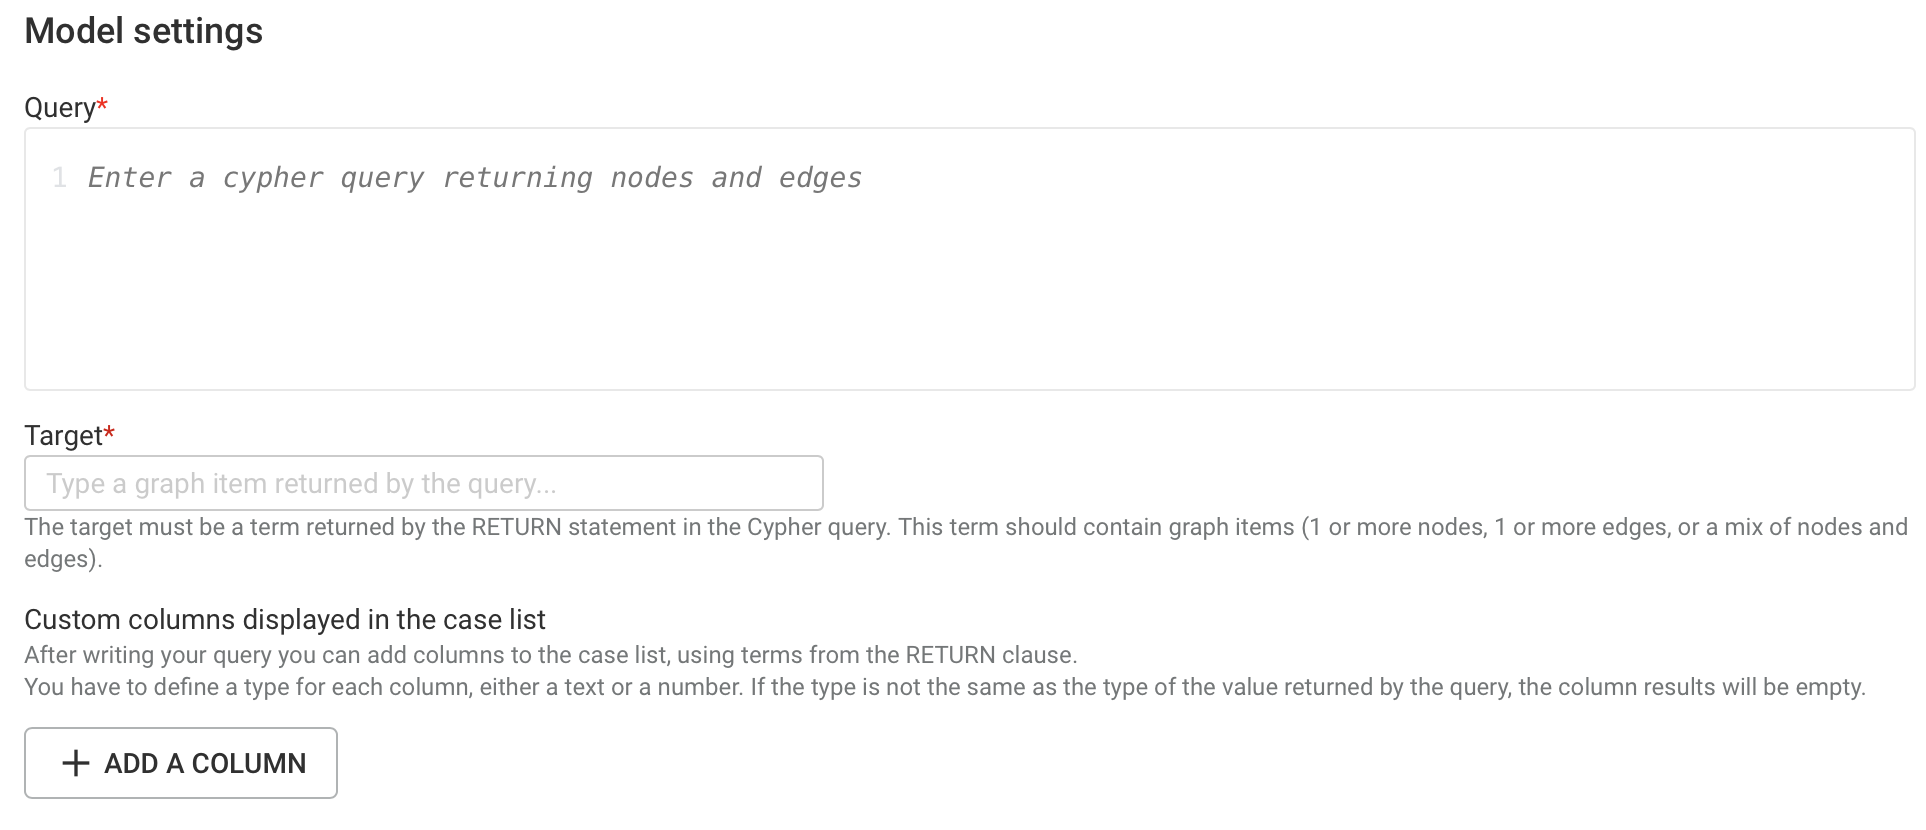
The preview feature is only used to validate the query, the results shown are raw detection results returned by the Cypher query.
The real list of cases may be different from the preview as multiple raw results may be grouped in the same case based on the target (see below).
The target must be a term returned by the RETURN statement in the Cypher query.
This term should contain graph elements such as a node, an edge or a collection of the two (other items are not valid and will be ignored).
The target helps assign the detection results from the alert query to the right case.
That means that for any given alert, all new detection results with the same target will be
assigned to the same open case.
A typical scenario may be when your query returns several paths but you would like to analyze all paths related to the same entity (target) in the same graph in Linkurious Enterprise. If for example, as a bank, you are monitoring the transactions of all the clients with a query similar to the following:
MATCH p = (c:Client)-[:HAS_BANK_ACCOUNT]->(a:BankAccount)-[t:HAS_TRANSFERED]-(other:BankAccount)
WHERE t.amount > 1000
RETURN p
You would be interested in having all the relevant transactions for a client (c) in the same investigation case. To achieve this, you would change the return statement to RETURN c, p and set c as the target of your alert.
Another typical scenario may be when your query already aggregates the data. Continuing with the previous example, you may be interested in analyzing cases where the total amount among all the transactions is over a predefined threshold. In this case, you can have a query similar to the following:
MATCH p = (c:Client)-[:HAS_BANK_ACCOUNT]->(a:BankAccount)-[t:HAS_TRANSFERED]-(other:BankAccount)
WITH c, collect(p) as paths, sum(t.amount) as total_amount
WHERE total_amount > 1000000
RETURN c, paths
When defining a grouping rule in your query you are most likely already implicitly defining where you want to focus the investigation. In this case, a good choice for the target would be the same set of variables used to define the grouping rule in the query (in this example, it would again be the client c).
When there is the need to define multiple variables as a target, they need to be collected together in another variable.
For example, to use n1 and n2 as a composite target, use the following return statement to create a new variable t to be used as the target:
RETURN [n1, n2] as t
The resulting cases are shown in the case list page as a table which can be sorted by custom columns defined during the alert setup.
The order defined in your Cypher query through the
ORDER BYstatement doesn’t impact the whole order of the case list.
Custom columns provide additional information that can be selected from the returned values of the query. A new custom column consists of:
Consider this cypher query snippet WITH c, sum(t.amount) as total_amount RETURN c, total_amount where c is a variable representing a node, we can use both the property of a graph element (c.name) and the variable name associated to a computed value (total_amount) as a term.

When several results are combined into a single case, the value shown in the column of the case list will be the last one returned by your cypher query.
A good practice is to choose terms associated to the target (e.g. a target’s property). If you have different needs, please get in touch.
The saved alert can be accessed in the "Alerts" page, as seen in the image below.

On the Alert page, use the edit button on the alert to change it by either using the context menu from when you right-click or from the action bar on the top-right of the screen after selecting the alert.
The next steps are the same as the alert creation.
Editing the query, the target or the columns of an existing alert will cause the deletion of all the open and in progress cases (i.e. the ongoing saved investigations and comment history will be deleted).
Closed cases are not deleted, however any new custom columns added after the closure of the case will be filled with an
N/Avalue.
Imagine a scenario where a Financial Institution is using Linkurious Enterprise and needs to perform a particular investigation described by the following:
You could use the following graph query for this alert:
MATCH (c:Client)-[e]->(p:Phone)<-[e2]-(c2:Client)
WHERE c <> c2
RETURN DISTINCT c, e, p
Such a query would return one detection result for each distinct Client connected to a Phone where there is at least another Client connected.
The image below shows all three detection results returned by the query when a Phone with number
123456789 was used by three different Clients with their respective client_id equal to 1, 2 and 3.
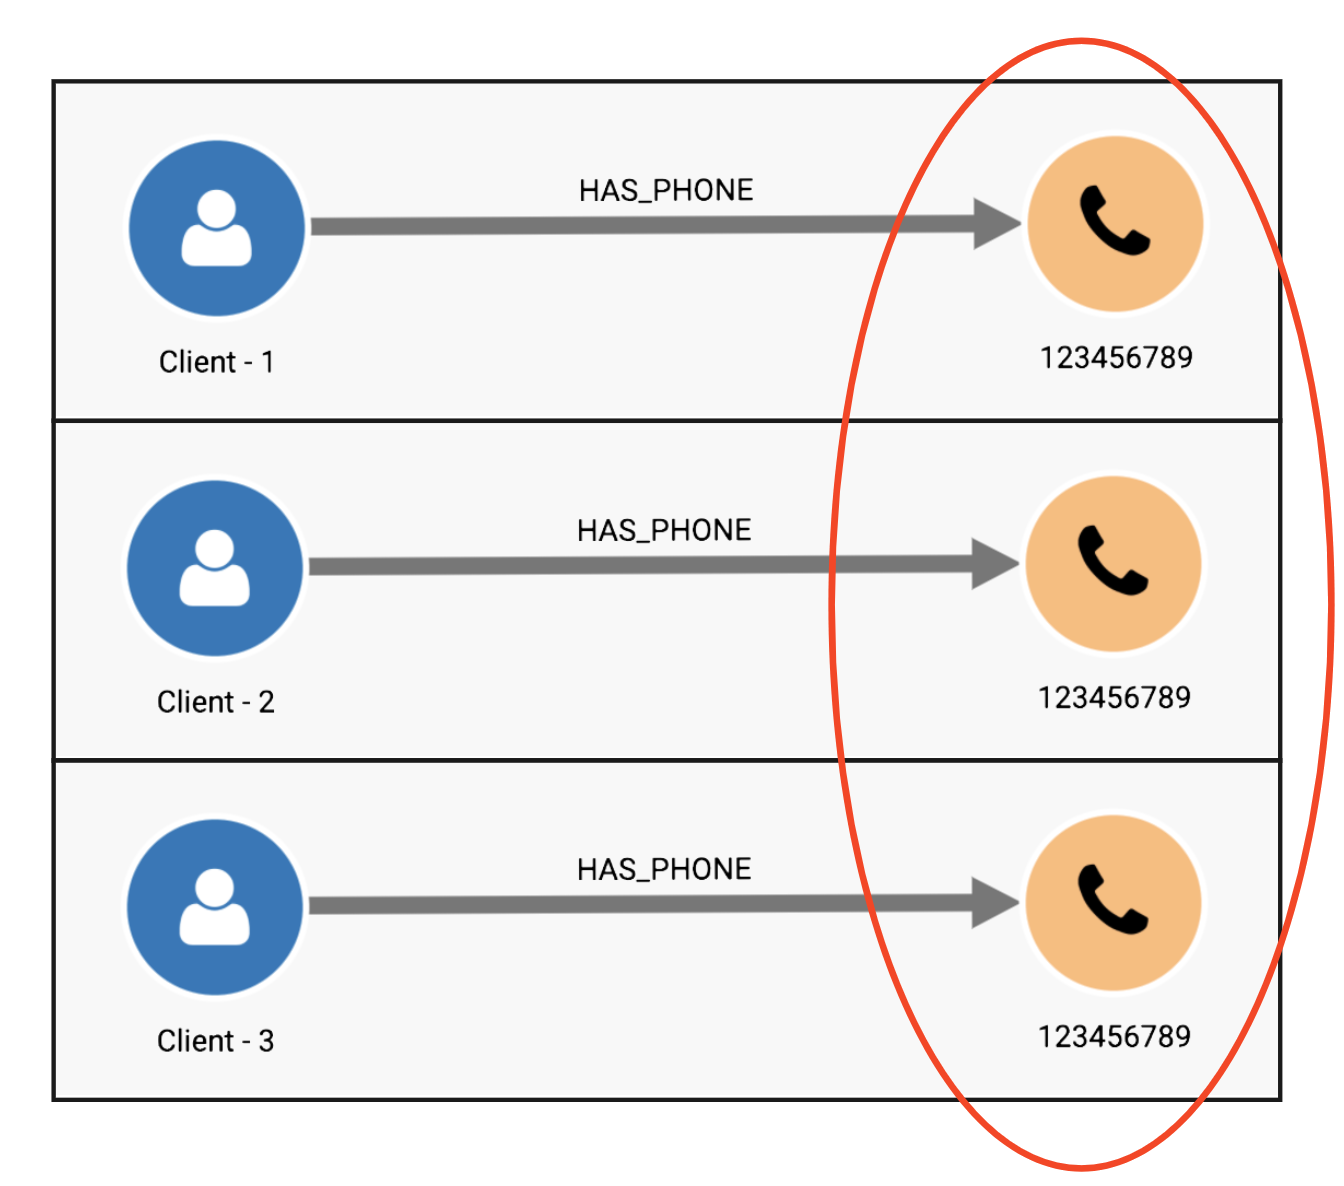
Since the investigator needs to focus on the Clients using the Phone, then it will be easier
to have all detection results that contain the same Phone merged into the same case. To achieve this,
simply declare that p is the target of this alert to generate a single case for investigation that contains
all the relevant information in one place.
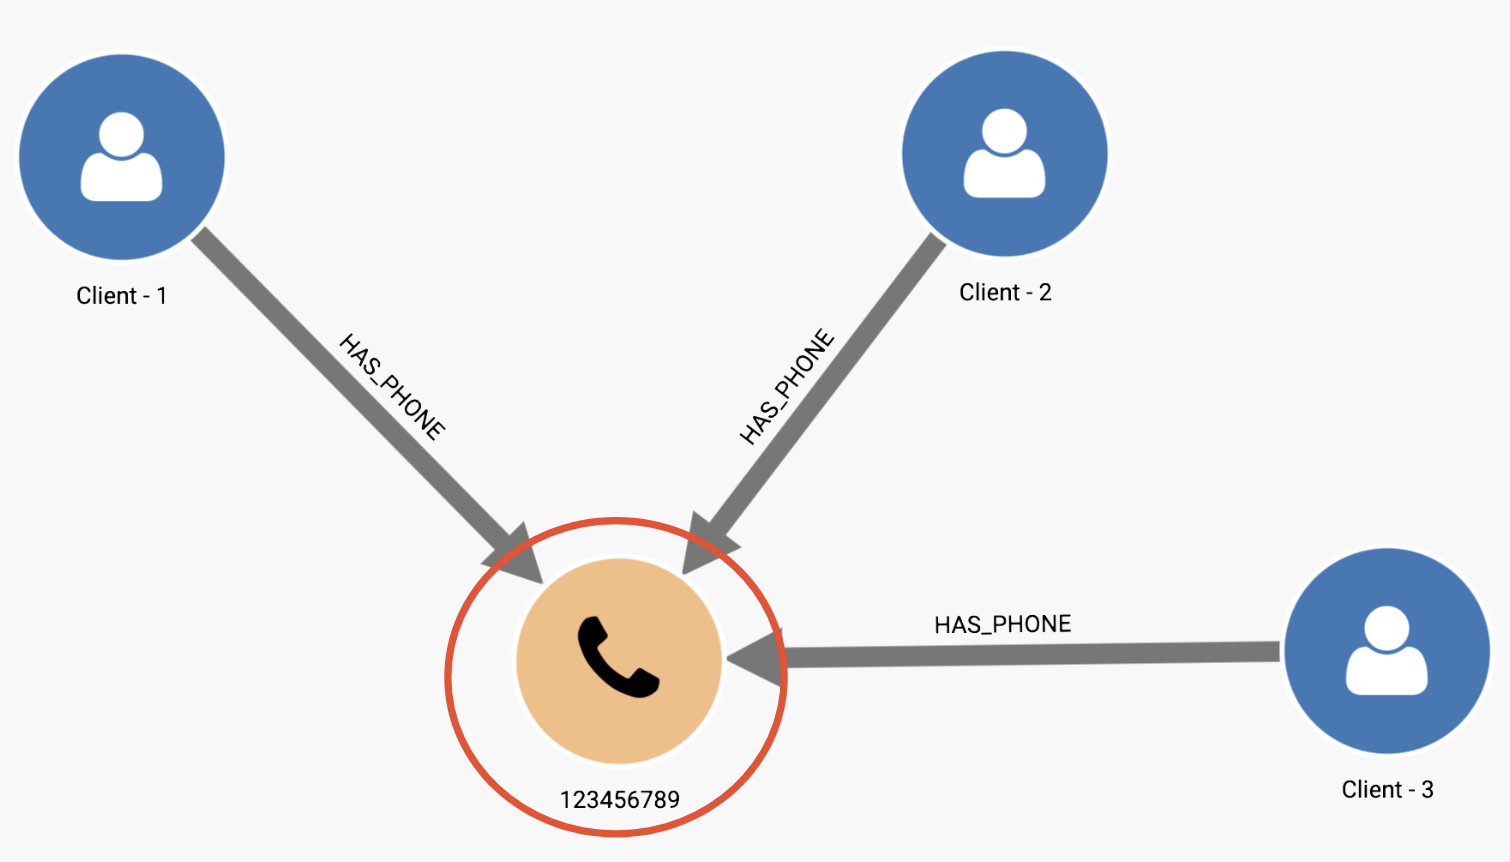
The case list can be enhanced by adding custom headers containing information about the target.
In this example, the Phone Number will help the investigator distinguish the different cases.
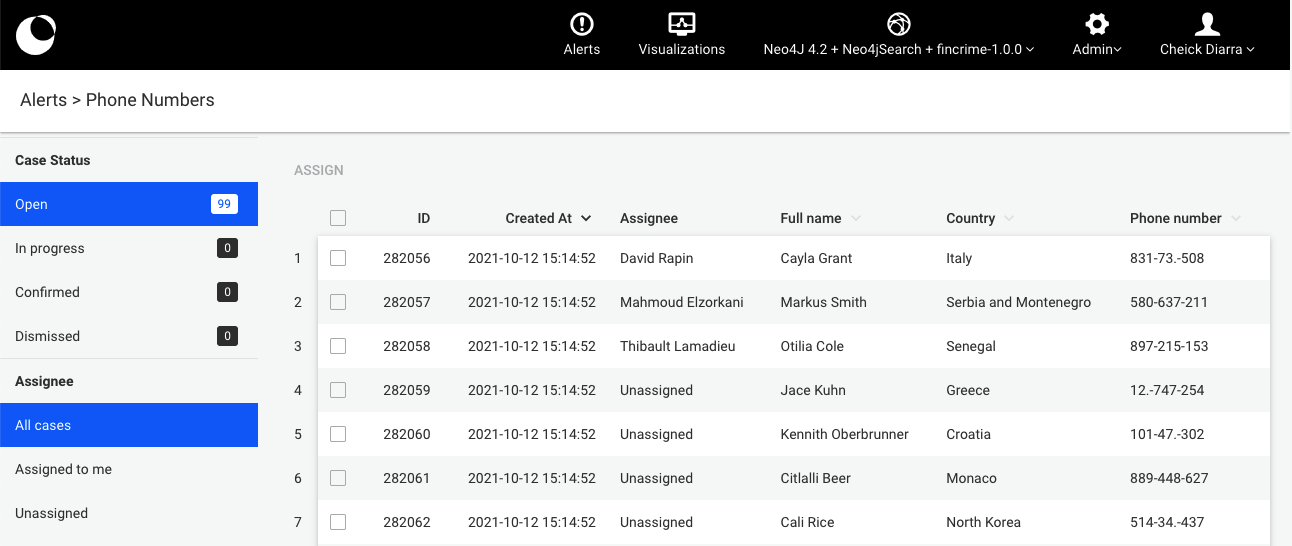
The above scenario can be achieved by creating the alert as follows:
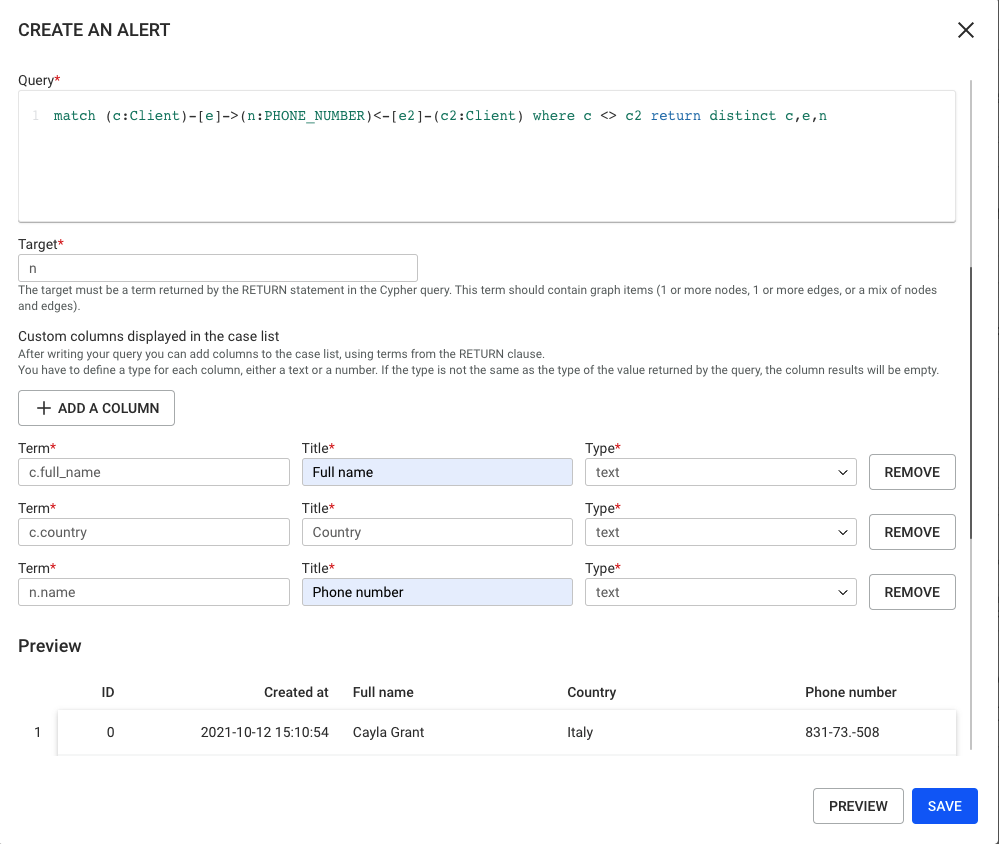
Notice how after a case is investigated and closed, a new alert execution identifying a new Client
(e.g. with client_id equal to 4) connected to the previous Phone will generate a new investigation case.
The new case will contain only the new Client to investigate, but the investigator has the possibility
to see that there are three additional nodes connected to the phone (indicated by the small numbered badge on the node).
To enable, disable, and customize the alerts behavior see how to configure Linkurious Enterprise.
The following options are available in alerts key:
enabled (default: true): The feature activation parameter. The value false will completely disable the feature preventing even the possibility to define new alerts.
maxMatchesLimit (default: 5000): The maximum number of matches returned by a single alert.
maxRuntimeLimit (default: 600000): The maximum execution time (in milliseconds) of a single alert.
Example of alerts configuration:
alerts: {
  "enabled": true,
  "maxMatchesLimit": 5000,
  "maxRuntimeLimit": 600000
}
Linkurious Enterprise supports email notifications for the following events, when they are correctly configured by admins.
Email Notifications when new cases appear in alerts.
Alert users can expect an email including information on the latest activity on alerts which they have access to and URLs of the alerts for easy access.
Email Notifications when a case is assigned to a user.
Alert users who have cases assigned to them by another user, will receive an email including the case assigned to them, the status and creation date of the case and the user who assigned it to them as well as the URL for easy access to the case.
In order for the URLs included in the emails to work properly, the user must be logged in to LKE before accessing them.
To enable, disable and customise the email notifications go to Admin > Configuration.
The following options are available in the email configuration key:
alertNotifications (default: false): This is the feature activation parameter. Its default value false will disable the feature completely while true would enable the feature. Keep in mind that in order for the feature to work properly the rest of the parameters should also be successfully set.
newCasesDigestNotificationFrequency (default: 0 9 * * *): This is a parameter which refers to the time interval you would wish to receive a digest email at. This parameter is a cron expression. The default value stands for 9:00 AM daily.
caseAssignmentNotificationFrequency (default: */10 * * * *): This is a parameter which refers to the maximum time interval before the user is notified if he/she got assigned to a case. This parameter is a cron expression. The default value stands for a time interval of 10 minutes.
fromEmail: This is the parameter for the sender's email address.
mailer: This is the configuration object which will contains all the required properties for sending emails.
type (default: smtp): This parameter refers to the email protocol used. Linkurious Enterprise only supports smtp for the moment.
host (default: 127.0.0.1): Refers to the server address of your mail service provider.
port (default: 25): Port number for the email server.
ssl (default: false): if true, the connection will use TLS when connecting to the email server. If false, TLS is used if the email server supports the STARTTLS extension. In most cases set this value to true if you are connecting to port 465. For port 587 or 25 keep it false.
allowSelfSigned (default: false): If true self-signed certificates are enabled.
auth (optional): The credentials to connect to the mail server.
user (default: user@serviceProvider.com ): The username (e.g. the Email Address)password (default: password): The password, it is recommended to provide the password as an environment variable.Example of email configuration
{
  "alertNotifications": true,
  "newCasesDigestNotificationFrequency": "0 0 9 * * ?",
  "caseAssignmentNotificationFrequency": "*/10 * * * *",
  "fromEmail": "john@myCompany.com",
  "mailer": {
    "type": "smtp",
    "host": "127.0.0.1",
    "port": 25,
    "ssl": false,
    "allowSelfSigned": false,
    "auth": {
      "user": "user@serviceProvider.com",
      "password": "password"
    }
  }
}
Linkurious Enterprise allows you to modify the visualizations appearence by modifying the ogma.options settings.
To edit the Ogma settings,
you can either use the Web user-interface
or edit the configuration file located at linkurious/data/config/production.json.
Example configuration:
{
  "renderer": "webgl",
  "options": {
    "styles": {
      "node": {
        "nodeRadius": 5,
        "shape": "circle",
        "text": {
          "minVisibleSize": 24,
          "maxLineLength": 35,
          "backgroundColor": null,
          "font": "roboto",
          "color": "#000",
          "size": 14,
          "maxTextLength": 60
        }
      },
      "edge": {
        "edgeWidth": 1,
        "shape": "arrow",
        "text": {
          "minVisibleSize": 4,
          "maxLineLength": 35,
          "backgroundColor": null,
          "font": "roboto",
          "color": "#000",
          "size": 14,
          "maxTextLength": 60
        }
      }
    },
    "interactions": {
      "zoom": {
        "modifier": 1.382
      },
      "pan": {
      },
      "rotation": {
        "enabled": false
      }
    },
    "backgroundColor": "rgba(240, 240, 240, 0)"
  }
}
Supported ogma.options settings are available here.
In addition to what you find in the Ogma documentation, Linkurious Enterprise allows the following extra configuration keys:
styles.node.nodeRadius (optional) The node radiusstyles.node.shape (optional) The default shape of a nodestyles.node.text.maxTextLength (optional) The maximum length of a node captionstyles.edge.edgeWidth (optional) The width of the edgestyles.edge.shape (optional) The default shape of an edgestyles.edge.text.maxTextLength (optional) The maximum length of an edge captionIn Linkurious Enterprise you can customize the default visual aspect of nodes, edges, and edge groups for new visualizations. Your users can then jump head first into the exploration of their data.
Styles can be configured individually by each user using the Design panel. Default values can be configured for all users by an administrator.
Styles belong to one particular data-source. To set the default styles of a data-source, you have two options:
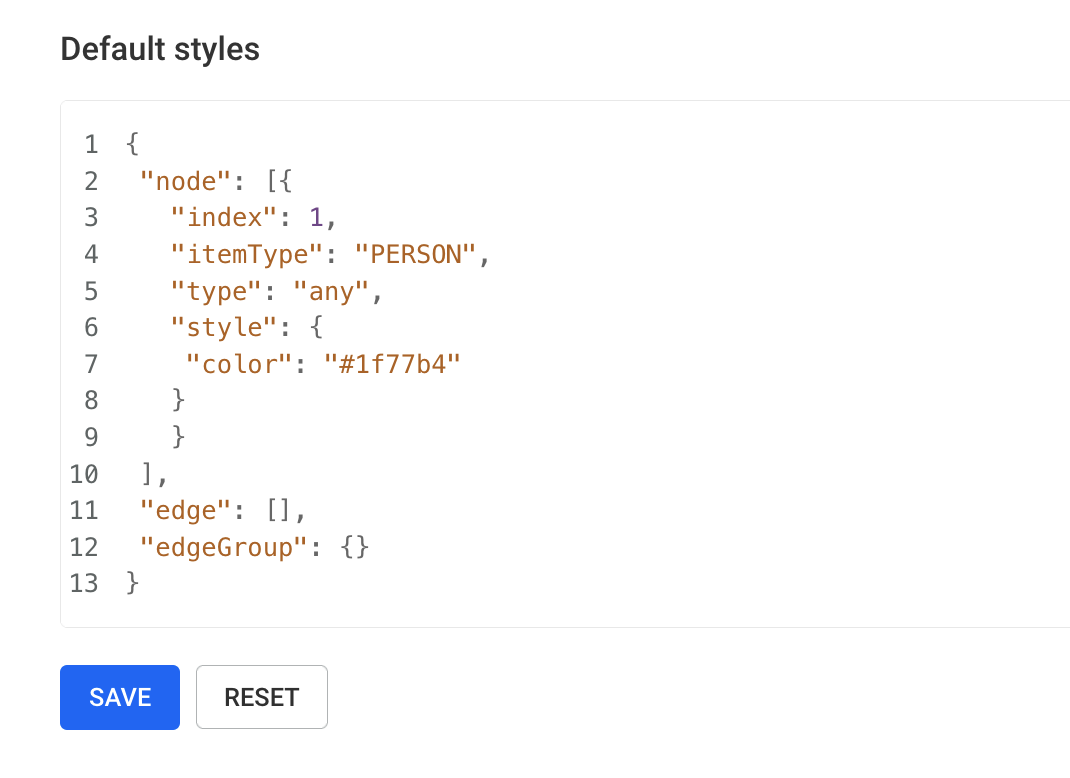
By default, every node category has a pre-assigned color.
Inside Default Styles, the nodes, edges, and edgeGroup sections define the
default styles for nodes, edges, and edge groups respectively.
A style rule has the following elements:
index: a unique number >= 0 used to define the order in which rules are applieditemType: node category or edge type the style rule applies to (optional if type is any)type: a value among "any", "novalue", "nan", "range", "is"input (optional): identify on which the style is computed onvalue (optional): a value to be used by the selector (see the Selectors sections for details)style: the style applied by this rule (see the Styles sections for details)All grouped edges of a data-source are styled with the same configuration. If we want to customize their style we need to specify directly the color, shape, and width within the apposite section (see the Style edge groups section for details). In this case the Selector is not needed.
The input field is an array containing a sequence of strings identifying the path to an item in the JSON representation of a visualization object (node or relationship). Supported paths are:
"properties": is the container of all the properties of a visualization object. To identify the property called name, the input value should be ["properties", "name"]."statisics": is the container of the internal statistics computed by Linkurious Enterprise on a visualization object. Current available statistics are:"degree": defines a node, represents the number of nodes connected through any type of relationship (in case of supernode, the value is not defined). To access this attribute, the input value should be ["statisics", "degree"].For example:
{
  "index": 3,
  "itemType": "COMPANY",
  "type": "is",
  "input": ["properties", "name"],
  "value": "linkurious",
  "style": {
    "color": "blue"
  }
}
The above rule will apply the style {"color": "blue"} to all nodes
with category "COMPANY" where the name is "linkurious".
{
  "index": 4,
  "type": "range",
  "itemType": "COMPANY",
  "input": ["statistics", "degree"],
  "value": {
    ">": 20
  },
  "style": {
    "size": "150%"
  }
},
{
  "index": 5,
  "type": "novalue",
  "itemType": "COMPANY",
  "input": ["statistics", "degree"],
  "style": {
    "size": "200%"
  }
}
The above rule will apply the style {"size": "150%"} to all nodes with category "COMPANY" that are
connected to more that 20 other nodes and the style {"size": "200%"} to all supernodes with category "COMPANY".
indexhas to be unique. It is currently required for technical reasons. This will be made more user-friendly in future releases.
The selector is used to specify to which items the style is applied to.
For example, you can configure all the "COMPANY" founded more than 12 years ago to have a particular
style. To do so, we use a style rule with a range type and with value:
{
  ">": 12
}
The overall style rule will look like the following (assuming we want to color the nodes in red):
{
  "index": 3,
  "type": "range",
  "itemType": "COMPANY",
  "input": ["properties", "age"],
  "value": {
    ">": 12
  },
  "style": {
    "color": "red"
  }
}
For range queries, you can use one or more among the following operators: >, <, >=, <=.
range: matches numerical values that are contained in the range defined in the value parameter, e.g.
{"<=": 12} means "smaller or equal to 12"{">": 0, "<": 10} means "between 0 and 10 excluded"any: matches any value
is: matches all values that are equal to the value parameter, e.g:
{
"type": "is",
"input": ["properties", "name"],
"value": "linkurious",
// ..
}
novalue: matches values that are null, missing or contain an empty string
nan: matches values that do not contain a numerical value (Not A Number)
In addition to
type,input, andvalue, you must always specifyitemTypeto filter by node category or edge type except iftypeisany.
Set under the style property key an object with one key, color, e.g:
"style": {
  "color": "blue" // or "#0000FF", "rgba(0, 0, 255, 1)"
}
propertyName in our case):"style": {
"color": {
"type": "auto",
"input": ["properties", "propertyName"]
}
}
The color style for nodes, edges, and edge groups has the same format.
For nodes, set under the style property key an object with one key, size, e.g:
"style": {
  "size": "220%"
}
For edges, it is quite similar: set under the style property key an object with one key, width, e.g:
"style": {
  "width": "220%"
}
Similar to setting the size manually, it is also possible to set a dynamic sizing rule based on a property, e.g:
"style": {
  "size": {
    "type": "autoRange",
    "input": ["properties", "age"],
    "scale": "linear"
  }
}
scale attribute can take two values:
linear: Edges and nodes are sized using a linear scale function based on their property values.logarithmic: Edges and nodes are sized using a logarithmic scale function based on their property values.If scale is not defined, linear is applied by default.
In the example above, all selected nodes and edges are scaled linearly based on the property age.
Nodes will be sized between the range of 50% (the smallest) and 500% (the biggest).
Edges will be sized between the range of 50% (the smallest) and 200% (the biggest).
Set under the style property key an object with one key, shape.
For nodes, set the shape of the node.
Possible values are: "circle" (default), "cross", "diamond", "pentagon", "equilateral", "square" or "star".
"style": {
  "shape": "star" // "circle", "cross", "diamond", "pentagon", "equilateral", "square" or "star"
}
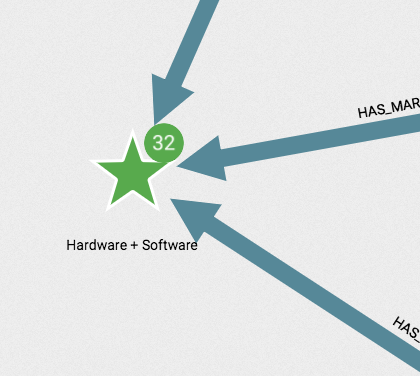
For edges and edge groups, set the shape of the edge.
Possible values are: "arrow" (default), "dashed", "dotted", "line" or "tapered".
"style": {
  "shape": "dotted" // "arrow", "dashed", "dotted", "line" or "tapered"
}
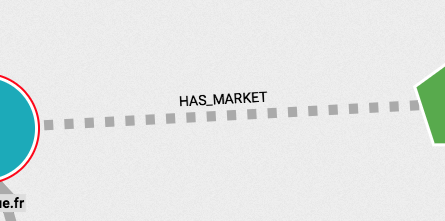
You can host your custom icons in Linkurious Enterprise itself by storing them in the folder
located in linkurious/data/server/customFiles/icons.
Users will find them in the Design panel:
![]()
If you want to edit style rules manually, the style rules to access these images would look like:
"style": {
  "image": {
    "url": "/icons/company.png"
  }
}
Nodes can be filled with an image if one of their property is a URL to an image. Available image formats are PNG, JPG, GIF, and TIFF.
The following style will set an image:
Example:
"style": {
  "image": {
    "url": "http://example.com/img/company.png"
  }
}
To assign dynamically an image to a node,
for example if the logo is stored in a node property called "logo_url",
you just need to set the following style:
"style": {
  "image": {
    "url": {
      "type": "data",
      "path": [
       "properties",
       "logo_url" // change it to the property key where your image urls are stored
      ]
    }
  }
}
If you want to resize your images in a node you can you use the additional properties scale, fit and tile, e.g.:
"style": {
  "image": {
    "url": ... // one of the above
    "scale": 0.8, // scale the image in the node
    "fit": false, // if true, fill the node with the image
    "tile": false // if true, repeat the image to fill the node
  }
}
Within the edgeGroup property key, we can directly set the color, shape, and width that will apply to all grouped edges of a data-source.
"edgeGroup": {
  "color": "red",
  "shape": "dashed", // "arrow", "dashed", "dotted", "line" or "tapered"
  "width": "320%"
 }
Editing the default styles in the data-source page automatically changes captions for existing users for newly created visualizations. These changes are not applied to existing visualizations.
In Linkurious Enterprise, node and edge captions are the texts displayed next to a node or an edge.
Captions, as for Styles, can be configured individually by each user using the Design panel.
As for Styles, an administrator can set the default values from its own workspace or by editing them from the data-source configuration page.
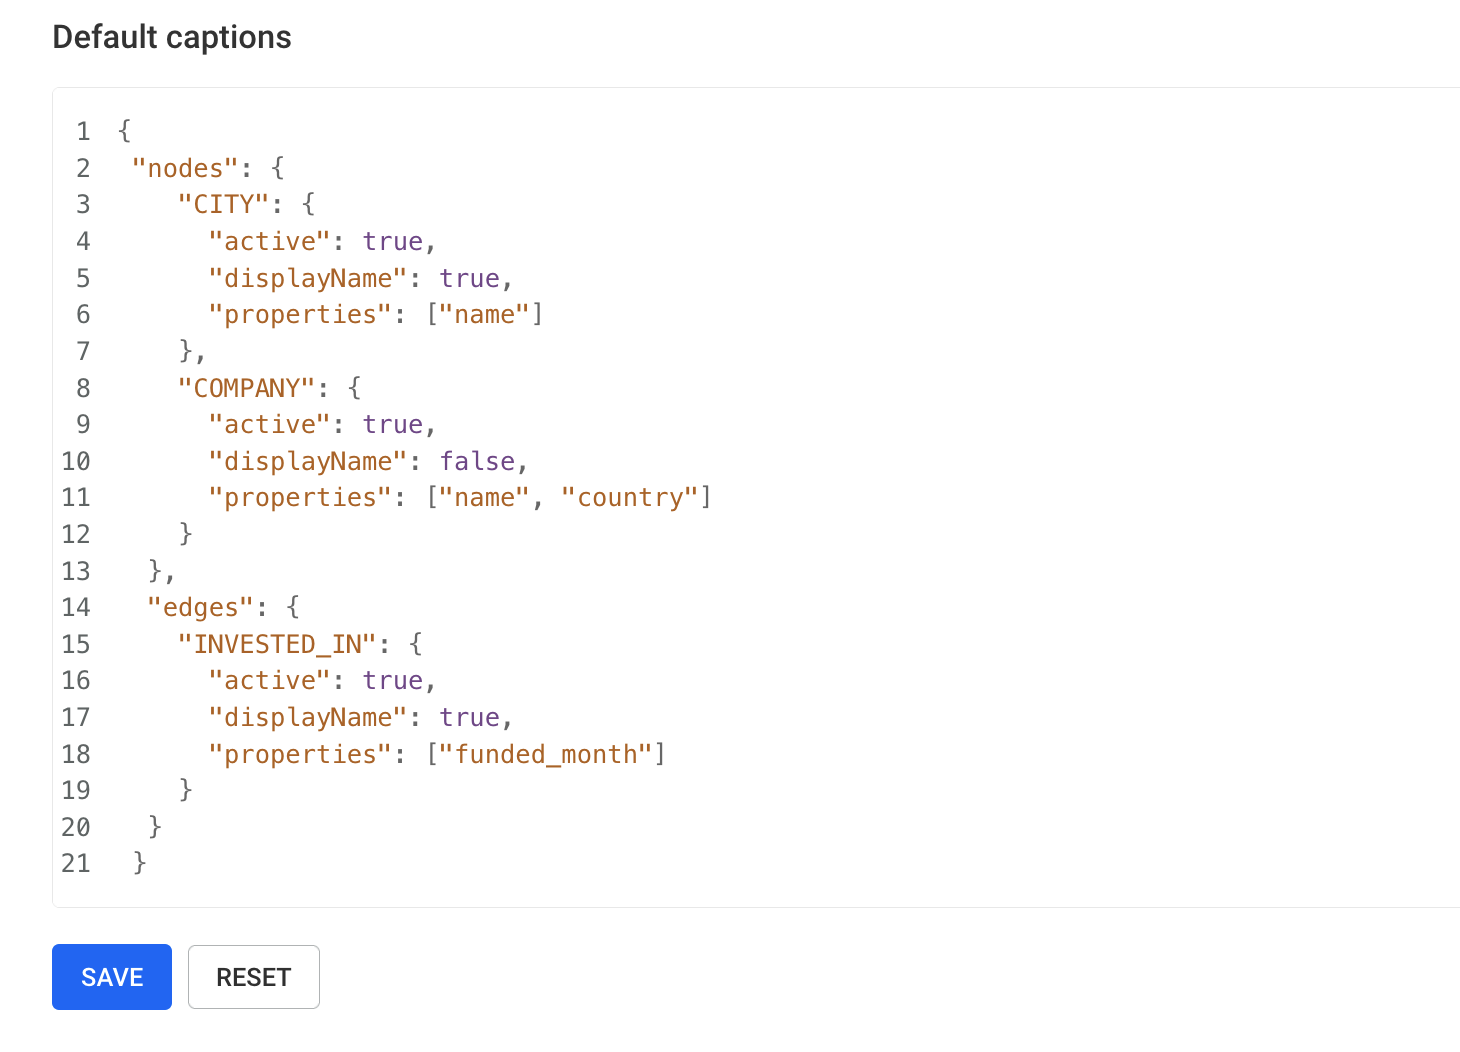
Inside Default Captions, the nodes and the edges sections define the
default captions for nodes and edges respectively.
Each of these two sections is an object where the keys are node categories or edge types and the values are objects with the following keys:
active: Whether this caption definition is useddisplayName: Whether to prefix the caption text with the node category or edge typeproperties: An array of properties keys that will be concatenated to create the captionsExample:
"defaultCaptions": {
  "nodes": {
    "CITY": {
      "active": true,
      "displayName": true,
      "properties": ["name"]
    },
    "COMPANY": {
      "active": true,
      "displayName": false,
      "properties": ["name", "country"]
    }
  },
  "edges": {
    "INVESTED_IN": {
      "active": true,
      "displayName": true,
      "properties": ["funded_month"]
    }
  }
}
CITY and name: "Paris" would have the caption CITY - Paris.COMPANY, name: "Google" and country: "USA" would have the caption Google - USA.INVESTED_IN and funded_month: "2016-04" would have the caption INVESTED_IN - 2016-04.Editing the default captions in the data-source page does automatically change captions for existing users for newly created visualizations. Existing visualizations are not touched.
In Linkurious Enterprise, you can configure the properties order per data-source that will be displayed in the following:
You will need “Manage data-source default styles” access right or be an administrator to edit them in the data-source settings page.
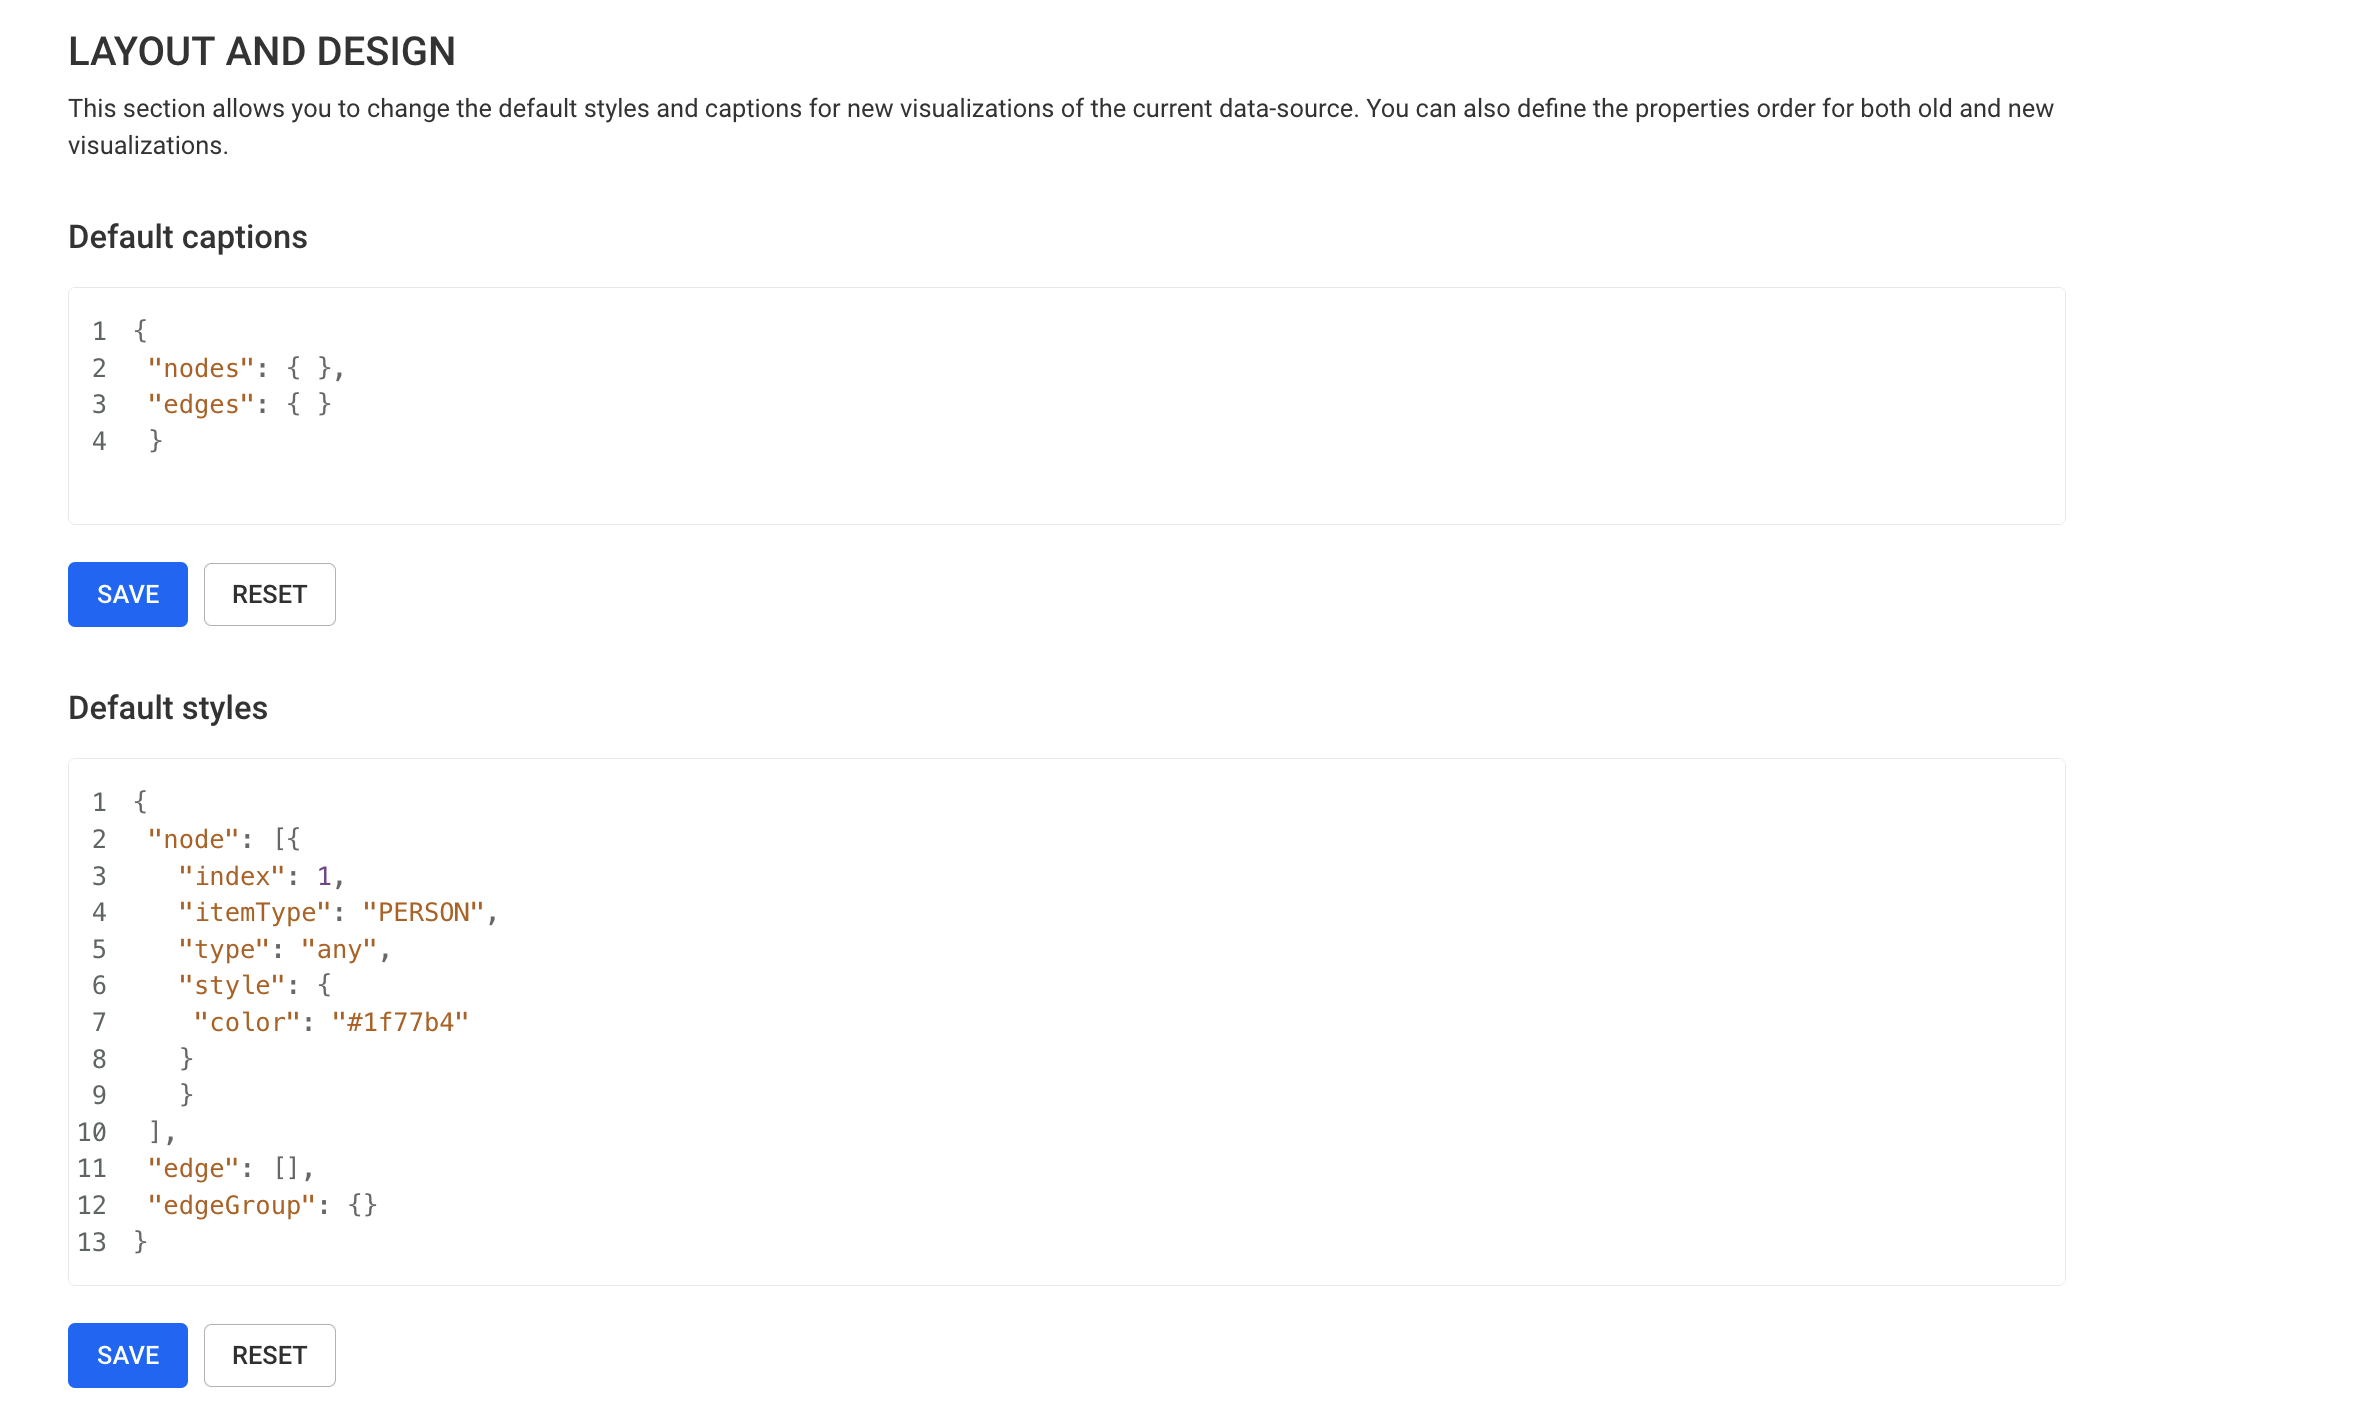
To do so, you will need to add an object with the properties that you want to see in the top of the list for each category and/or edge type.
Example:
{
  "node": {
    "SENDER": ["SendId", "FullName"],
    "BENEFICIARY": ["BenId", "Country"]
  },
  "edge": {
    "TRANSACTION": ["Amount", "Currency"]
  }
}
Properties not defined in JSON will remain alphabetically-ordered, and will appear after the defined properties.
The category order is always alphabetical and is case-sensitive:
Linkurious Enterprise supports displaying nodes with geographic coordinates (latitude and longitude) on a map.
Users are able to switch a visualization to geo mode when geographic coordinates are available on at least one node of the visualization. The map tiles layer used in geo mode can be customized by users.
By default, Linkurious Enterprise comes pre-configured with several geographical tile layers.
Administrators change the available geographical tile layers by editing the leaflet section in the configuration file (linkurious/data/config/production.json).
The leaflet key is an array of geographical tile layer configurations.
Each entry has the following attributes:
name (required, string): Name of the geo tiles layer.urlTemplate (required, url): Tile URL template with {x}, {y} and {z} parameters ({s} is optional).minZoom (required, number): The minimum zoom level supported by the layer.maxZoom (required, number): The maximum zoom level supported by the layer.thumbnail (required, url): URL of a 128x60 image to be used as a thumbnail for the layers (for user-added layers, the URL is relative to the linkurious/data/customFiles folder).attribution (required, string): The layer copyright attribution in HTML format.subdomains (string): Letters to use in the {s} tile URL template (required if urlTemplate contains {s} ).overlay (boolean): Whether this layer is a base layer (false) or a transparent layer that can be used as an overlay (true).id (string): Unique tiles layers identifier (MapBox only).accessToken (string): Tiles layer access-token (MapBox only).Geographical tile layers and overlay layers can be found at https://leaflet-extras.github.io/leaflet-providers/preview/.
Example configuration:
"leaflet": [
{
"overlay": true,
"name": "Stamen Toner Lines",
"thumbnail": "",
"urlTemplate": "http://stamen-tiles-{s}.a.ssl.fastly.net/toner-lines/{z}/{x}/{y}.png",
"attribution": "Map tiles by <a href="http://stamen.com">Stamen Design</a>, <a href="http://creativecommons.org/licenses/by/3.0">CC BY 3.0</a> — Map data © <a href="http://www.openstreetmap.org/copyright">OpenStreetMap</a>",
"subdomains": "abcd",
"id": null,
"accessToken": null,
"minZoom": 2,
"maxZoom": 20
},
{
"name": "MapBox Streets",
"thumbnail": "/assets/img/MapBox_Streets.png",
"urlTemplate": "https://api.tiles.mapbox.com/v4/{id}/{z}/{x}/{y}.png?access_token={accessToken}",
"attribution": "Map data © <a href="http://openstreetmap.org">OpenStreetMap</a>, <a href="http://creativecommons.org/licenses/by-sa/2.0/">CC-BY-SA</a>, Imagery © <a href="http://mapbox.com">Mapbox</a>",
"subdomains": null,
"id": "mapbox.streets",
"accessToken": "pk.eyJ1Ijoic2hleW1hbm4iLCJhIjoiY2lqNGZmanhpMDAxaHc4bTNhZGFrcHZleiJ9.VliJNQs7QBK5e5ZmYl9RTw",
"minZoom": 2,
"maxZoom": 20
}
]
Audit trails are detailed logs about the operations performed on your graph databases by your users. Because they have the potential to take up a substantial amount of memory depending on the number of users and the operations performed, they are disabled by default.
Audit trails can be enabled and configured in linkurious/data/config/production.json.
They are found under the auditTrail key, which contains the following options:
enabled (default: false): Whether to enable audit trail recording.logFolder (default: "audit-trail"): Where to store the results of the audit trail. This path is relative to the linkurious/data directory.fileSizeLimit (default: 5242880, i.e. 5MB): Maximum size of one log file in bytes. A new file is created when the limit is reached (i.e. the logs are rotated). This avoids the creation of unworkably large log files.strictMode (default: false): Whether to ensure that each operation has been logged before returning its result to the user. By setting it to true, logging will take place immediately; if false, the operation will be performed and will not be recorded in the audit trail until it is finished. This can have a substantial effect on the responsiveness of the server if, for example, large queries are run.mode (default: "rw", read and write): Which kinds of user operation to log ("r" for READ, "w" for WRITE, "rw" for READ WRITE). Read operations are those that do not make changes to the database. Note that raw queries are considered READ WRITE and will appear in the audit trail whether or not they make changes do the database.logResult (default: true): Whether to include the result of each operation in the log, i.e. whether to return a JSON representation of each node that has been added, updated, deleted, or simply matched. This can have a huge effect on log size: by setting logResult to false, the audit trail will only capture the properties of the nodes requested, the changes made to those nodes, or raw queries, and not the nodes themselves.logPlugins (default: true): Whether to include all requests and JSON responses to plugins in the audit trail.logFullTextSearch (default: false): Whether to include all requests and JSON responses from the search API in the audit trail.Enabling the audit trail can impact performances negatively.
Here are options to consider to improve performances:
"mode": "w": only log write queries, ignore read queries"logResult": false: only log the query sent by the user, not the response sent by the server"strictMode": false: do not strictly wait for the audit-trail log to be written to response to each user requestThe audit trail log files contain JSON lines in JSONL format.
You can easily bind a log-management system like Logstash to interpret them.
Each log line contains the following information when the action is a graph request:
mode: "READ", "WRITE" or "READ WRITE".date: The date of the operation (in ISO 8601 format).user: The email of the user performing the operation.sourceKey: The identifier of the data-source the operation was applied to.action: The type of the operation, which is one of:"getNode""getEdge""rawQuery""createNode""createEdge""updateNode""updateEdge""deleteNode""deleteEdge""getNodesByEdgesID""getAdjacentNodes""getAdjacentEdges""getAllShortestPaths""searchFull"params: The parameters of the operation.result: The result of the operation (if auditTrail.logResult is set to true in linkurious/data/config/production.json).Each log line contains the following information when the action is a plugin request:
mode: "PLUGIN".date: The date of the operation (in ISO 8601 format).user: The email of the user performing the operation.action: "pluginRequest".params: The parameters of the operation which contains the following:pluginName: The name of the plugin.requestUrl: The http request url.requestMethod: The http method (POST, GET, etc.).requestBody: The content of the request data.result: The result of the operation (if auditTrail.logResult is set to true in linkurious/data/config/production.json).Lines are written to the log as follows:
{"mode":"WRITE","date":"2017-01-09T17:34:07.446Z","user":"simpleUser@example.com","sourceKey":"e8890b53","action":"createEdge","params":{"createInfo":{"source":4328,"target":4332,"type":"ACTED_IN","data":{"tata":"toto"}}},"result":{"edge":{"id":5958,"data":{"tata":"toto"},"type":"ACTED_IN","source":4328,"target":4332}}}
{"mode":"READ","date":"2017-01-09T17:34:07.478Z","user":"simpleUser@example.com","sourceKey":"e8890b53","action":"getNode","params":{"id":4330},"result":{"node":{"id":4330,"data":{"tagline":"Welcome to the Real World","title":"The Matrix","released":1999,"nodeNoIndexProp":"foo"},"categories":["Movie","TheMatrix"]}}}
{"mode":"READ","date":"2017-01-09T17:34:07.507Z","user":"simpleUser@example.com","sourceKey":"e8890b53","action":"getEdge","params":{"edgeId":5950},"result":{"edge":{"id":5950,"data":{"edgeNoIndexProp":"bar","roles":["Neo"]},"type":"ACTED_IN","source":4313,"target":4330}}}
{"mode":"READ WRITE","date":"2017-01-09T17:34:12.253Z","user":"user@linkurio.us","sourceKey":"e8890b53","action":"rawQuery","params":{"query":"MATCH (n:Person) RETURN n","dialect":"cypher"},"result":{"nodes":[{"id":4357,"data":{"born":1967,"name":"Andy Wachowski"},"categories":["Person"],"edges":[]},{"id":4359,"data":{"born":1967,"name":"Carrie-Anne Moss"},"categories":["Person"],"edges":[]},{"id":4360,"data":{"born":1954,"name":"James Cameron"},"categories":["Person"],"edges":[]},{"id":4361,"data":{"born":1964,"name":"Keanu Reeves"},"categories":["Person"],"edges":[]},{"id":4362,"data":{"born":1965,"name":"Lana Wachowski"},"categories":["Person"],"edges":[]},{"id":4364,"data":{"born":1901,"name":"Phillip Cameron"},"categories":["Person"],"edges":[]},{"id":4365,"data":{"born":1976,"name":"Sam Worthington"},"categories":["Person"],"edges":[]}]}}
{"mode":"PLUGIN","date":"2022-04-21T12:37:40.339Z","user":"user@linkurio.us","action":"pluginRequest","params":{"pluginName":"data-table","requestMethod":"POST","requestUrl":"/plugins/table/api/runQueryByIDPlugin","requestBody":"{\"query\":{\"id\":1,\"sourceKey\":\"d80aefa8\",\"name\":\"test\",\"content\":\"match (n:TEST) return n\",\"dialect\":\"cypher\",\"description\":\"\",\"sharing\":\"private\",\"type\":\"static\",\"write\":false,\"createdAt\":\"2022-04-21T12:02:55.124Z\",\"updatedAt\":\"2022-04-21T12:02:55.124Z\",\"builtin\":false,\"right\":\"owner\",\"owner\":{\"name\":\"Unique user\",\"email\":\"user@linkurio.us\"}},\"queryParams\":{\"global\":{\"queryId\":\"1\",\"sourceKey\":\"d80aefa8\"},\"templateFields\":{}}}"},"result":""}
Each line is a JSON objects in the following format (with logResult set to true):
{
  "mode": "WRITE",
  "date": "2017-01-09T17:34:07.446Z",
  "user": "simpleUser@example.com",
  "sourceKey": "e8890b53",
  "action": "createEdge",
  "params": {"createInfo":{"source":4328,"target":4332,"type":"ACTED_IN","data":{"tata":"toto"}}},
  "result": {"edge":{"id":5958,"data":{"foo":"bar"},"type":"BAZ","source":4328,"target":4332}}
}
The params key contains the parameters of the operation being performed. In this case, the user has run as createEdge action; params then contains the source and target IDs of the edge, as well as the edge type and a data key which holds the properties set on that edge.
result contains a JSON representation of the edge produced by the action. As can be seen, there is a substantial amount of duplication between the information in params and in data. This may not be a consideration with operations on single nodes, but with larger collections can mean that log size increases substantially. Consider the example below:
{
  "mode": "READ WRITE",
  "date": "2017-01-09T17:34:12.289Z",
  "user": "user@linkurio.us",
  "sourceKey": "e8890b53",
  "action": "rawQuery",
  "params": {
    "query": "MATCH (n1)-[r:DIRECTED]->(n2) RETURN n1, r",
    "dialect": "cypher"
  },
  "result":{"nodes":[{"id":4357,"data":{"born":1967,"name":"Andy Wachowski"},"categories":["Person"],"edges":[{"id":6009,"data":{},"type":"DIRECTED","source":4357,"target":4366},{"id":6010,"data":{},"type":"DIRECTED","source":4357,"target":4367},{"id":6011,"data":{},"type":"DIRECTED","source":4357,"target":4368}]},{"id":4358,"data":{"tagline":"Return to Pandora","title":"Avatar","released":1999},"categories":["Avatar","Movie"],"edges":[{"id":6034,"data":{},"type":"DIRECTED","source":4360,"target":4358}]},{"id":4360,"data":{"born":1954,"name":"James Cameron"},"categories":["Person"],"edges":[{"id":6034,"data":{},"type":"DIRECTED","source":4360,"target":4358}]},{"id":4362,"data":{"born":1965,"name":"Lana Wachowski"},"categories":["Person"],"edges":[{"id":6020,"data":{},"type":"DIRECTED","source":4362,"target":4366},{"id":6021,"data":{},"type":"DIRECTED","source":4362,"target":4367},{"id":6022,"data":{},"type":"DIRECTED","source":4362,"target":4368}]},{"id":4366,"data":{"tagline":"Welcome to the Real World","title":"The Matrix","released":1999,"nodeNoIndexProp":"foo"},"categories":["Movie","TheMatrix"],"edges":[{"id":6020,"data":{},"type":"DIRECTED","source":4362,"target":4366},{"id":6009,"data":{},"type":"DIRECTED","source":4357,"target":4366}]},{"id":4367,"data":{"tagline":"Free your mind","title":"The Matrix Reloaded","released":2003},"categories":["Movie","TheMatrixReloaded"],"edges":[{"id":6021,"data":{},"type":"DIRECTED","source":4362,"target":4367},{"id":6010,"data":{},"type":"DIRECTED","source":4357,"target":4367}]},{"id":4368,"data":{"tagline":"Everything that has a beginning has an end","title":"The Matrix Revolutions","released":2003},"categories":["Movie","TheMatrixRevolutions"],"edges":[{"id":6022,"data":{},"type":"DIRECTED","source":4362,"target":4368},{"id":6011,"data":{},"type":"DIRECTED","source":4357,"target":4368}]}]}
}
In this case, we've used a raw query to read nodes from the database without making any changes to them. The results of the query are returned to us in result, and include a substantial number of nodes and edges. To maximize the usefulness of audit trails and to minimize their footprint, it might be advisable to exclude unnecessary data, including passive queries such as these. Disabling logResult and setting mode to "w" (logging only operations which perform write operations to the database) is one strategy for accomplishing this.
A plugin is software running on top of Linkurious Enterprise extending its capabilities. For example, a plugin that adds the functionality of importing your data to Linkurious Enterprise via CSV files.
Official plugins are plugins built, distributed, and maintained by Linkurious team. Customers and 3rd party developers can easily create their own plugins using our detailed Plugins Development Guide.
plugin-manager): A tool to easily manage plugins in Linkurious Enterprise.csv-importer): A tool for importing data into your data source quickly from a CSV file.data-table): Get results of a query in a table.image-export): Export visualization as an image file for printing or presentations.The preferred way is to perform the installation through the Plugin Manager web interface (by default accessible from /plugins/plugin-manager). It requires an admin account.
In case you need to perform a manual installation, you can proceed as follow:
Make sure to have write access to the Linkurious Enterprise installation folder of as well as an application admin account.
.lke file of the plugin you need to install, for official plugins you can download it from the Releases section of the plugin page.lke file to the following path <linkurious>/data/pluginsAdmin -> Global configurationPlugins settings fieldPlugins settings sectionIf you want the system to automatically install official plugins, you can set the LKE_PLUGINS environment
variable as an array of strings for every plugin to be deployed. The valid strings are available in the list
of official plugins.
If you are using Docker, the environment variable needs to be set for the container.
If the variable is not defined, the system will consider the below as default
(deploying the Plugin Manager and the Image Export plugins).
LKE_PLUGINS=["plugin-manager","image-export"]
The version that will be installed depends on your Linkurious Enterprise version. Be sure to keep the system up to date to have the latest version of the plugins installed.
Admin -> Global configurationPlugins settings fieldPlugins settings section (if the plugin has never started before
you will not find it, you can either add the configuration manually or start the plugin first)You can configure multiple instances of a single plugin by adding a new JSON object to the plugin's array.
Configuration keys supported by all the plugins:
| Key | Type | Description | Example |
|---|---|---|---|
basePath |
string (optional) | A base path on which the plugin will be mounted. Defaults to the plugin name defined in the manifest. | "my-path" |
debugPort |
number (optional) | A debug port on which to attach a debugger for the plugin NodeJS process. If not specified, the plugin won't be started in debug mode. | 9230 |
The following example will deploy:
my-plugin that will be accessible by its default path /plugins/my-plugin (the plugin name)my-second-plugin that will be accessible from the custom path /plugins/my-pathmy-second-plugin that will be accessible from the custom path /plugins/my-other-path{
"my-plugin": [
],
"my-second-plugin": [
{
"basePath": "my-path"
},
{
"basePath": "my-other-path",
}
]
}
To completely uninstall a plugin from the system (i.e. all the deployed instances), you can either use the Plugin Manager or remove the file manually added through the manual installation.
After the above procedure, any configuration for to the removed plugin will be ignored by the system. If you are not foreseeing to reuse the plugin in the future, you may want to clear the related plugin's configurations to only keep active ones.
If you have deployed several instances of a plugin and want to uninstall some of them, edit the plugins configuration and remove the entries for the instances you want to remove.
Once installed and configured, any Linkurious Enterprise authenticated user can use the plugin. Additional restrictions may be imposed by the plugin itself.
We recommend configuring a custom action in Linkurious Enterprise to avoid building the link to the plugin manually.
Compatibility is mentioned on the download page of each plugin. You can easily identify that by looking at the minimal and maximal supported Linkurious Enterprise version.
If you are facing problems with a plugin follow the next steps:
If you are still facing problems, please get in touch with support while keeping this in mind:
Using url parameters, you can create visualizations on the go to integrate Linkurious in your workflow.
To open a visualization pre-filled with data, you need to use the url /workspace/new.
Then, by adding url parameters, you can fill your visualization with a specific item, or by running a query:
http://localhost:3000/workspace/new?populate=nodeId&item_id=45869
This url will open a visualization with the node #45869.
You can find below a list of all parameters available and their usage.
| field | description | accepted values |
|---|---|---|
| key | Key of the data-source. | A valid source key (default is the first connected data source) |
| populate | Describes how the sandbox should be populated. | "visualizationId", "expandNodeId", "nodeId", "edgeId", "queryId", "searchNodes", "searchEdges", "pattern", "caseId" |
| item_id | ID of the node, edge, query, pattern or visualization to load (required when populate is one of visualizationId, queryId, nodeId, edgeId, expandNodeId). |
The ID of the ressource to load |
| case_id | ID of alert case to load (required when populate is caseId). |
An existing case ID |
| search_query | Search query to search for nodes or edges (required when populate is one of searchNodes or searchEdges). |
any string of characters |
| search_fuziness | Search query fuziness (when populate is one of searchNodes or searchEdges). |
Any number between 0 and 1 (default is 0.1) |
| pattern_query | Pattern query to match nodes and/or edges (required when populate is pattern). |
Any valid Cypher or Gremlin query (depending of the datasource query language) |
| pattern_dialect | Query dialect to use (required when populate is pattern). |
"cypher", "gremlin" |
| query_parameters | Template query parameters (required when populate is queryId and the query is a template). | any valid template query parameters in JSON format (e.g. {"param1": "abc", "param2": 123} |
You can also open a visualization by using the url /workspace/:id.
You can use specific parameters to customize it.
http://localhost:3000/workspace/5
This url will open the visualization of id "5".
| field | description | accepted values |
|---|---|---|
| id | ID of the visualization. | An existing visualization ID |