Appearance
Connecting to Google Spanner
Google Cloud Spanner is a fully managed, scalable, globally distributed, and strongly consistent database service that is designed for mission-critical applications. It combines the benefits of relational databases with the scalability of NoSQL databases, making it an ideal choice for modern applications that require high availability and low latency.
In this tutorial, we will show you how to connect to a Google Spanner database using GQL and display the data with Ogma. We will use the Google Cloud Spanner service and the Graph Query Language to retrieve data from the database.
We will also demonstrate how to visualize the data using Ogma, a powerful graph visualization library.
We will cover the following topics:
- Setting up a Google Cloud Spanner database
- Loading data from a static CSV file into the database
- Connecting to the database using Node.js
expressapp andGQL - Running queries using
GQL - Visualizing the data with Ogma
- Adding styles and layout to the graph
- Adding interactivity to the graph
Prerequisites
- A Google Cloud account
- A Google Cloud Spanner instance
- A Google Cloud Spanner database
The dataset
The dataset used in this tutorial is a simple graph of IMDB movies, actors and genres. You can find it in .csv format on Kaggle. It contains an exempt of about 1000 movies from IMDB. We will expalin to you how to parse and load this dataset into Google Spanner.
Connecting to Google Spanner
You can connect to a Google Spanner database using the @google-cloud/spanner library. This library provides a simple and easy-to-use API for connecting to Google Spanner and running queries. You will need to set up authentication using a service account key file.
- Go to the Google Cloud Console (https://console.cloud.google.com/)
- Navigate to "IAM & Admin" > "Service Accounts"
- Click "Create Service Account"
- Enter a name and description for your service account
- Assign the necessary roles for Spanner access:
- Cloud Spanner Admin
- Cloud Spanner Database Admin
- Cloud Spanner Viewer (if you only need read access)
- Click "Create Key" and select JSON format
- Save the downloaded JSON file in a secure location - this is your credentials file (you can find a sample credentials file in the
filesfolder of this tutorial)
Now you need to point your application and scripts to the credentials file. You can do this by setting the GOOGLE_APPLICATION_CREDENTIALS environment variable to the path of your JSON key file. Here's an example of the .env file we will be using in this tutorial:
# Google Cloud Spanner Configuration
SPANNER_PROJECT_ID=<your-project-id>
SPANNER_INSTANCE_ID=<your-instance-id>
SPANNER_DATABASE_ID=<your-database-id>

# Path to your Google Cloud Service Account key file
GOOGLE_APPLICATION_CREDENTIALS=<path-to-your-credentials-file>
You can find the example in the files/.env.example file. You can rename it to .env and fill in the values.
Setting up your Node.js application.
We will be using TypeScript and Node.js to do the data processing and the application server. So you will need to initialize a Node.js/Typescript project using npm:
bash
npm init -y
npm install typescript ts-node @types/node express tsx vite @google-cloud/spanner dotenv uuid csv-parser --save-dev
This will install the tsx transformer that would allow you running TypeScript code directly in Node.js. ts-node types would allow you operating the Node.js types easier in TypeScript. express and vite will be used later to create the API and the simple web application to visualize the data. @google-cloud/spanner is the library that allows you to connect to Google Spanner and run queries. dotenv is used to load environment variables from the .env file. uuid is used to generate unique IDs for the nodes in the graph. csv-parser is used to parse the CSV files.
Loading the dataset
Using .env file to load the credentials and configuration
We will be using the dotenv library to load the environment variables from the .env file. You can create a .env file in the root of your project and add the following content:
ts
import dotenv from 'dotenv';
// Load environment variables from .env file
dotenv.config();
From now on you can use the process.env object to access the environment variables.
Parsing the CSV file
We will be using the csv-parser library to parse the CSV file. You can create a files/populate_db.ts file and add the following code:
ts
import csv from 'csv-parser';
import fs from 'fs';
import { v4 as uuidv4 } from 'uuid';

...

fs.createReadStream(csvFilePath)
  .pipe(csv())
  .on('data', (row: MovieRow) => {
    // here you can process each row of the CSV file
    // and create the nodes and edges records for the graph,
  })
The uuid library is used to generate unique ids for the records - they will be used to create the relations and connect the nodes and edges. Full implementation you can find in the files/populate_db.ts file.
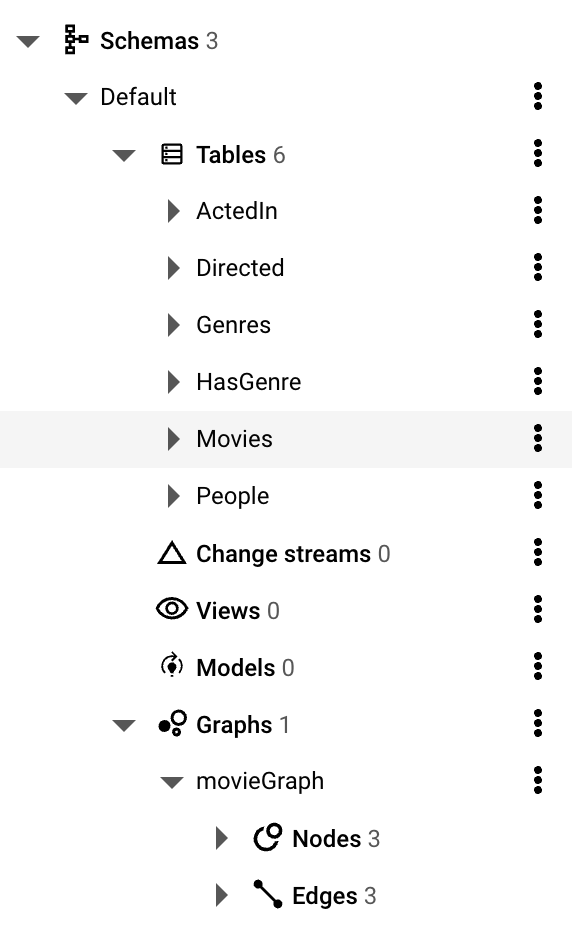
Creating the schema
After parsing the CSV file we will create a database and assign a schema to it. The schema will be used to create the tables and the indexes. You can find a full version of the script in the files/populate_db.ts script. But first, let's set up the tables, indexes and the graph schema. It looks like a set of SQL commands that we have separated into files/schema.ts file.
ts
export const dbSchema = [
  // Movies table (Node)
  `CREATE TABLE Movies (
        id STRING(36) NOT NULL,
        title STRING(MAX) NOT NULL,
        description STRING(MAX),
        year INT64,
        runtime INT64,
        votes INT64,
      ) PRIMARY KEY (id)`,

  // People table (Node)
  `CREATE TABLE People (
        id STRING(36) NOT NULL,
        name STRING(MAX) NOT NULL
      ) PRIMARY KEY (id)`,

  // Genres table (Node)
  `CREATE TABLE Genres (
        id STRING(36) NOT NULL,
        name STRING(MAX) NOT NULL
      ) PRIMARY KEY (id)`,

  // Directed relationship table (Edge)
  `CREATE TABLE Directed (
        id STRING(36) NOT NULL,
        personId STRING(36) NOT NULL,
        movieId STRING(36) NOT NULL,
        FOREIGN KEY (personId) REFERENCES People (id),
        FOREIGN KEY (movieId) REFERENCES Movies (id)
      ) PRIMARY KEY (id)`,

  // ActedIn relationship table (Edge)
  `CREATE TABLE ActedIn (
        id STRING(36) NOT NULL,
        personId STRING(36) NOT NULL,
        movieId STRING(36) NOT NULL,
        FOREIGN KEY (personId) REFERENCES People (id),
        FOREIGN KEY (movieId) REFERENCES Movies (id)
      ) PRIMARY KEY (id)`,

  // HasGenre relationship table (Edge)
  `CREATE TABLE HasGenre (
        id STRING(36) NOT NULL,
        movieId STRING(36) NOT NULL,
        genreId STRING(36) NOT NULL,
        FOREIGN KEY (movieId) REFERENCES Movies (id),
        FOREIGN KEY (genreId) REFERENCES Genres (id)
      ) PRIMARY KEY (id)`,
];
This will create tables to store the movies, people, genres and the relationships between them. An important part of this step is to ennable the graph schema. This is done by a special command that will tell Google Spanner which tables are nodes and which tables are edges and hoe to connect them. So for that you need the following directive (add it to the array of queries above):
sql
CREATE OR REPLACE PROPERTY GRAPH movieGraph
  NODE TABLES (
    Movies,
    People,
    Genres
  )
  EDGE TABLES (
    Directed
      SOURCE KEY (personId) REFERENCES People (id)
      DESTINATION KEY (movieId) REFERENCES Movies (id)
      LABEL Directed,
    ActedIn
      SOURCE KEY (personId) REFERENCES People (id)
      DESTINATION KEY (movieId) REFERENCES Movies (id)
      LABEL ActedIn,
    HasGenre
      SOURCE KEY (genreId) REFERENCES Genres (id)
      DESTINATION KEY (movieId) REFERENCES Movies (id)
  )
You can see that it will create the movieGraph graph schema and define the nodes and edges. The SOURCE KEY and DESTINATION KEY are used to define the source and destination nodes of the edges. ActedIn, Directed and HasGenre are the types of edges we will be using in the application.
To create the tables and the graph schema, you can use the following code:
ts
// Create Spanner client
const spanner = new Spanner({
  projectId: config.projectId
});

// Get instance and database
const instance = spanner.instance(config.instanceId!);
const database = instance.database(config.databaseId!);

// Check if schema already exists
const [schema] = await database.getSchema();
if (schema.length > 0 && !drop) {
  console.log('Schema already exists, skipping creation.');
  return;
}

// Create schema
try {
  const statements = dbSchema;
  const [operation] = await database.updateSchema(statements);
  await operation.promise();
  console.log('Schema created successfully!');
} catch (error) {
  console.error('Error creating schema:', error);
  throw error;
}
Inserting data
After creating the schema, you can insert the data into the database. You can use the insert method of the database object to insert the data. You can find a full version of the script in the files/populate_db.ts file. Here is an example of how to insert data into the database:
ts
// Insert data into Movies table
const movieRows = movies.map((movie) => ({
  id: uuidv4(),
  title: movie.title,
  description: movie.description,
  year: movie.year,
  runtime: movie.runtime,
  votes: movie.votes,
}));
await database.table('Movies').insert(movieRows);
Now that the data is loaded and schema is created, you can see it in the Google Spanner console like this:
Node.js API
In order to query the database you will need to create a Node.js REST API. The reason why you have to do it and cannot query the database directly from the browser is that you should not expose your database credentials to the client. So you will need to create a simple API that will handle the requests and return the data.
ts
import express from 'express';
import { Spanner } from '@google-cloud/spanner';
import dotenv from 'dotenv';

// Load environment variables from .env file
dotenv.config();

// Initialize Express app
const app = express();
const port = 3000;

// Initialize Spanner client and point it at the database (see files/db.ts)
const database = getDatabase();
Now you can create the endpoints to query the database. We envision requesting data in a following way:
/api/movies/:title- to get the movie by title, its director, actors and genres/api/actors/:name- to get the person by name, the movies they acted in and the genres of those movies/api/genres/:name- to get the genre by name, the movies of that genre and the actors in those movies
Form the UX perspective, it will happen when we want to explore the graph by double-clicking on a node. So let's create the endpoints for that (full version in files/server.ts):
ts
// Route stubs
app.get('/movie/:title', async (req: Request, res: Response) => {
  const { title } = req.params;
  const [rows] = await database.run({
    sql: GET_MOVIE_BY_TITLE,
    params: { title }
  });
  // Placeholder for database query logic
  res.json({
    message: `Stub: Get movie with title "${title}"`,
    graph: toGraph(rows)
  });
});
For convenience, we have separated the query and the data convertors. The query will look like this:
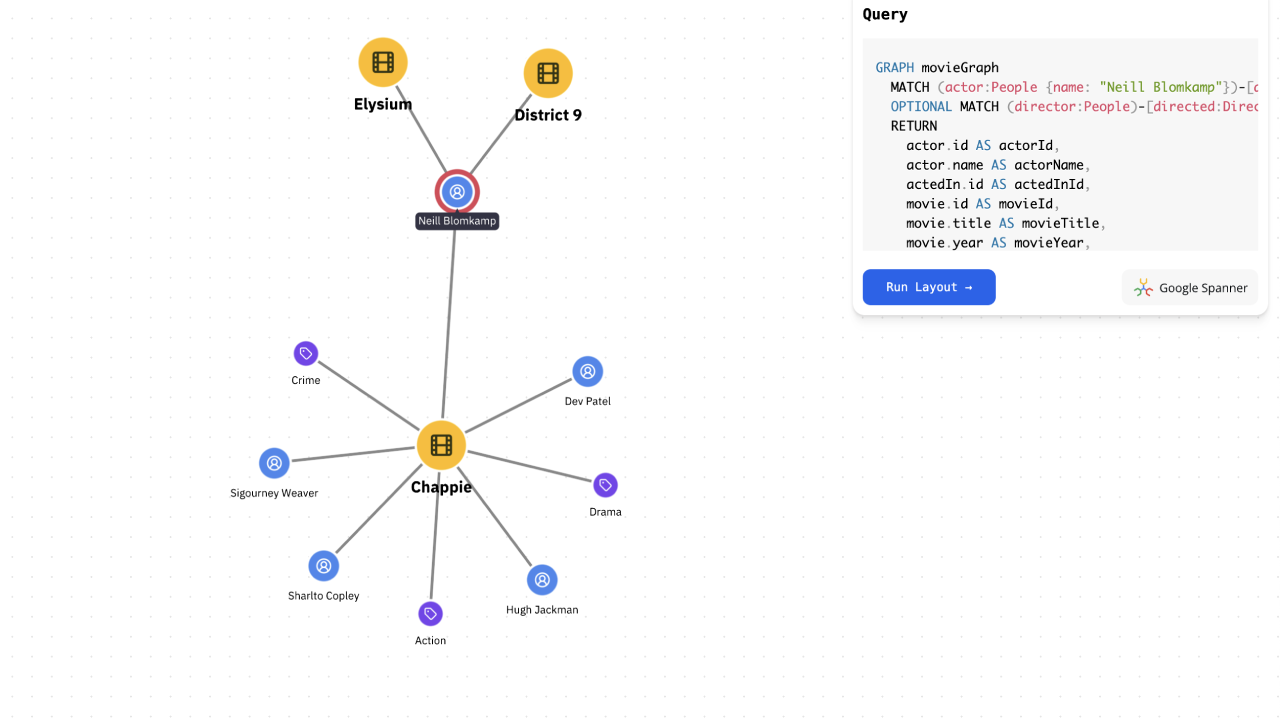
Cypher
GRAPH movieGraph
MATCH (m:Movies { id: @movieId })
OPTIONAL MATCH (director:People)-[:Directed]->(m)
OPTIONAL MATCH (actor:People)-[:ActedIn]->(m)
OPTIONAL MATCH (genre:Genres)-[:HasGenre]->(m)
RETURN
  m.id AS movieId,
  m.title AS title,
  m.description AS description,
  m.year AS year,
  m.runtime AS runtime,
  m.votes AS votes,
  director.id AS directorId,
  director.name AS directorName,
  actor.id AS actorId,
  actor.name AS actorName,
  genre.id AS genreId,
  genre.name AS genreName
This will traverse the graph and output all the inforamtion that we will need to form the resulting nodes and edges in JSON format. For convenience, we will convert them directly to the format that Ogma is expecting. We have a special parser class for that, you can find the full code for it in the files/parser.ts file. The logic there is that it's trying to extract all the possible nodes and links from the mixed data in query result and return them, possibly avoiding the duplication. So if it encounters movie, actor or genre data, it will make sure it will for the objects according to the model shapes and create the edges between them.
Running the server
You can run the server using the following command:
bash
npx tsx files/server.tsThis will start the API server on the port 3000. Of course it's a very simple way of running it and in the production environment you well have to taker care of the security and the access to the API from the client. But for our simple application it will be enough.
Web application
We will be using vite to create and run our web application. It's very simple, by default it will be looking for the index.html file in the root of the project. This file will load the index.ts script that will run the application with the visualization. You can find the full code in the files/index.ts file. The main part of the code is to create the Ogma instance and load the data from the API. You can use the following code to create the Ogma instance:
ts
import Ogma from '@linkurious/ogma';

const ogma = new Ogma({
  container: 'graph-container',
});
You can then use npx vite to run the application. It will start a local server on port 5173 and you can access it in your browser at http://localhost:5173. Normally at this point you will just see the blank screen and no errors in the console.
Proxying the API
To make the api accessible from our dev server, we will need to add a proxy to the vite.config.ts file. You can do it like this:
ts
import { defineConfig } from "vite";

export default defineConfig({
  server: {
    proxy: {
      "/api": {
        target: "http://localhost:3000", // Replace with your backend server URL
        changeOrigin: true,
        rewrite: (path) => path.replace(/^\/api/, ""),
      },
    },
  },
});
This will proxy all the requests to /api to the backend server running on port 3000. So now you can access the API from the frontend using the /api prefix. So you can run the server in one terminal and the client in another terminal.
Adding styles
We know that we will have the movies, actors and genres in the graph. Conveniently, we can share the type checking code between the server and the client, so creating selective node styles becomes very easy. You can see the full version of the code in files/styles.ts but it generallty looks like this:
ts
const isMovie = (node: OgmaNode) => node.getType() === 'Movies';

export function addStyles(ogma: Ogma<NodeDataType>) {
  ogma.styles.addNodeRule(isMovie, {
    color: '#FCBC05',
    text: {
      content: node => node.getData('title'),
      font,
      size: 16.5,
      style: 'bold',
      minVisibleSize: 0
    },
    radius: 8,
    icon: {
      content: getIconCode('icon-film'),
      font: 'Lucide',
      scale: 0.5,
      color: '#372b09'
    }
  });
  ... // other types and states
}
Loading the first movie subgraph
Now that we have the API and the styles, we can load the first movie subgraph. We have wrapped all the calls to the API in a client class that will handle parameter validation and pass them to the API. You can find the full code in the files/client.ts file. We will use this abstraction like this:
ts
const client = new API();
const initialMovie = "Chappie";
const graph = await client.getMovieByTitle(initialMovie);

// add the graph to Ogma (it will be styled immediately)
await ogma.setGraph(graph);
// run the layout to position the nodes and center on them
await ogma.layouts.force({ locate: true });
This will load the graph from the API and add it to Ogma.
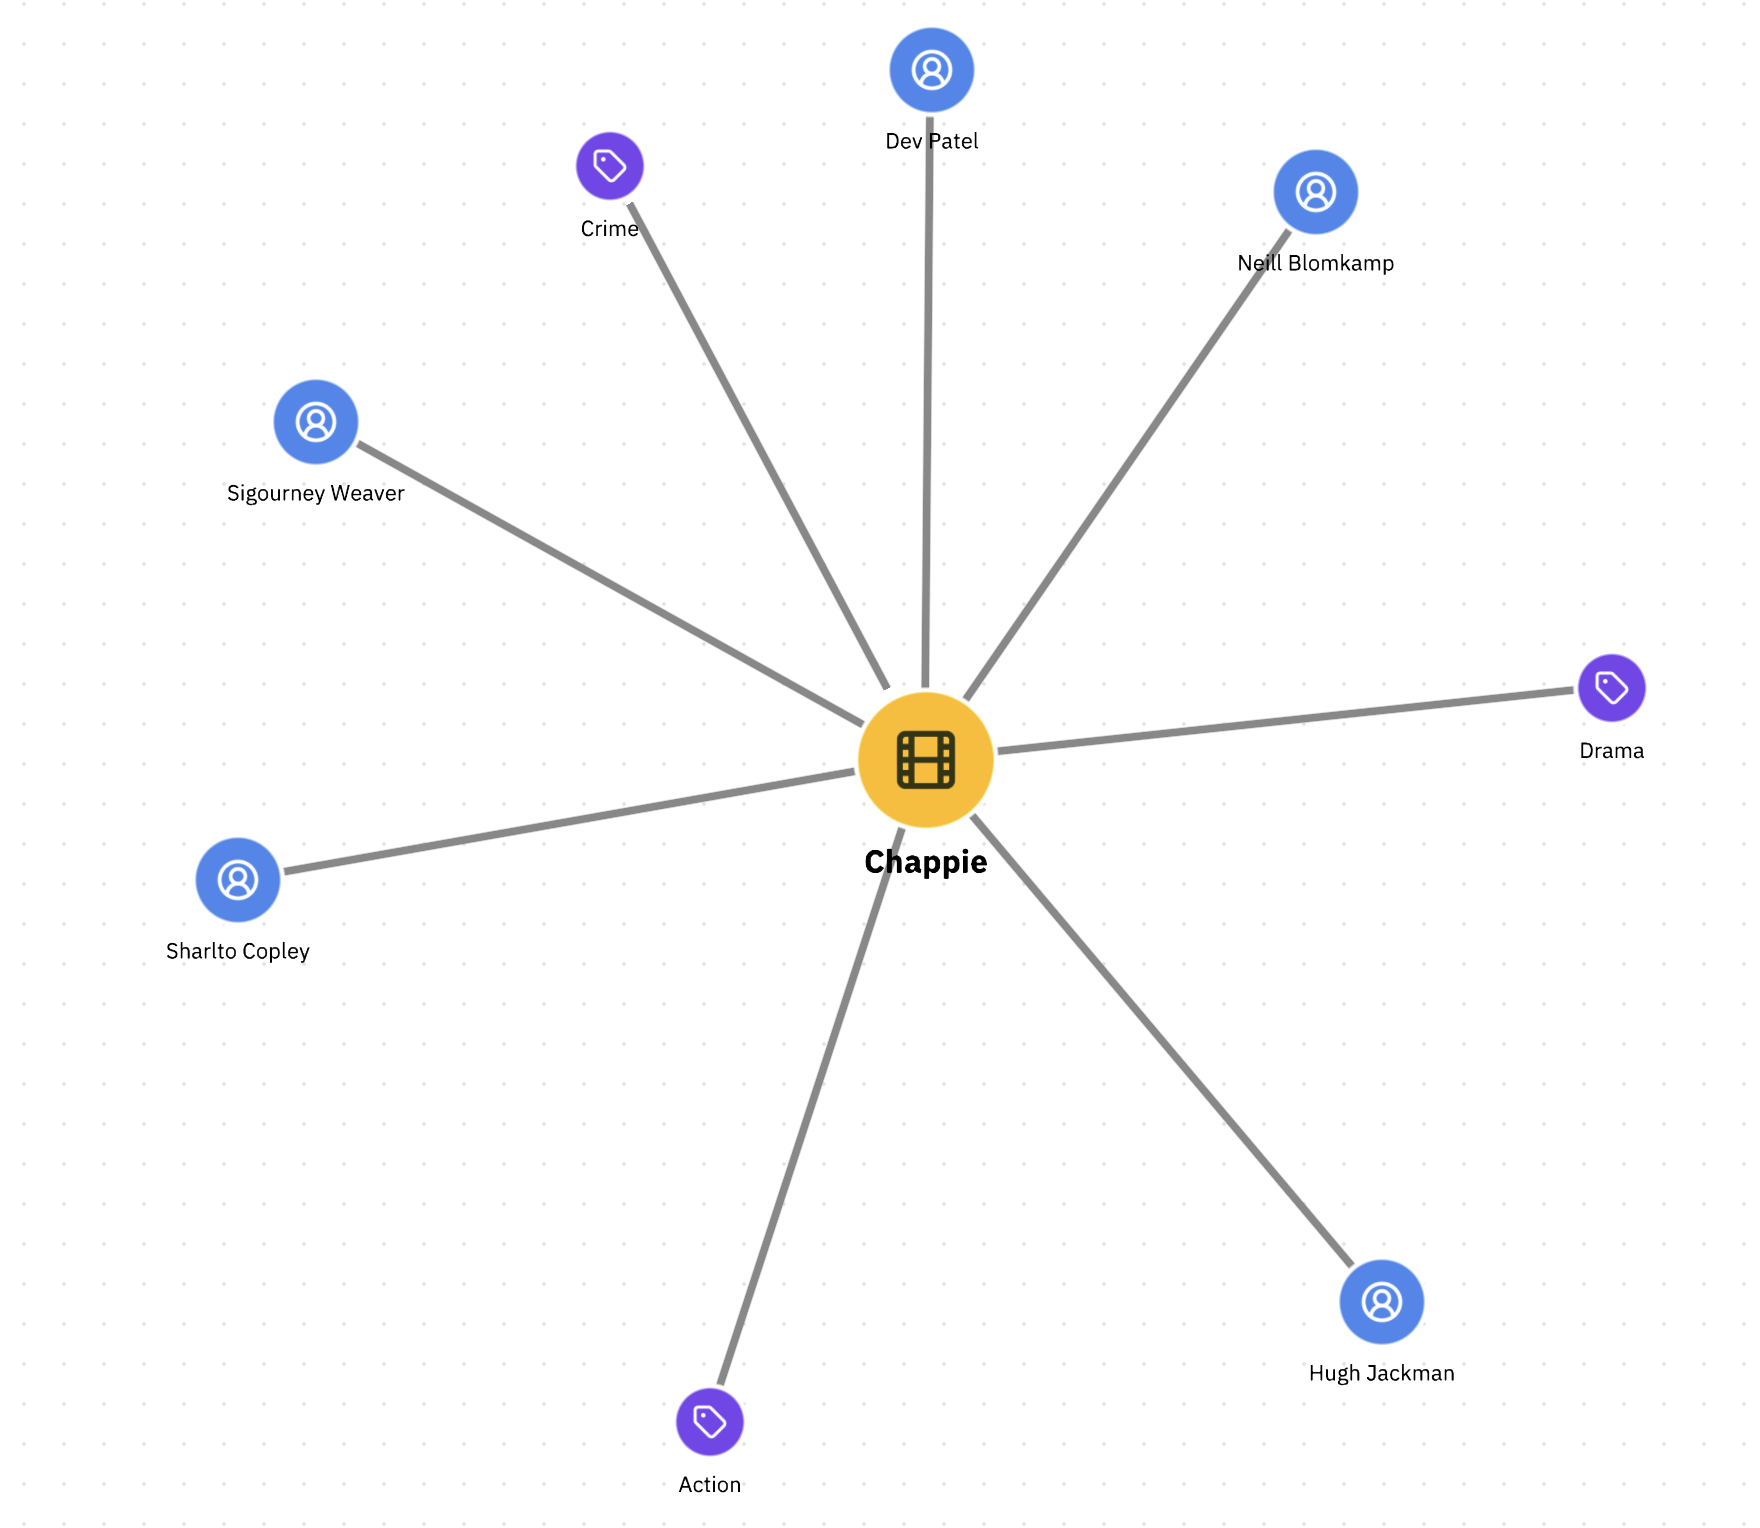
Congratulations, you have the first subgraph loaded from Google Spanner into your visualization! You can see the movie, its director, actors and genres. You can also see the styles applied to the nodes and edges.
Adding interactivity
We will add the behaviors to expand the adjacent nodes and edges when double-clicking on the node. For that, you will just need to figure which endpoint to query, based on the node type:
- for an actor, you will need to query the
/api/actors/:nameendpoint to get all the movies the actor was in - for a genre, you will need to query the
/api/genres/:nameendpoint to get all the movies of that genre - for a movie, you will need to query the
/api/movies/:titleendpoint to get all the actors and genres of that movie
ts
// listen to the double-click event on the graph
ogma.events.on("doubleclick", async ({ target }) => {
  if (target && target.isNode) { // we clicked a node
    if (isMovie(target)) { // and it represents a movie
      const movieTitle = target.getData("title");
      const graph = await client.getMovieByTitle(movieTitle);
      // add the graph, ignore duplicate nodes and edges
      await ogma.addGraph(graph, { ignoreInvalid: true });
      // zoom in on the new nodes
      await addGraphAndZoomIn(graph);
    } else if (isPerson(target)) { // other types of nodes
      ...
You can see the full experience in our Google Spanner example. It uses a mock database to query, but you can easily combine that code and this tutorial to recreate the full application using this data.