Appearance
@linkurious/ogma-vue wrapper
We provide a seamless integration between Vue3 and Ogma. It is available on Github: npm:
sh
npm install @linkurious/ogma-vue@latestIt is a Vue3 component that wraps the Ogma library and provides a simple way to use it in your Vue applications. It allows you to create and manage Ogma instances, handle events, and interact with the graph data in a reactive way. It has has full type support and is designed to work with the latest version of Ogma.
Please check out the Ogma-vue documentation for further details.
Manual integration (Advanced)
If you don't want to use @linkurious/ogma-vue and create your own wrapper, this tutorial will show you some guidelines. This tutorial will guide you for the integration of Ogma inside your Vue application. It is meant to be a build-from-scratch tutorial.
The goal of this tutorial is to provide a simple Vue application with:
- a component that displays the instance of Ogma
- a button to add a node
- a reactive message box that shows the current selection
Creating the app
In order to create the app the vue-cli package will be used here:
npx @vue/cli create vue-ogma-projectThe application is now ready, so it is possible to go into the new application folder and install the Ogma package.
npm install --save https://get.linkurio.us/api/get/npm/ogma/<VERSION>/?secret=<YOUR_API_KEY>For alternative methods of installing Ogma, please refer to the getting started guide;
The Ogma component
The Ogma component will provide a simple template node that the Ogma library will use to create the canvas. When the template will be mounted on the page, then a Ogma instance is created and the provided data is used to create a graph representation.
vue
<template>
  <div
    id="graph-container"
    style="position: absolute; left: 0; top: 0; bottom: 0; right: 0;"
  ></div>
</template>

<script setup lang="ts">
// point to the correct path in case of alternative installation steps here
import Ogma from '@linkurious/ogma/ogma';
import { ref, onMounted, onUnmounted } from 'vue';
import type { RawGraph } from '@linkurious/ogma';

interface Props {
  data: RawGraph;
}

const props = defineProps<Props>();

const ogma = ref<Ogma | null>(null);

onMounted(() => {
  // create the instance of Ogma
  ogma.value = new Ogma({
    container: 'graph-container'
  });
  // setup more things in here on the instance
  ogma.value.setGraph(props.data);

  ogma.value.layouts.force();
});

onUnmounted(() => {
  if (ogma.value) {
    // remove all the things from the instance and destroy it
    ogma.value.destroy();
  }
});
</script>
Save the content as Ogma.vue and pass to the App integration part.
Show the Ogma component in the page
Once the Ogma component is ready it is possible to use it inside the App.vue as component:
vue
<template>
  <div id="app">
    <OgmaGraph :data="graph" />
  </div>
</template>

<script setup lang="ts">
import { ref, computed } from 'vue';
import OgmaGraph from './components/Ogma.vue';
import type { RawNode, RawEdge } from '@linkurious/ogma';

const nodes = ref<RawNode[]>([{ id: 0 }, { id: 1 }]);
const edges = ref<RawEdge[]>([{ id: '0-1', source: 0, target: 1 }]);

const graph = computed(() => {
  return { nodes: nodes.value, edges: edges.value };
});
</script>

<style>
#app {
  font-family: 'Avenir', Helvetica, Arial, sans-serif;
  -webkit-font-smoothing: antialiased;
  -moz-osx-font-smoothing: grayscale;
  text-align: center;
  color: #2c3e50;
  margin-top: 60px;
}
</style>
At this point the graph is shown in the page but it is not possible to add any new data to it, just drag and move.
Adding a Node to Ogma
In order to add a node to Ogma the following steps are required:
- add a new button component
- emit an event when the user clicks the button
- listen the event and save the new graph state
- execute the layout in Ogma when the graph state is propagated
The first step is pretty easy, writing a simple button component like this one:
vue
<template>
  <button @click="$emit('add-node')">Add a node</button>
</template>

<script setup lang="ts">
defineEmits<{
  'add-node': [];
}>();
</script>
Save this component as Button.vue file. Now it's the turn to add the button component to the App.vue:
vue
<template>
  <div id="app">
    <OgmaGraph :data="graph"/>
    <div id="controls">
      <AddNodeButton @add-node="onAddNode" />
    </div>
  </div>
</template>

<script setup lang="ts">
import { ref, computed } from 'vue';
import OgmaGraph from './components/Ogma.vue';
import AddNodeButton from './components/Button.vue';
import type { RawNode, RawEdge } from '@linkurious/ogma';

const nodes = ref<RawNode[]>([{ id: 0 }, { id: 1 }]);
const edges = ref<RawEdge[]>([{ id: "0-1", source: 0, target: 1 }]);

const graph = computed(() => {
  return { nodes: nodes.value, edges: edges.value };
});

const onAddNode = () => {
  // create a new node and edge
  const newNode: Node = { id: nodes.value.length };
  const newEdge: Edge = {
    source: newNode.id - 1,
    target: newNode.id,
    id: `${newNode.id - 1}-${newNode.id}`
  };
  // update the state
  nodes.value.push(newNode);
  edges.value.push(newEdge);
};
</script>

<style>
#app {
  font-family: 'Avenir', Helvetica, Arial, sans-serif;
  -webkit-font-smoothing: antialiased;
  -moz-osx-font-smoothing: grayscale;
  text-align: center;
  color: #2c3e50;
  margin-top: 60px;
}

#controls {
  position: absolute;
  top: 10px;
  right: 10px;
  line-height: 24px;
}
</style>
Last step is to make the OgmaGraph component aware of the change and react appropriately:
vue
<template>
  <div
    id="graph-container"
    style="position: absolute; left: 0; top: 0; bottom: 0; right: 0;"
  ></div>
</template>

<script setup lang="ts">
import Ogma from '@linkurious/ogma';
import { ref, onMounted, onUnmounted, watch } from 'vue';
import type { RawGraph, Node, Edge } from '@linkurious/ogma';

// utility function conveniently added
function getLastOne<T>(list: T[]): T {
  return list[list.length - 1];
}

interface Props {
  data: RawGraph;
}

const props = defineProps<Props>();

const ogma = ref<Ogma | null>(null);

// re-usable version for load and update events
const loadAndLayout = async (nodes: RawNode[], edges: RawEdge[]) => {
  if (!ogma.value) return;
  await ogma.value.addGraph({ nodes, edges });
  await ogma.value.layouts.force({ locate: true });
};

onMounted(async () => {
  // create the instance of Ogma
  ogma.value = new Ogma({
    container: 'graph-container'
  });

  // refactor the load and layout code into a re-usable function
  loadAndLayout(props.data.nodes, props.data.edges);
});

watch(() => props.data, (newData) => {
  const lastNode = getLastOne(newData.nodes);
  const lastEdge = getLastOne(newData.edges);
  loadAndLayout([lastNode], [lastEdge]);
});

onUnmounted(() => {
  if (ogma.value) {
    ogma.value.destroy();
  }
});
</script>
At this point it is possible to click the button and see the OgmaGraph component animated with a new node added to it.
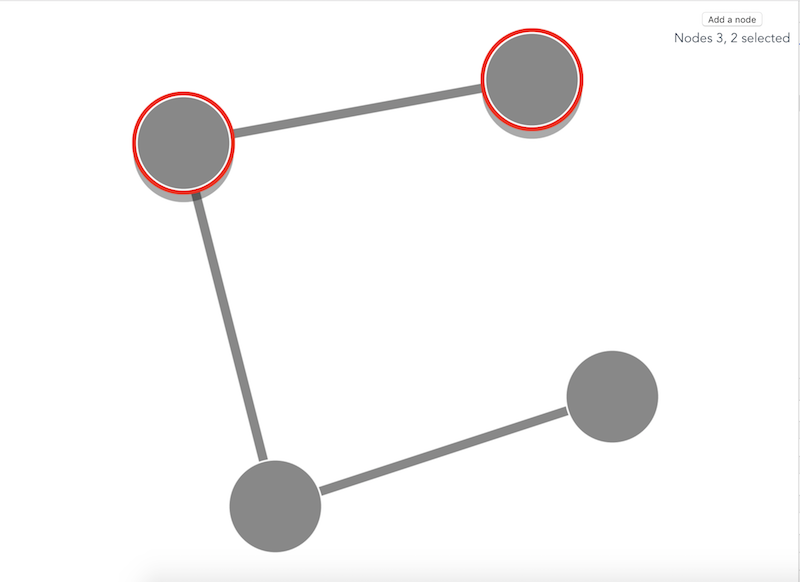
Adding a reactive message box
The last part of the tutorial covers how to connect the part of the application with events triggered by the Ogma instance. The goal is to have a message box on the left side of the page updated everytime the user clicks on a node.
The first step is to create intercept the Ogma event of selection:
vue
<template>
  <div
    id="graph-container"
    style="position: absolute; left: 0; top: 0; bottom: 0; right: 0;"
  ></div>
</template>

<script setup lang="ts">
import Ogma from '@linkurious/ogma';
import { ref, onMounted, onUnmounted, watch } from 'vue';
import type { RawGraph, RawNode, RawEdge } from '@linkurious/ogma';

function getLastOne<T>(list: T[]): T {
  return list[list.length - 1];
}

interface Props {
  data: RawGraph;
}

const props = defineProps<Props>();

const emit = defineEmits<{
  selection: [nodeIds: number[] | null];
}>();

const ogma = ref<Ogma | null>(null);

const clearSelection = () => {
  emit('selection', null);
};

const setSelection = () => {
  if (!ogma.value) return;
  emit('selection', ogma.value.getSelectedNodes().getId());
};

const loadAndLayout = async (nodes: RawNode[], edges: RawEdge[]) => {
  if (!ogma.value) return;
  await ogma.value.addGraph({ nodes, edges });
  await ogma.value.layouts.force({ locate: true });
};

onMounted(async () => {
  // create the instance of Ogma
  ogma.value = new Ogma({
    container: 'graph-container'
  });

  // add listeners
  ogma.value.events
    .on('nodesSelected', setSelection)
    .on('nodesUnselected', clearSelection);

  await loadAndLayout(props.data.nodes, props.data.edges);
});

watch(() => props.data, (newData) => {
  const lastNode = getLastOne(newData.nodes);
  const lastEdge = getLastOne(newData.edges);
  loadAndLayout([lastNode], [lastEdge]);
});

onUnmounted(() => {
  if (ogma.value) {
    // remember to remove the listeners before the destroy
    ogma.value.events.off([setSelection, clearSelection]);
    ogma.value.destroy();
  }
});
</script>
Now it's time to create the message box component that will show the message:
vue
<template>
  <div>{{ message }}</div>
</template>

<script setup lang="ts">
import { ref, watch } from 'vue';

interface Props {
  selection: number[] | null;
}

const props = defineProps<Props>();

const message = ref('No node selected');

watch(() => props.selection, (newSelection) => {
  console.log({ newSelection });
  if (newSelection == null) {
    message.value = 'No node selected';
    return;
  }
  if (newSelection.length === 1) {
    message.value = `Node ${newSelection[0]} selected`;
    return;
  }
  message.value = `Nodes ${newSelection.join(', ')} selected`;
});
</script>
Save this last component as InfoPanel.vue. The last step is to connect the OgmaGraph component with the InfoPanel component, this can be done through the App.vue component:
vue
<template>
  <div id="app">
    <OgmaGraph :data="graph"  @selection="onSelection" />
    <div id="controls">
      <AddNodeButton @add-node="onAddNode" />
      <InfoPanel :selection="selected" />
    </div>
  </div>
</template>

<script setup lang="ts">
import { ref, computed } from 'vue';
import OgmaGraph from './components/Ogma.vue';
import AddNodeButton from './components/Button.vue';
import InfoPanel from './components/InfoPanel.vue';
import type { RawNode, RawEdge } from '@linkurious/ogma';

const nodes = ref<RawNode[]>([{ id: 0 }, { id: 1 }]);
const edges = ref<RawEdge[]>([{ id: '0-1', source: 0, target: 1 }]);
const selected = ref<number[] | null>(null);

const graph = computed(() => {
  return { nodes: nodes.value, edges: edges.value };
});

const onAddNode = () => {
  const newNode: Node = { id: nodes.value.length };
  const newEdge: Edge = {
    source: newNode.id - 1,
    target: newNode.id,
    id: `${newNode.id - 1}-${newNode.id}`
  };

  nodes.value.push(newNode);
  edges.value.push(newEdge);
};

const onSelection = (sel: number[] | null) => {
  selected.value = sel;
};
</script>

<style>
#app {
  font-family: 'Avenir', Helvetica, Arial, sans-serif;
  -webkit-font-smoothing: antialiased;
  -moz-osx-font-smoothing: grayscale;
  text-align: center;
  color: #2c3e50;
  margin-top: 60px;
}

#controls {
  position: absolute;
  top: 10px;
  right: 10px;
  line-height: 24px;
}
</style>
The App.vue has now a new selected data property which holds the selection state and propagates it to the InfoPanel component.
The result: